Free Diagramming UI kit: design user flows and enhance UX

Start your UX design project off the right way: design awesome user flow diagrams with Justinmind’s brand-new Diagramming UI kit
As you may have guessed by now, Justinmind is the place to come if you’re looking to create a website wireframe or app.
However, that’s not all you can do with our wireframing tool. What about that step just before the wireframe? Our pre-installed Diagramming UI kit lets you define and demonstrate your user flows.
Before you start wireframing your screens, diagramming user flows with a flowchart maker is the best way to ensure that your UX design process is in line with users’ needs. Our Diagramming UI kit is the perfect flowchart maker to create diagrams and validate use cases early on in the design process.
So if you haven’t done so already, check out our Diagramming UI kit. We’ll show you how to get set up and diagramming user flowcharts in no time! If you want more options, check out the UI kits page!

Our Diagramming UI kit is based on the Business Process Model and Notation (BPMN) graphical notation specification. This is the de facto standard for business process modelling used by businesses and organizations who want to better understand their internal business procedures and communicate them to users and stakeholders.
Our UI kit is made up of five types of widgets to make flowcharts: basic diagramming, flow, connectors, components and swimlane basics. Let’s take a look at each category and how you can make the most of them.

This category includes UI widgets for defining essential actions in the user flow (flow objects), such as events, gateways, activities and labels.

In this category you’ll find connecting objects that show the order in which activities are performed in a user journey and are represented as solid or dashed lines. Here you’ll find the following flows for your diagrams: sequence, bi-directional, message, conditional sequence flows, associations and annotations.

This category comprises a set of connectors with labels that show the order of activities, with the addition of a description. Use the Connector Positive and Connector Negative widgets to create a decision tree-like section in your wireframe to explain possible consequences of user actions.

The Components category contains a set of readymade icons and labels that provide instant feedback about user actions (e.g. the Refresh icon to signal that the page needs to be refreshed at a certain point in the user flow).

This category contains two pool and two lane widgets. Use these to define the outline of your user journey. Graphically, the Pool widget is a container for portioning a user flow from other flows, and the Lane widget is used to separate different activities by different users or personas within the same user flow.
Before you start designing your product, you need to know everything there is to know about your users, their goals and their needs. You also need to know how they are going to use your product. For instance, how will users book a hotel room from your website? Which users will be visiting your site? Essentially, you need to define your user journey.
A quick way to begin exploring your user journey is by creating a simple user flow chart. Before moving on to the more advanced stages of the design process – i.e. high-fidelity prototyping and user testing – sketching out your flow chart helps you determine which personas you’ll be designing for, as well as what user and business goals need to be addressed. Learn more about designing with personas.
Wireframing the user journey can help you identify the type of content your site or app requires, what kinds of interaction you’ll need to include, the information architecture, etc., prior to jumping further into the design process.
So why specifically our free UI kit? Wireframing a diagram with Justinmind’s Diagramming UI kit helps bridge the gap between design intention and implementation. It also provides important details and clarity to your design assumptions before fleshing your designs out with wireframes and prototypes.
Our Diagramming UI kit won’t just help you get to know your target users, it will actually enable you to visualize decision points at every step in the user journey. By simply dragging and dropping widgets to the canvas, you can map out exactly how and when users will interact with your site in order to improve the overall UX of the site.

Our use of standard UI elements and naming conventions (according to the BPMN) will also help to provide a common language for all involved in the design process – from designers, to developers, business analysts and stakeholders.
Getting started creating comprehensive user flow diagrams in Justinmind is easy. All you have to do is follow these simple steps:
1. Download the Justinmind wireframing tool
2. Open Justinmind and start a new web or mobile device prototype
3. To the left of your canvas you’ll see Widgets panel
4. Look for the Diagramming section and start dragging and dropping widgets to create user flows!
As soon as you’ve done this, you’ll be ready to start creating your user flowchart.
Making your flowchart with Justinmind’s Diagramming UI elements couldn’t be easier. Simply drag and drop widgets from the Widget palette to the canvas to get started. Next we’ll show you how to create a complete user flow diagram in your Justinmind web wireframe.

In our example, we’re going to diagram a use case (step-by-step description of a process) of a user booking some hotel rooms.
In this particular use case, we have two personas in the user flow: the user (making the booking) and the hotel (managing the booking). Both must be included in the user flow in order for it to work.
Note that in reality, much of the activity by the hotel will be automatic, however, we’ve included the full user flow example in our use case to give you a more complete picture of the user journey.
Let’s start by defining the overall process/activity within our use case. Start by dragging a Horizontal Pool widget to the canvas – remember that the pool element is used to represent the framework of a process or use case.
Rename your pool by going to the Properties palette and changing the default text on the left-hand side. We recommend using the name of the use case you are about to wireframe – in this case “Check in online now”.
Then, place two Horizontal Lane widgets inside the pool, one on top of the other. The lanes will represent the actions taken by each user persona.
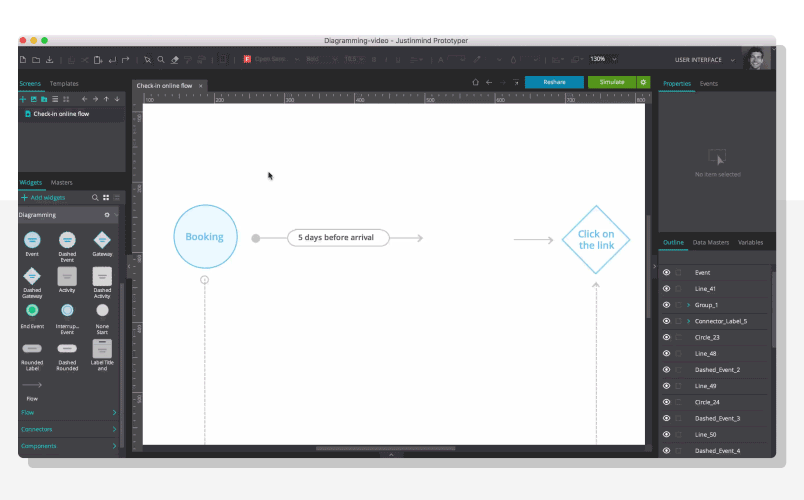
As you can see from the image above, we’ve used a whole combination of widgets from our Diagramming UI kit to map out the user flow of this use case. Let’s take a look at the widgets we used and why.
We used the Event widget to represent the main activities in the user flow, such as the user’s booking, the hotel receiving the user’s order, notifications and emails.
We utilized the sequence flow widgets to show the reader which direction the user flow was moving in at any given point.
We used Connector Labels widgets to connect actions and effects that needed some explanation. For instance, once the user has made their booking, they will receive an email prior to arrival, letting them know that it’s time to check in to the hotel. The connector label lets the reader know exactly when the user will receive that email, as well as pointing them in the direction of the next step in the process.
Association widgets simply link flow objects (such as the user’s check in with the order email).
Activity widgets represent a task that the user must perform (such as clicking a URL, downloading an eKey by pressing a button).
We made use of Gateways to show the direction of flow. Note that they shouldn’t be used to make decisions – combine them with Activity widgets to do so.
Surprise surprise – Call to action buttons! Learn more dos and don’ts of making buttons in our post about website button design.
Affirmative/Negative widgets helped us to signify what happens if the user does or doesn’t do something in the user flow.
The End Event widget helped us to indicate where the user flow ends.
Justinmind’s widgets are all designed using atomic design principles, meaning you can easily customize them any way you like. To modify your UI elements, select one on the canvas and simply head to the Properties palette (on the right-hand side of the canvas).
From the Properties palette, you can change their size, color, transparency and position, and add a shadow, border or background layer to them fit your brand’s design guidelines.
Once you’re happy, you can share your wireframe with your team. To do so, you can either send them a link to view it in their browser, or add them as prototyping users to your Justinmind account. This will allow them to edit the flow diagram directly. Learn more about Justinmind’s Teamwork features.
When creating a user flow diagram, you need to think about who will be using the website or app. Make sure that you clearly define the scope of the user flow by identifying the who, what, when, where and why of your flow diagram, making full use of your new widgets.
Start by identifying the trigger of your user flow, or the user’s entry point. For instance, the user in our example may have reached the hotel’s website by performing an organic search. Your user flow should always include Start and End events, so that the reader can visualize the user journey in its entirety.
The whole point of making a flowchart is to establish how your users are going to use your site or app. Therefore, it’s essential that your flowchart be as clear as possible.
You need to take into account the visual hierarchy of the UI elements on the canvas and partition different personas and user flows appropriately. If necessary, create sub-flows to split user flows into phases if they are particularly long. The BPMN guide suggests creating “Call” Activity UI elements to show repeat events, which will help you to keep lengthy flows organized on the canvas. Learn more about creating your own widgets and UI libraries in Justinmind.
If you need to map out the user flow of your website or app, Justinmind’s brand-new Diagramming UI kit is your new best friend. With standard UI widgets and icons, it takes no time at all to put together flow diagrams to share your designs with everyone in your team.
Wireframing with the user in mind just got so much easier. Download Justinmind’s Diagramming UI kit now to see what we mean.