
User flows can make your life and your users’ lives easier. Learn how to make them for a design that goes with the flow!
Imagine you’re a builder, standing beside a foundation. Your boss hands you a bunch of bricks and a cement mixer and says “just build something cool with those…”. No blueprint, no layout.
Create user flows and bring them to life with Justinmind
How many houses have you been in where you had to enter through the bathroom, then out into the garage, into the bedroom and into the kitchen? Hopefully none – it doesn’t happen. This would be the housing equivalent of a digital product built without a user flow!
Fortunately, we have UX designers who draw up user flows for the apps and websites that are supposed to make users’ lives easier. Read on to learn how user flows lead to better product design and how to create them with the Justinmind prototyping tool. We’ve also thrown in some awesome examples!
A user flow is a diagram that shows how users move through your app or website to do something specific. It’s like a map that helps you see the steps they take to reach their goal. You can make these maps at any point while designing your app or website, and they can help you decide how to organize the information.
To gain a deeper understanding, watch this video that explains what a user flow is and how to create one:
Depending on where you are in the design phase, the form that a user flow diagram can take varies:
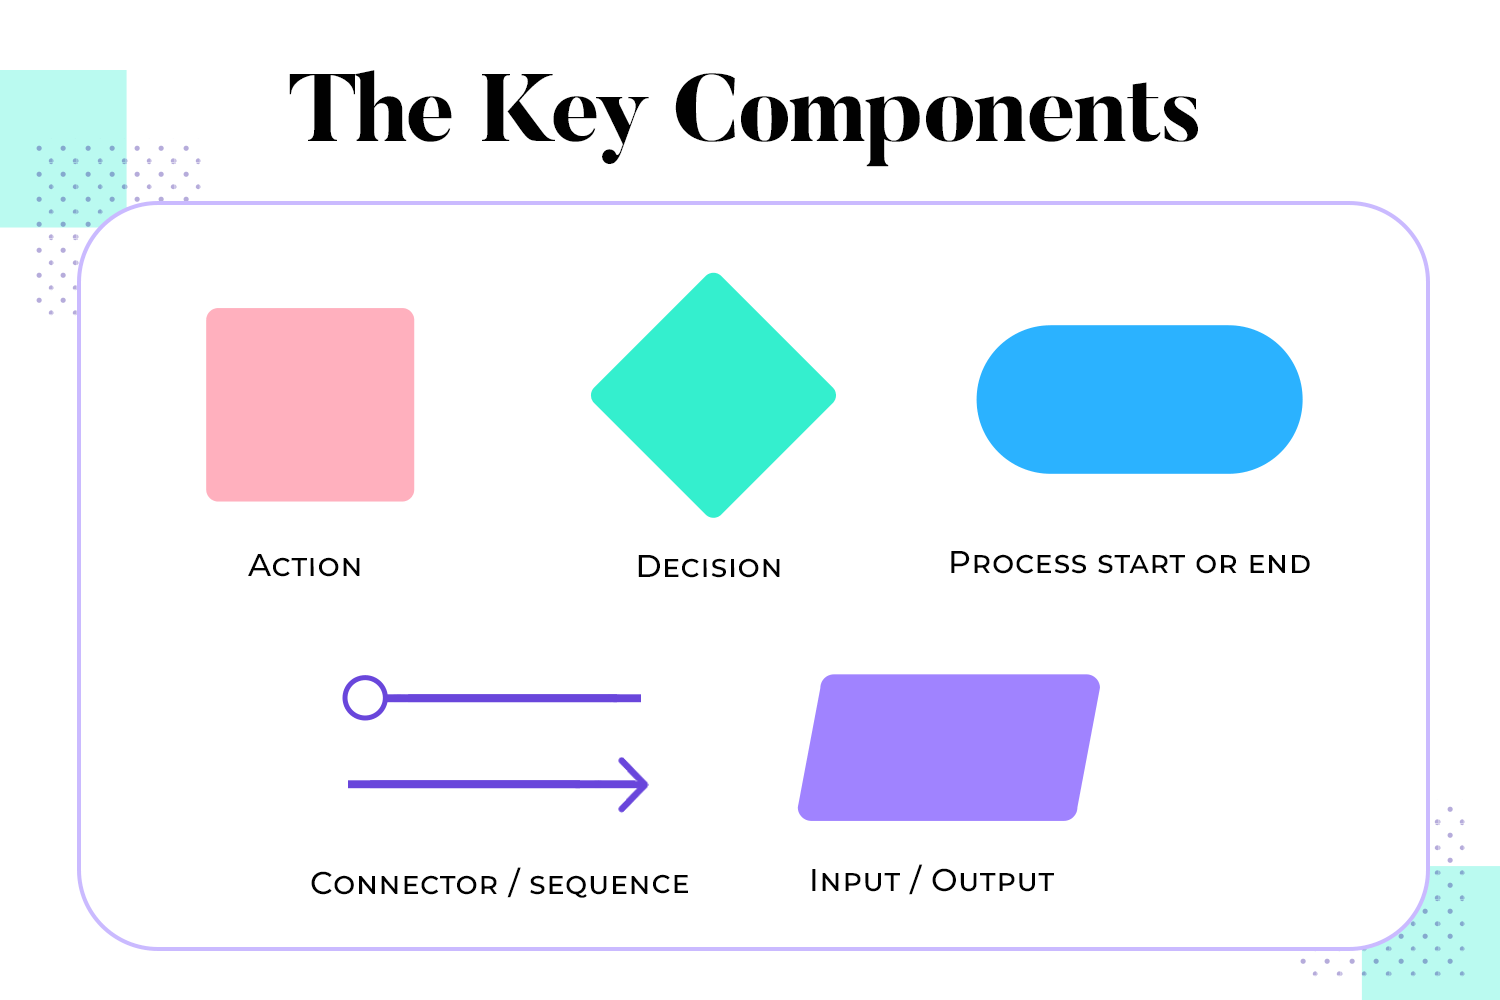
- Early Stages: Many design teams create user flows before creating their UI wireframes. Preliminary user flow diagrams usually take the form of a chart using shapes with often universal meanings:
- Rectangles: Notes
- Diamonds: Decision
- Circles: Entry points
- Arrows: User navigation
- Squares: Sometimes used for notes

- Wireframes: Once the design team creates wireframes of the product’s screens, they often replace the rectangles in the user flow with these wireframes. This combination of user flows and wireframes is sometimes called a “wireflow” in the design world.
- Prototypes: Many design teams continue to create user flows up to the prototype stage, swapping out the rough sketches with the actual screens of the prototype. In some cases, teams may create a user flow to make an existing product or feature better by analyzing the flow with tools like Google Analytics.
There are many reasons you should consider creating user flows, especially if you’re just commencing your product’s design phase. Here are the key benefits:
Promote user-centered design: User flows help you visualize how users navigate within your app or website, helping you optimize screen layouts for intuitive, goal-oriented interaction.
Identify friction points: User flows highlight potential points of hesitation in the user journey, enabling you to proactively simplify the experience and streamline navigation.

Prevent costly errors: Making changes to user flows early on is significantly faster and more cost-effective than altering UI designs or code during the development phase. As noted by the London App Brewery, changing navigation in the design phase takes only seconds to minutes, while changes during development can be time-consuming and expensive.
Various roles within a design and development team collaborate to create user flow diagrams. Here’s an overview of the typical contributors and their respective roles:
UX designers are usually the ones who take the lead in making user flows. They carefully plan out the path a user takes within an app or website, making sure it’s easy and simple to follow. They use user flow diagrams to make sure the design matches what the user wants and needs, making the whole thing better to use.
Product managers use user flow diagrams to understand how customers browse the product and ensure that it achieves business objectives. They collaborate closely with UX designers to prioritize additions that enhance and simplify the user experience, ultimately contributing to the product’s success.

They collaborate closely with UX designers to ensure that the user flow is consistent with the overall visual design and interface components. They aim to provide consumers with a smooth and visually pleasant experience.
They translate the user flow into functional code, implementing the navigational paths and interactions outlined in the diagram. They may also provide feedback on technical feasibility during the design process. All this helps them build and integrate features that align with the intended user experience.
Stakeholders, including marketing teams and executives, use user flow UX to understand the user journey to make sure the product meets user expectations and business objectives.
User flows and user journeys (also known as journey boards or user journey maps) are usually confused, yet they serve different purposes in UX design. Here’s how they vary:
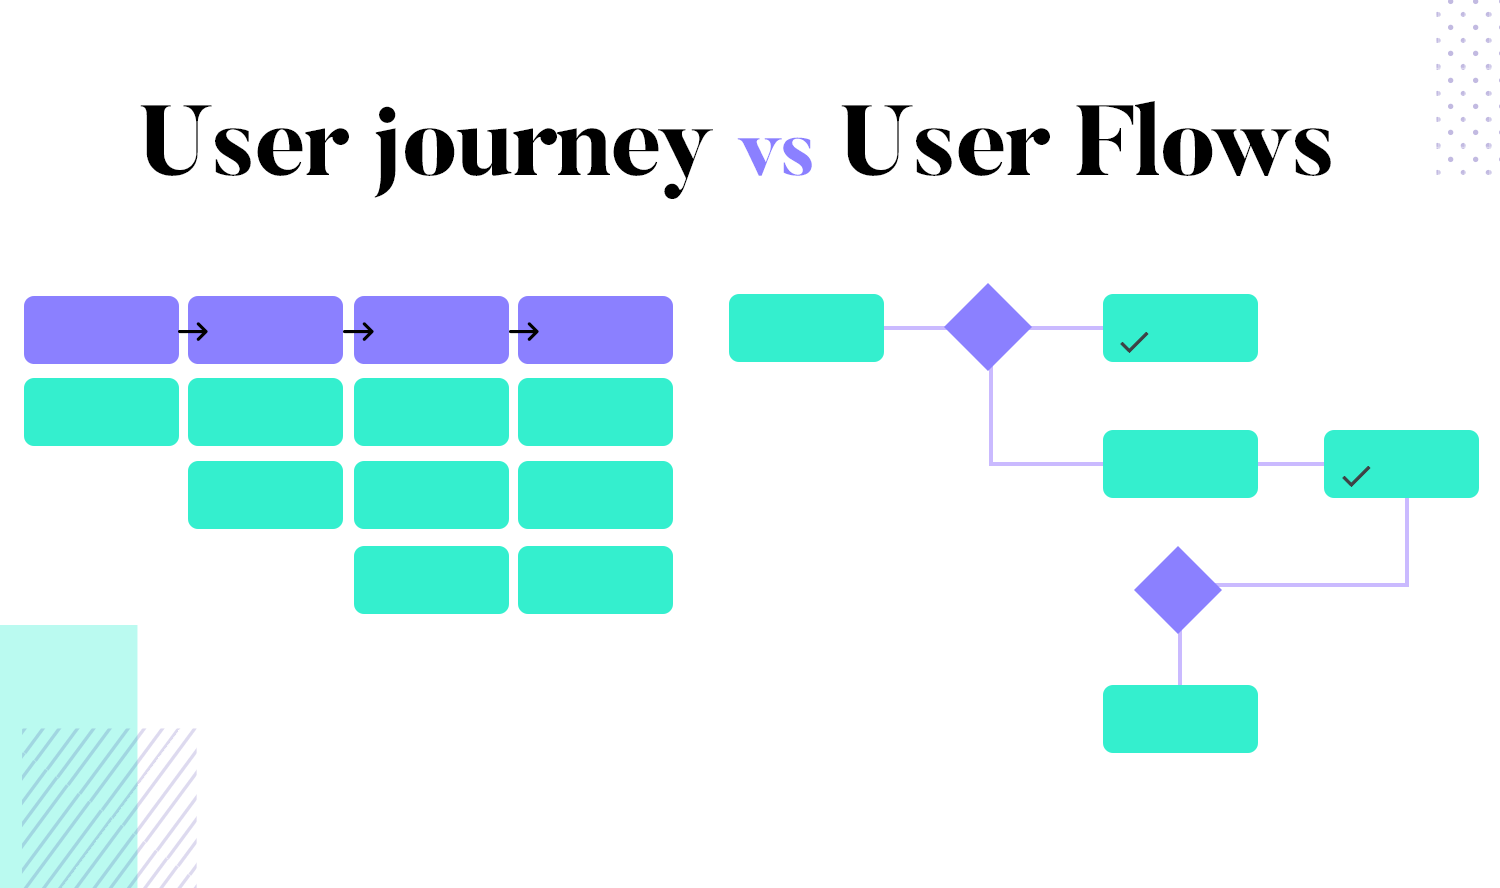
User journeys focus on the big picture. They look at the whole path a user takes from finding out about your product to using it in different places. They think about how the user feels and what problems they have at each step, giving a wide view of the user experience. This helps teams see the entire journey and identify all the points where a user interacts with the product.
On the other hand, user flows also focus on the details. They show the specific steps a user takes to complete a task within your app or website. They are about the exact decisions and actions users make as they navigate your product. Designers carefully chart each step in the user’s journey within the user flow diagram, optimizing the experience to ensure smooth and efficient navigation. These diagrams serve as invaluable blueprints, guiding designers in planning and visualizing the optimal user path.
User journeys describe the user experience throughout the product. Sketch emojis are often used to express emotions such as happiness or frustration. Each step reflects the user’s thoughts and feelings, creating a full picture of how the product is used. This allows designers to better grasp the whole experience and how consumers feel, making it simpler to develop something that resonates emotionally with them.
In contrast, user flows show the step-by-step path of choices and actions. They are more technical and focus on how users move through the product. This way, the design helps users reach their goals easily, making the experience simple and clear. By using user flow diagrams, designers can plan the exact paths users take, creating a smooth and easy-to-follow journey.
User journeys provide detailed context and consider all points of engagement between the user and the product from the first interaction to the last interaction. This includes sales channels, customer service points, and other relevant communications. Understanding these multiple touchpoints is essential to creating a consistent and seamless user experience.
User flows, however, specifically focus on navigation within the product. They show how a user moves through different screens or sections to complete a particular task. This focus helps design the structure and flow of the user interface to facilitate efficient and frictionless navigation. User flow examples can illustrate these navigation paths and help in testing and validating the design.
Create user flows and bring them to life with Justinmind
Creating an effective user flow map is essential to enhancing the user experience. Here is an overview and step-by-step guide to help you create a detailed user flow diagram.
These are the first points where users enter an app or website. Entry points can be the homepage, landing page, or any screen where the user journey begins.
These actions are performed by the user when interacting with the product. Examples include clicking a button, filling out a form, or browsing content.
These are moments in the user flow where the user must make a decision, such as selecting options or choosing between different paths. Decision points often contain conditional logic that affects the next step in the flow.
These elements represent different paths taken by users based on their decisions. Branches can lead to different parts of an app or website, while loops can take the user back to a previous point to perform additional actions.
These are the points where users end their journey or leave the app or website. Exit points can be the completion of a task, making a purchase, or logging out.
Define scope and objectives: Start by clearly defining what you want in your project. Set specific goals and scope to ensure they align with your overall business objectives.
Identify user personas and their goals: Understand the users and what they want to achieve. Creating detailed user personas will help map the needs and behaviors of different users.
Map out the user flow using diagrams or flowcharts: Use tools to visualize user flows. User flow charts and flowcharts help visualize the steps the user takes, including all actions, decisions, and processes from entry to exit.
Validate and iterate user flow through user testing and feedback: Once you’ve created a draft user flow, test it with real users and collect feedback. Use this input to make the required changes and fixes. Redesigning your user flow ensures that it best matches the user’s demands and improves the overall user experience.
When designing user flow diagrams, there are right ways and wrong ways to go about it. You want to avoid creating a confusing document that only the design team can understand. Here are some best practices to create clear and intuitive user flows:

Always give a descriptive, straightforward name to your user flow that describes its purpose. For example, name it “navigation from homepage to dashboard.” This encourages you to break your flows into manageable parts, rather than combining every action into one complex document.
Ensure that your user flow diagrams have one-directional flows. Imagine a road system where drivers go the wrong way on a one-way street – chaotic and confusing. Similarly, user flows should move in a single direction to avoid confusion. Lines and arrows should flow linearly without back-and-forth movement for a single action.
Design each user flow with one goal at a time. This helps maintain focus and clarity. If the design is not straightforward, users may become distracted. Avoid sidetracking issues by keeping each flow focused on completing one specific task.
A legend key makes your user flow diagram instantly more understandable. It helps those unfamiliar with these diagrams to quickly grasp what each shape and symbol represents. For example, use circles for entry points, rectangles for screens, and diamonds for decision points.
Start your user flow with a clear entry point. Whether it’s the login screen or the homepage, a defined entry point sets the stage for a linear start-to-finish journey. If there are multiple entry points, specify them clearly or consider breaking them into different flows.
Create user flows and bring them to life with Justinmind
Clearly label each action, screen, and decision in your user flow diagram. For example, label a login screen as “login screen” or a decision point as “log in or sign up.” Avoid long-winded labels; keep them concise and to the point.
Use color with purpose in your user flows. Assign different colors to different elements to make the diagram easier to understand. For instance, use green for decisions, blue for screens, and yellow for entry points. This color-coding helps readers quickly understand the diagram.
Make sure your user flows are complete and lead to a clear resolution. Don’t leave the end goal ambiguous. For example, if a user needs to go through an extra screen for GDPR compliance, map it out as an alternative path. This eliminates ambiguity and helps identify potential errors or friction.
Once you have this basic user flow chart drawn up, either on paper or by using one of the many great user flow tools available, you can then start to sketch out or wireframe your screens with confidence. After you’ve wireframed your screens, you can then add these screens in place of the rectangles, and add the text from the rectangles to notes.
Once you have that flow defined, you can then go on to create your final prototype. You might wish to add these screens to your user flow. Doing this always helps give your client a much bigger and clearer overview of how the product is turning out. It also helps convey the type of experience the user is going to have.
Then you simply iterate and reiterate on those flows until you get them exactly right.
Create user flows and bring them to life with Justinmind
When creating paths for people to use on apps and websites, it’s key to understand the differences between the two. Mobile apps, like those for iPhones or Androids, usually have simple entry points due to direct access from user devices. This makes their journeys simpler than those of websites, as users typically don’t access them from other places online.
Website user journeys, on the other hand, can be more complex. They often have multiple entry points and involve click-based interactions. However, special website tools can help streamline these paths for easier navigation.
Here is a list of well thought out examples of user flows for both mobile and website applications at different stages of fidelity classified according to different types:
These user flows focus on the specific tasks users need to complete within an app or website.
What we like about this delivery app design user flow is that the screen wireframes are large and clear, with each onscreen element clearly labeled, with the blue arrows pointing to notes which contain zero surplus information. Each screen is linked with a broken orange line.

The steps and the elements are clearly distinguished in this example, giving us a clear picture of the flow: landing page, choose language, enter address details and send information.
This user flow for a student guide website is already completed with screen wireframes, or could be seen as a “wireflow”. The user starts off at the homepage, where they can then navigate to the categories page, with a further listing of the subcategories. Every flow follows a linear direction.

Each screen is clearly labeled and notes briefly demonstrate the main purpose of the screens with multiple options.
Feature-based user flows map out the exact steps a user takes to use certain tools or parts of an app or website.
This music app user flow is a great example of how a potentially complex user flow can be simplified and made interesting with a consistent color scheme – in this case: neon red against a black background.

What’s particularly helpful about this user flow diagram is the fact that each user interaction, such as taps and swipes are all clearly laid out, rather than simply showing the navigation between the screens.
This image is a brilliant example of an early conception of a mobile app user flow that uses shapes to tell the story of how the user navigates through an e-commerce app to browse products, add items to a wishlist, and proceed to checkout.

What we see is an unmistakable simple navigational flow from editing the profile, to uploading a cover photo and uploading artwork to be sold. The many complex steps on the way to this goal have been laid out in a simple way that anyone can understand. It provides an ideal launchpad to start fleshing out wireframe screens, which otherwise might have been a lot more complex and error prone without the information this user flow provides.
Onboarding user flows guide new users through the initial setup or introduction to an app or website.
This is a glorious example of the versatility of insight that user flows can offer; they can even be used to indicate the user’s path through small screen devices like the Apple Watch.
This Apple Watch user flow is simple, easy on the eyes and actually pleasant to look at. The familiar homescreen of the Apple Watch is displayed, then all of the flows and alternate flows are succinctly laid out and flowing in one direction.

The notes are short and sweet, taps are indicated and the watch outline and screen remains consistent, eliminating any potential confusion.
Here’s another great example of an e-commerce website where the user starts off and moves towards one main goal – to buy something (or to arrive at the order confirmation page).

Unlike the previous example, this user flow is a more developed wireflow, with the main layout for each of the screens already deliberated. The user lands on the homepage and has three different options: click on product or category banner, click on a marketing campaign or scroll below the fold. Each flow ultimately ends up at the order confirmation page.
Each different option is demonstrated with a simple, minimalist wireframe screen, for the ultimate simplicity. This is the perfect foundation to further develop the fidelity of these screens into a prototype that can be tested out on users.
Conversion user flows are designed to guide users take a specific action, like making a purchase or joining a service.
What we like about this colorful user flow is the simplicity of its organization, along with the fact that it uses color for the purpose of coding and easy visual assimilation.

The user flow in this case represents the goal of the user making a purchase and receiving a discount via a pop up window. This is all clearly displayed with just a few shapes. Screens can quickly and easily be recognized as they are in blue and the crucial decision diamond where a user chooses to make a purchase or not is clearly represented in green.
Sometimes, designing an e-commerce or simply a website where purchases can be made isn’t always so straightforward. Usually this is because there are multiple paths the user can take before making a purchase depending on whether they’re registering for the first time or if they’ve forgotten a password.

This e-commerce website user flow clearly demonstrates the complexity of the interconnectedness of all the screens that lead to one ultimate goal. Yet the flow itself doesn’t look complicated and gets the messages across in a simple, clear way.
These user flows show how an app or website responds when something goes wrong or when someone uses it in an unexpected way.
This vector-based user flow of a news app demonstrates very clearly the typical navigation that a user might be expected to go through when they open up the app on the native app on their cell phone.

For example, the user logs in and is immediately taken to the home screen unless they haven’t signed up, in which case they will go there after they sign up. They then have a few other choices, such as navigating to menu and settings, to their dashboard, to news articles, etc.
This user flow is a great example of using simple screen wireframes, clear labelling and a consistent flow with transitional arrows to easily convey an otherwise complicated and potentially confusing navigational spaghetti.
We decided to include this website user flow with a legend key because it’s a great example of how to create a simple user flow using shapes and a clear color coding system, so that anyone can understand the main functionality of the website.

Green is used when the user enters and exits the web app. Blue and red reflect the alternating flows the user can take depending on whether they log in or sign up. Rectangles represent screens and actions, whereas user decisions are clearly distinguished from computer decisions.
Create user flows and bring them to life with Justinmind
These user flows help guide users through troubleshooting and accessing customer support, making sure they can resolve issues efficiently.
This example shows how a user flow helps people easily fix problems with a product. It guides users through clear steps, checking if the issue is solved or needs more help. This user flow diagram is like a map, showing the paths someone might take. It helps user experience (UX) designers make products easier to use.
In this case, the user flow example focuses on troubleshooting. Each step is clearly marked, making it easy for users to follow and fix the problem quickly. This flow differs from a user journey, which is a broader look at how someone interacts with a product. The user flow focuses on a specific task, making it a valuable tool for improving the user experience.

Another great option for troubleshooting is this flowchart as it simplifies diagnosing and fixing system performance issues. It is split into three clear steps: investigation, diagnosis, and resolution. Each step helps you pinpoint the problem and find a solution. The use of different colors and clear labels makes the process easy to follow, ensuring an efficient troubleshooting experience.

Did you know that you can create user flows in Justinmind with the User flows module? To do so, you have two options: you can either create a user flow using shapes, or you can create it using screens from existing wireframes and prototypes that you have created in the User Interface module.
You can get to this feature in Justinmind by clicking on the modules dropdown menu on the top right of the screen, and selecting the ‘User flows’ module. You’ll see the default module is ‘User interface’.

This will then open up a canvas where you can drag and drop the following components from the toolbar:
- Actions
- Screens
- Decisions
- Notes
- Images
You can link these features up using the connection tools in the toolbar. You can also import your wireframe and prototype screens to add to your user flow.

To create user flows with your wireframe screens, just open your wireframe or prototype file and select the User flows module from the modules dropdown menu. The User flows canvas will open up and you’ll see your wireframe or prototype screens in the Screens palette to the left, which you can drag and drop to create your User flow boards.

When you link up screens with connection tools, the corresponding link interactions in the wireframe or prototype will show with a ‘chain link’ symbol. If you cannot see the link symbols, all you have to do is go back to the User Interface module, and add a simple click interaction.
When you create your own user flows and workflows in Justinmind, you can also simulate them! Just hit the simulate button in the toolbar to open the simulation in your browser, you can also click on the hamburger menu in the simulation page and select the User flows tab. Then select the board you want to simulate. Click on the screen you want to start from, and start simulating!
The best thing? Like all features in Justinmind, the User flows feature lets you collaborate using the Share icon in the toolbar.
Create user flows and bring them to life with Justinmind
User flows help us focus on user-centered design, to create a consistent experience for the user with the minimum friction possible. But they also help make the designer’s life easier as well because they save time and money.
User flows help us to identify any possible problems before we start designing high fidelity screens and prevent re-designs after the product has entered the development stage. They also force us to consider the easiest way for a user to complete a task and to consider alternative flows, leading to the best user experience possible.
In short, to map out a user flow is to shine a light on the path to UX success. All the more reason to start making one before you begin your next design!