Adding conditions to interactions
You can add conditions in your projects to define when an event should or shouldn’t trigger. You can use them to build hi-fi user experiences, including:
- Form validation
- Conditional screen navigation
- Combination lock screens
- Animations
- …and much more.
In this tutorial, you’ll learn the basics of the expression builder, which you’ll use to build conditions.
Build an event
Before you can add a condition, you’ll need to create an event in your project. For example, imagine you’re creating a form to sign up for a newsletter with an Input Text Field F and a Button B. When you submit the form, you’d like to link to another screen.
To create this event:
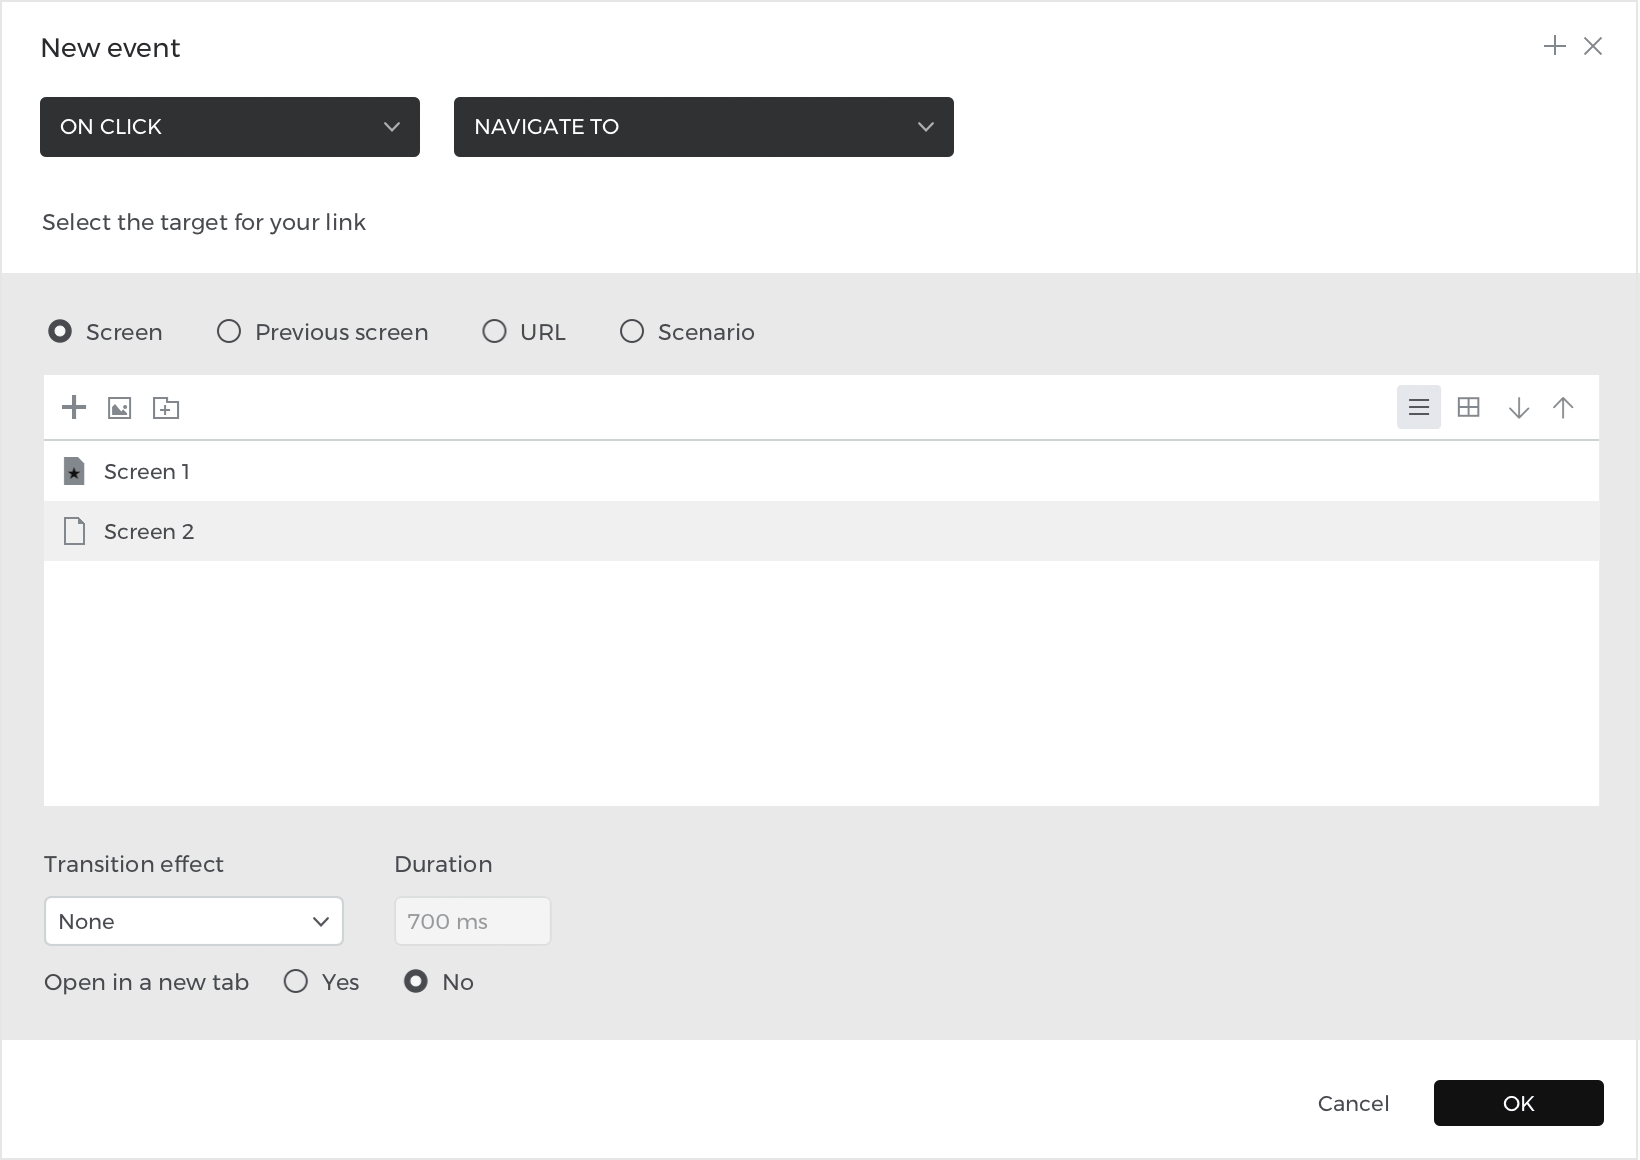
- Select the button, go to the Events palette and click ‘Add event’.
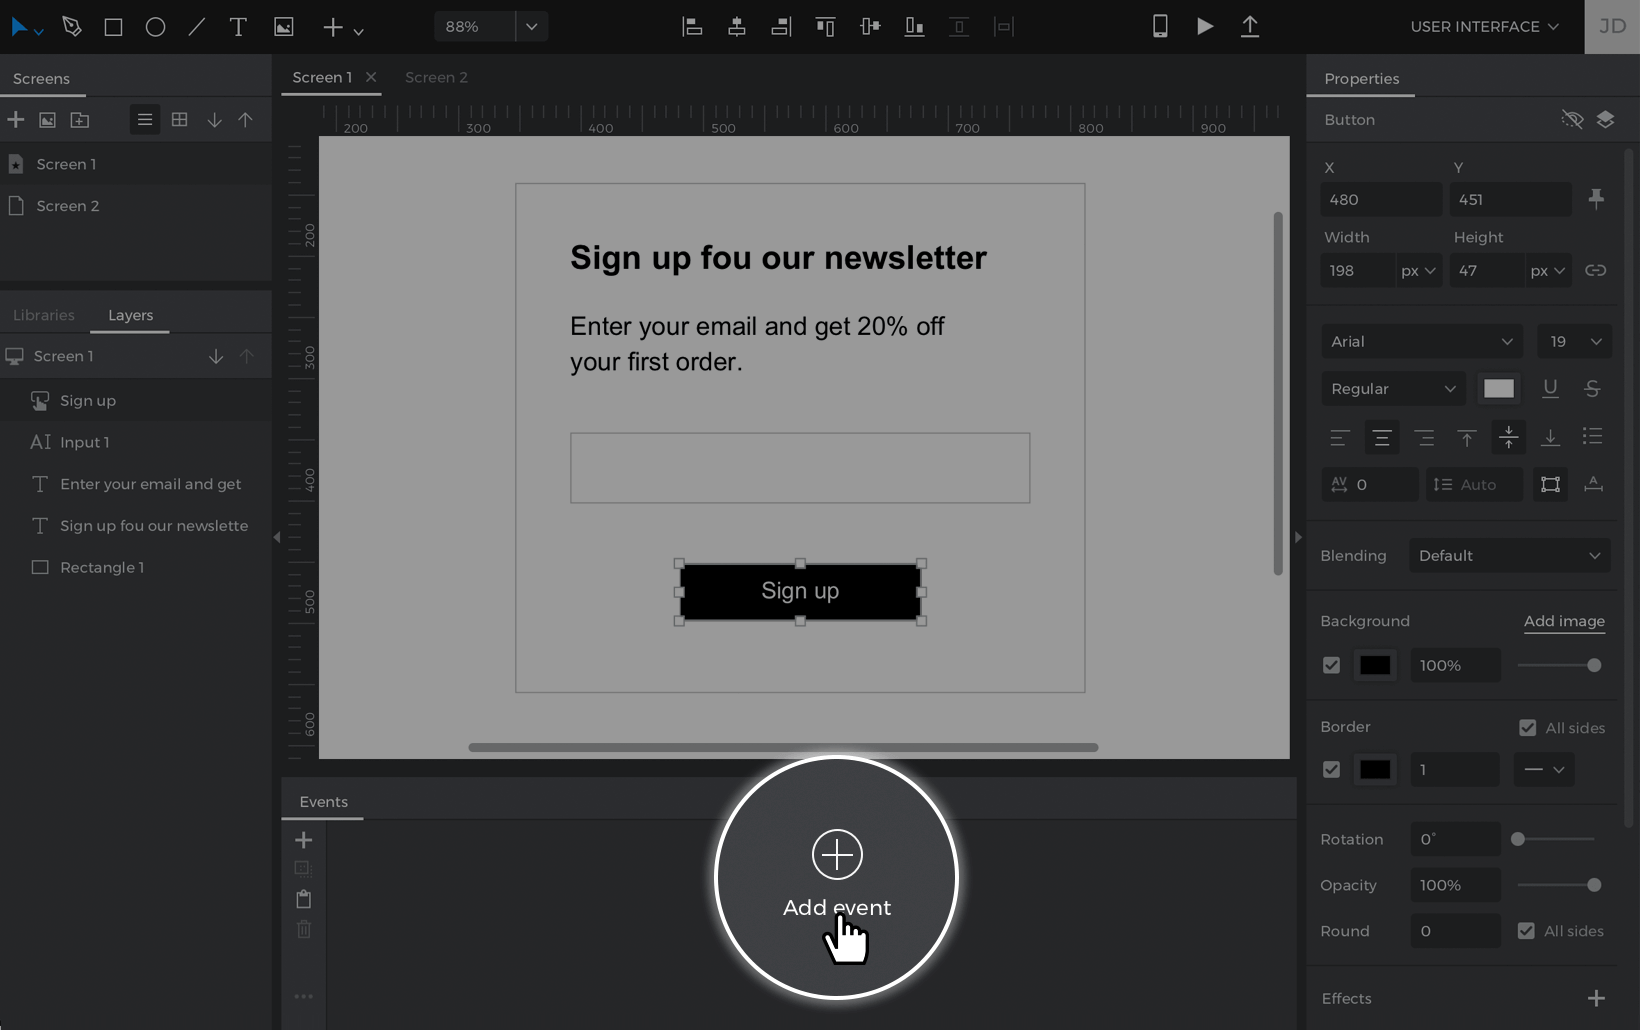
- Create an On Click + Navigate To event and select a different screen to link to.
 Note: for mobile and tablet projects, On Click will be On Tap.


You’ll see the event you just created in the Events palette, where you’ll now see a text link labeled ‘add condition’.
Define a condition
You don’t want to be able to submit the newsletter sign-up form if you haven’t entered any information in the form, so you’ll want to add a condition to this event.
Click the ‘add condition’ text above the event you created in the Events palette. You’ll see the Conditional Expression builder. Here’s how it looks:

- The expression – you’ll drag components here to build the condition.
- Functions – this tab contains options for defining logic and other comparisons between elements.
- Constants – find fixed values, like the project’s screen width or height, your computer’s time, or regular expression formulas here.
- Canvas preview – drag elements on the screen to the expression. You’ll only be able to use elements on the current screen.
- Variables – view and use the Variables in your project in the expression.
- Data Masters – find your Data Masters and their fields here to use in an expression.
To build a condition, you can drag and drop any of those elements, constants, and logic functions to the expression. For example, to create the condition that checks to see if the sign-up form is empty:
- Look to the Canvas preview. Select the input text field and drag it to the open space in the expression that reads “click to edit or drag & drop a component”.
- In the Functions tab, scroll down to the ‘Logic’ section. Drag a Not Equals (≠) function next to the input text field in the expression.
- You’ll see a new open space appear in the expression. Double click on this space, but leave it blank.
- Click ‘OK’ to finish building the expression.
The expression you just created will check to see if the input text field is not empty. If it isn’t, you’ll go to the next screen. If it is empty, the event won’t trigger.
Continue on to the next tutorial and learn how to build other conditions in your projects.
How-tos: learn how to design common use cases
You can use conditions in your projects to create dynamic user experiences, like conditional navigation, error message/form validation, and much more. Check out the exercises below for some examples of how to use them in Justinmind.
Conditional navigation
In this how-to, you’ll learn how to build a simple condition that checks which value you select in a dropdown. You’ll then link to the corresponding screen.
Design the example
- Create a Search screen with texts and rectangles. Add a button and label it “Search”.
- Add a Dropdown/Select List widget to the Canvas and style it as preferred. You can find it in the Toolbar dropdown under ‘Interactive input fields’.
- With the dropdown selected, go to the Properties palette and click on ‘Edit values’. Delete all the values in the dialog and add two new ones – “Houses” and “Apartments”.
- Click the ‘+’ button in the Screens palette and create two new screens. Name one “Houses” and the other “Apartments”. Customize these screens as preferred.
Create the events
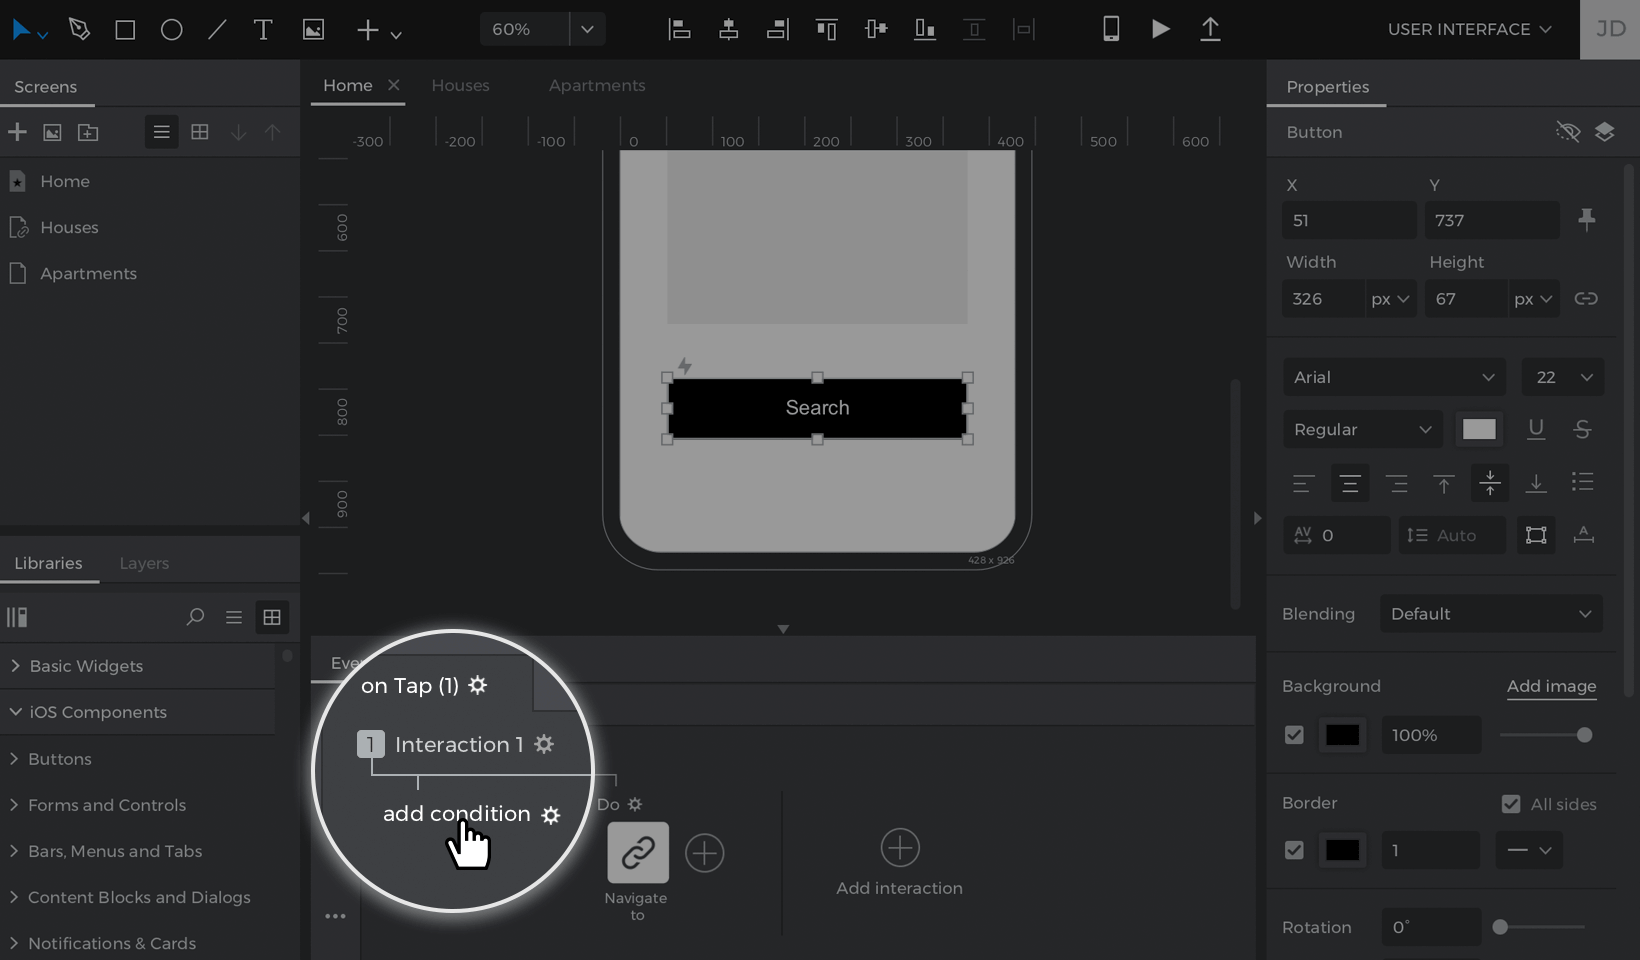
- Go back to the Search screen and select the “Search” button. Look to the Events palette and click ‘Add event’. Create an On Tap + Navigate To event and choose the Houses screen as the target.
- Look to the Events palette, where you’ll see the event you just created. Click the ‘add condition’ text link above the action, which will open the Conditional Expression builder.

- Follow these steps to build the condition:
- a. Look to the Canvas preview and drag the dropdown to the open space in the expression that’s labeled “Click to edit or drag & drop a component”.
- b. Drag the Equals (=) logic function next to the dropdown in the expression.
- c. You’ll see a new open space appear in the expression. Double-click in this space and write “Houses”.
- d. Click ‘OK’ to finish building the expression.
Note: the value you type into the expression must match the value from the dropdown.The event and condition you just created will link you to the Houses screen only if you select “Houses” from the dropdown.
- Still in the Events palette, click on the ‘Else’ text link below. Create another On Tap + Navigate To event and link to the Apartments screen.Since there are only two options you can select from the dropdown, you don’t need to create a condition for this action.

Here’s how your events palette should look:

Click the ‘Play’ button to simulate your project. Select a value from the dropdown and you’ll be linked to the corresponding screen.
Different actions on a button
You can also use conditions to assign different actions a button that will trigger after you click on it each time.
Design the example
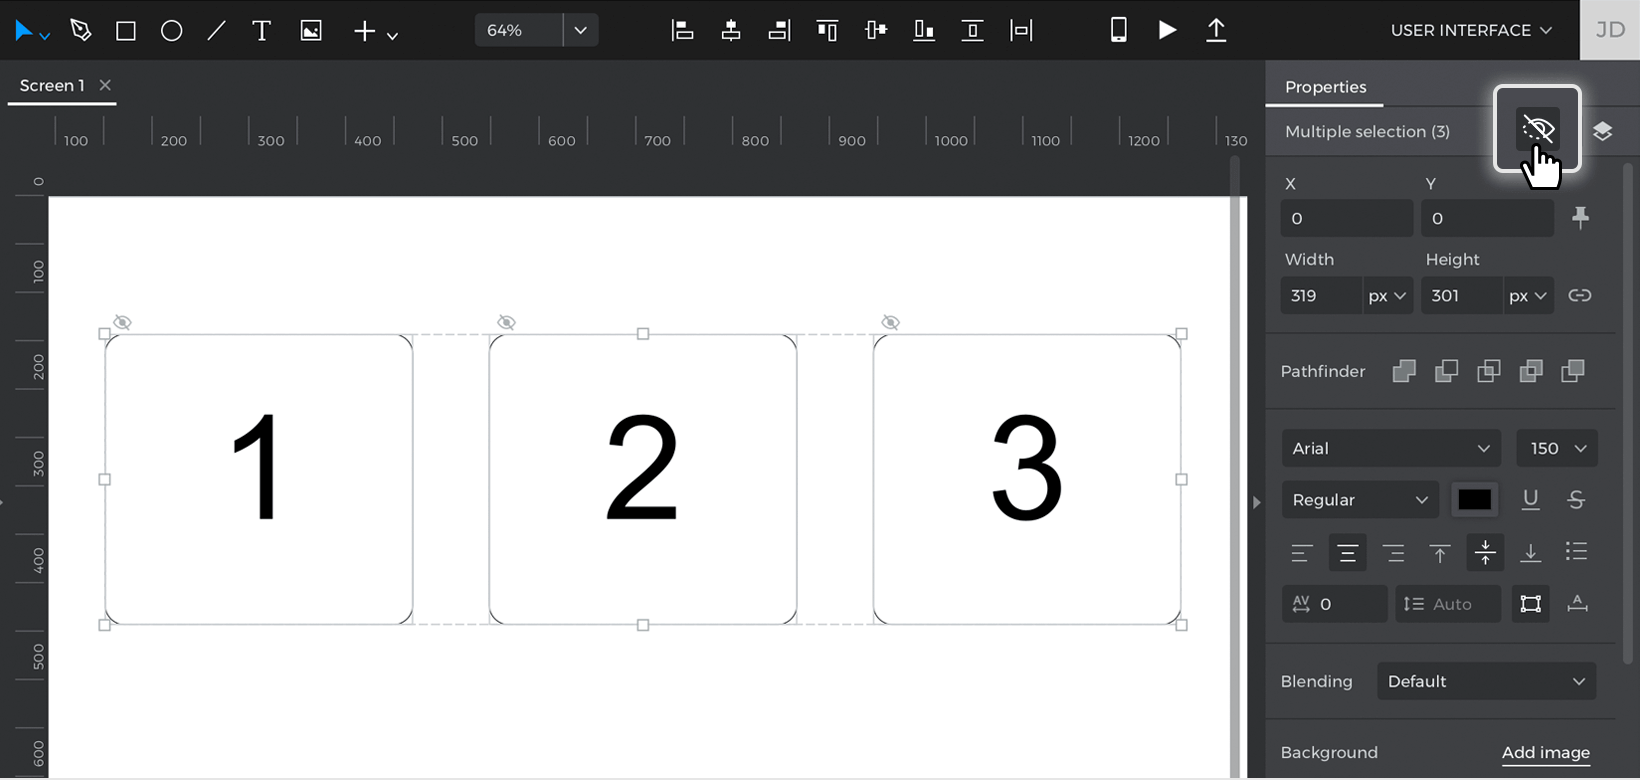
- Place three rectangles and a button on the Canvas.
- Select all the rectangles and mark them as hidden in the Properties palette.


Create the events
- Select the button on the Canvas, go to the Events palette, and click ‘Add event’.
- Create an On Click + Show event, selecting the first rectangle to show with a fade effect. Click ‘OK’ to finish building the event.
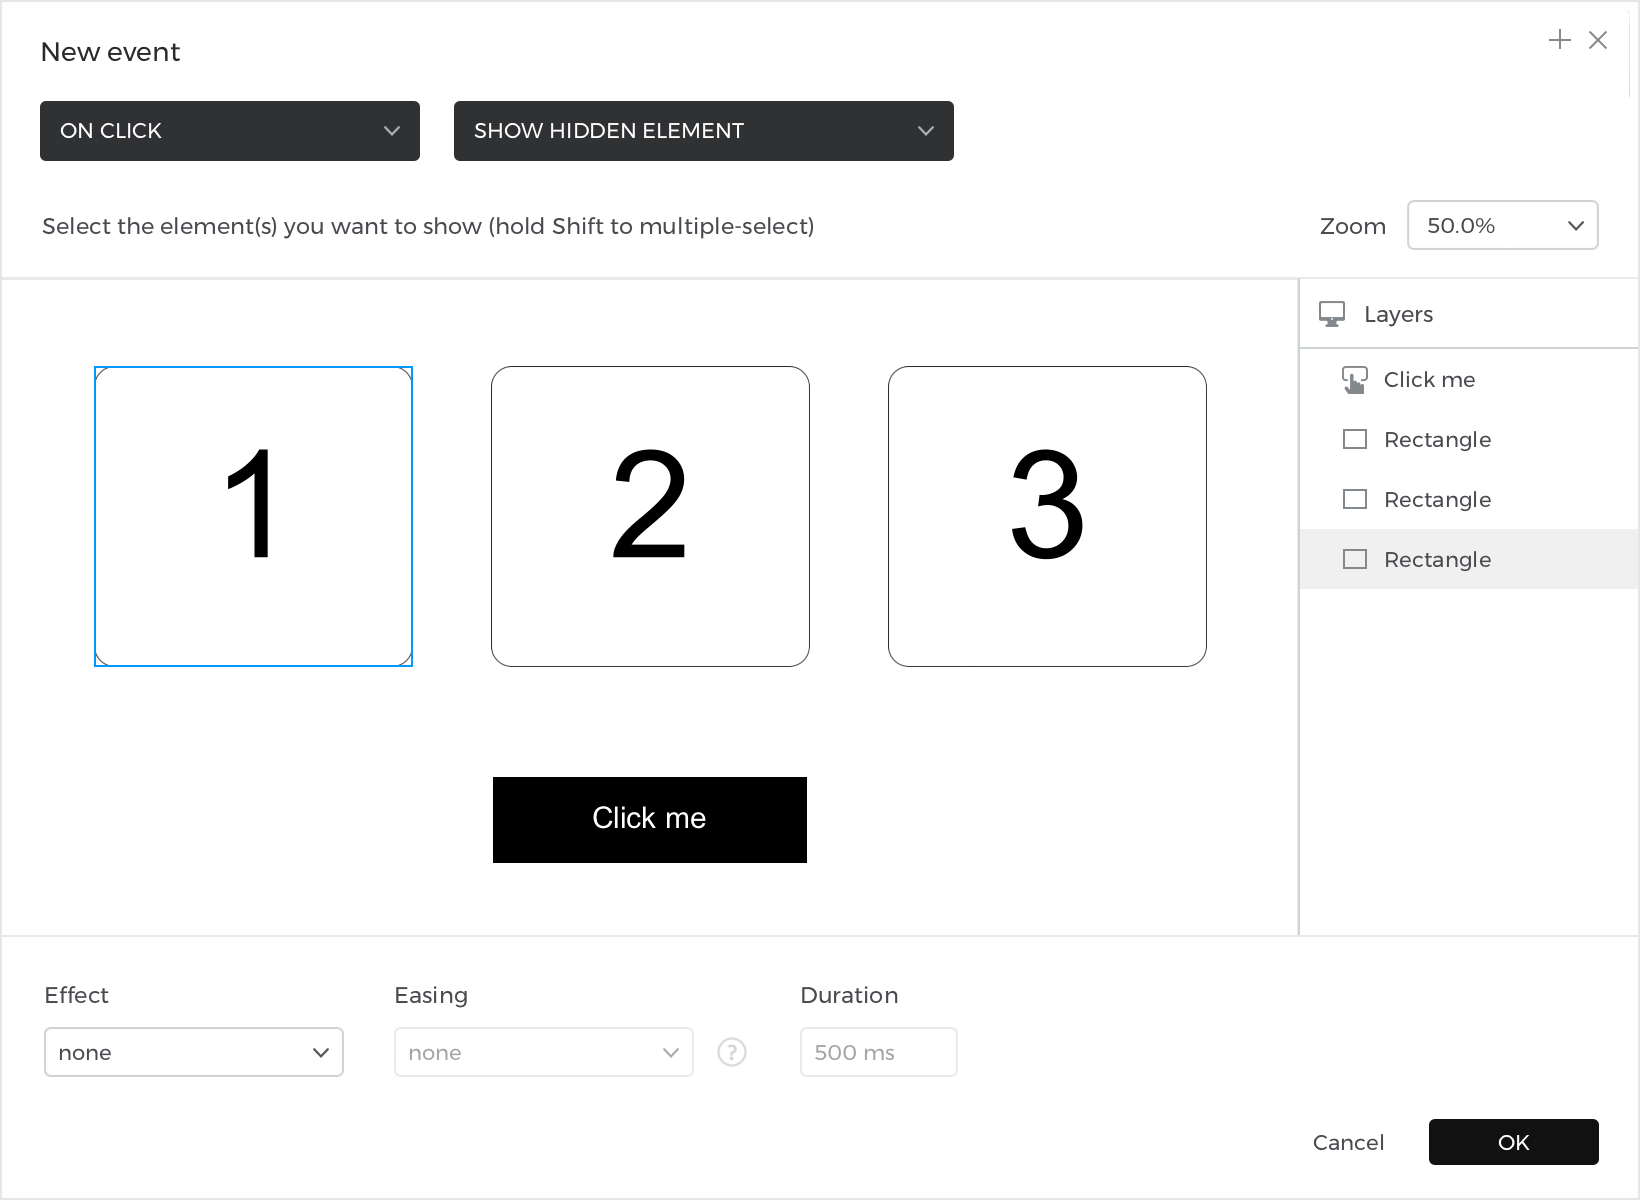

- Look back to the Events palette and click the ‘add condition’ text link above the event you just created. Follow these steps to build the expression:

- a. Drag the first rectangle to the open space in the expression.
- b. You’ll see a dropdown appear below the element in the expression. Click on it and select the ‘Is visible’ option.
- c. Drag a Not logic function to the expression. Click ‘OK’ to finish building the expression.
- This condition checks to see if the first rectangle is not visible. If it’s not, it will show the first rectangle.
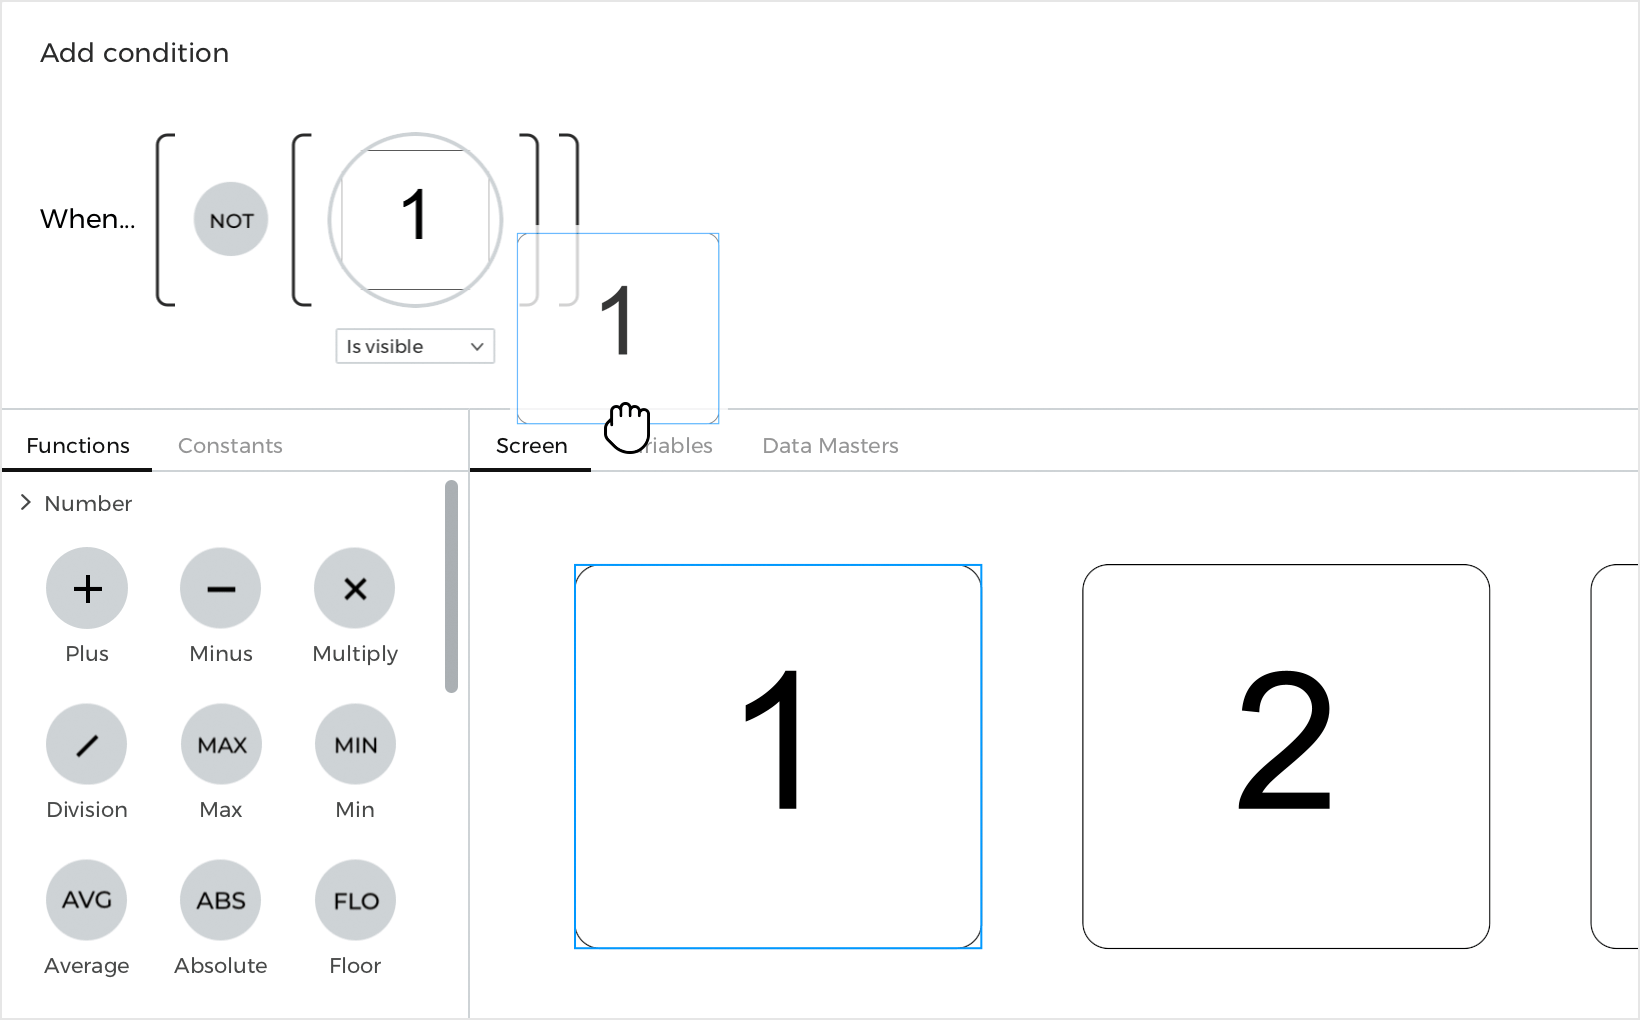
- Click on the ‘Else’ text and build another On Click + Show event, selecting the second rectangle to show with a fade effect.
- Click the ‘Else add condition’ text above the action you just created and build this condition:
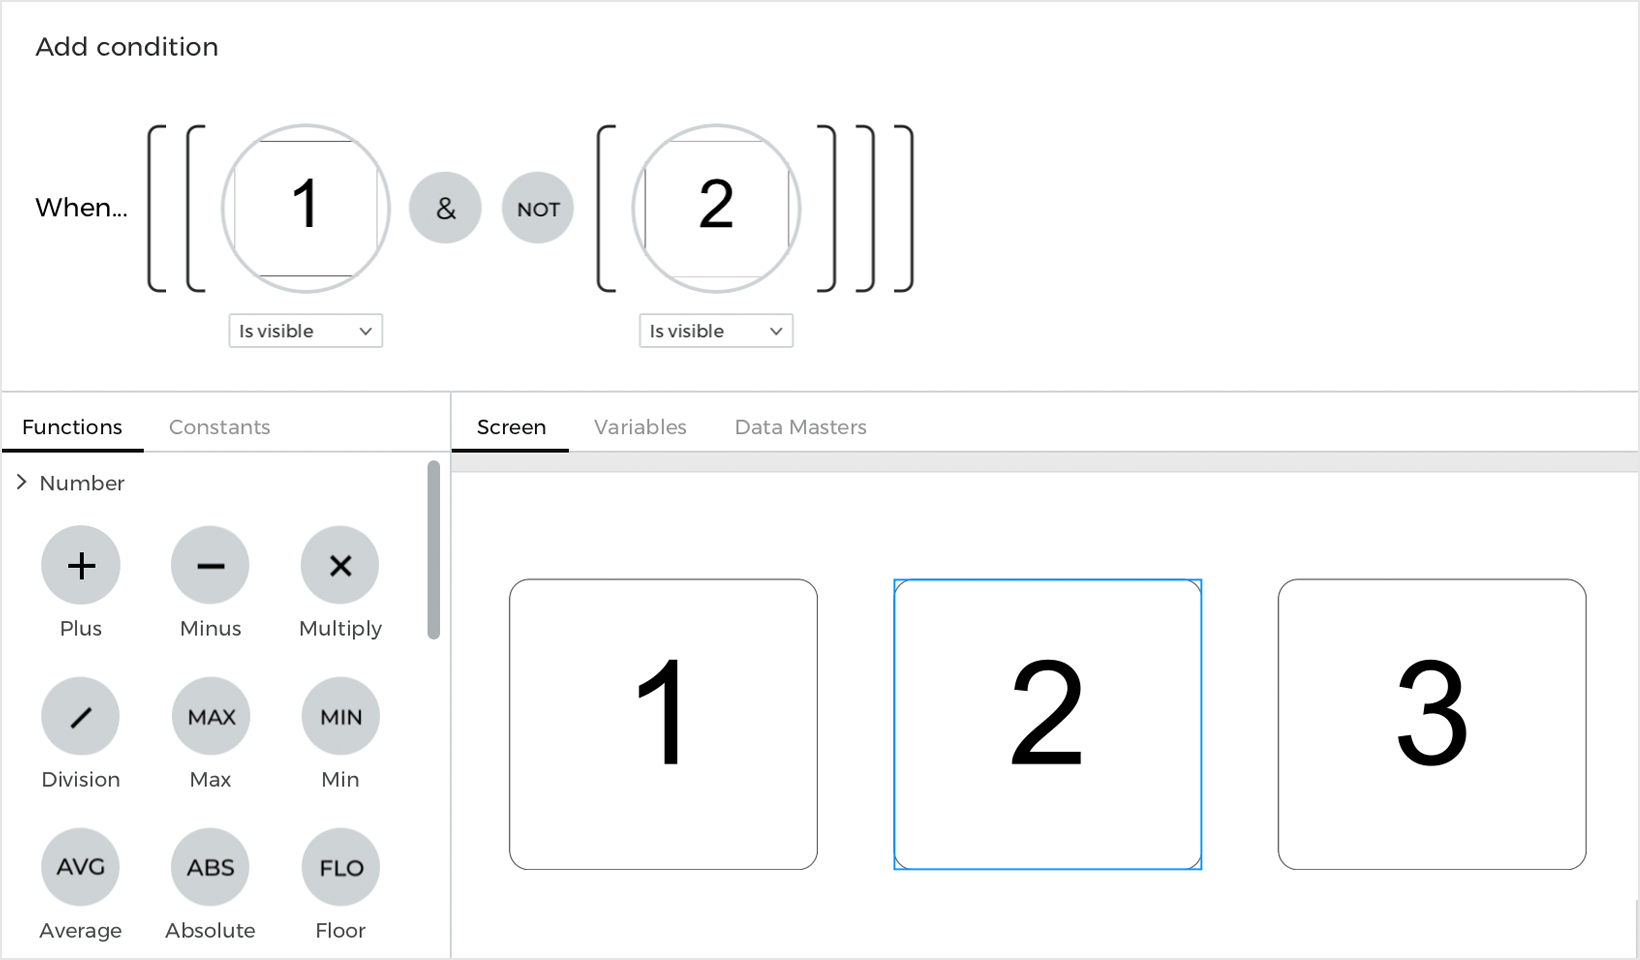

- a. Drag the first rectangle to the open space in the expression and select ‘Is visible’ from the dropdown.
- b. Place an And (&) logic function next to the rectangle in the expression.
- c. Drag the second rectangle to the open space in the expression and select ‘Is visible’ from the dropdown.
- d. Place a Not logic function to the left of the second rectangle and click ‘OK’ to finish building the expression.
- This condition checks to see if the first rectangle is visible and the second rectangle is not visible on the Canvas. If so, it will show the second rectangle.
- Tap the ‘Else’ text link again and build another On Click + Show event, selecting the third rectangle to show with a fade effect. You won’t need to add a condition to this event.


Here’s how your Events palette should look:

Click the ‘Play’ button to simulate your project. Click the button to see the first rectangle appear. Click the button again to see the second rectangle show up, and tap it once more to see the last rectangle.
Error messages in an input form
Now, you’ll learn how to build conditions that check to see if all the fields in a form are filled out and validated correctly. If they’re not, you’ll show an error message.
Design the example
- Drag two Input Text Fields F and a Button to the Canvas. Align them to match the example.
- Double-click on each input text field to add a placeholder value. Type in “Email”, and “Password”.
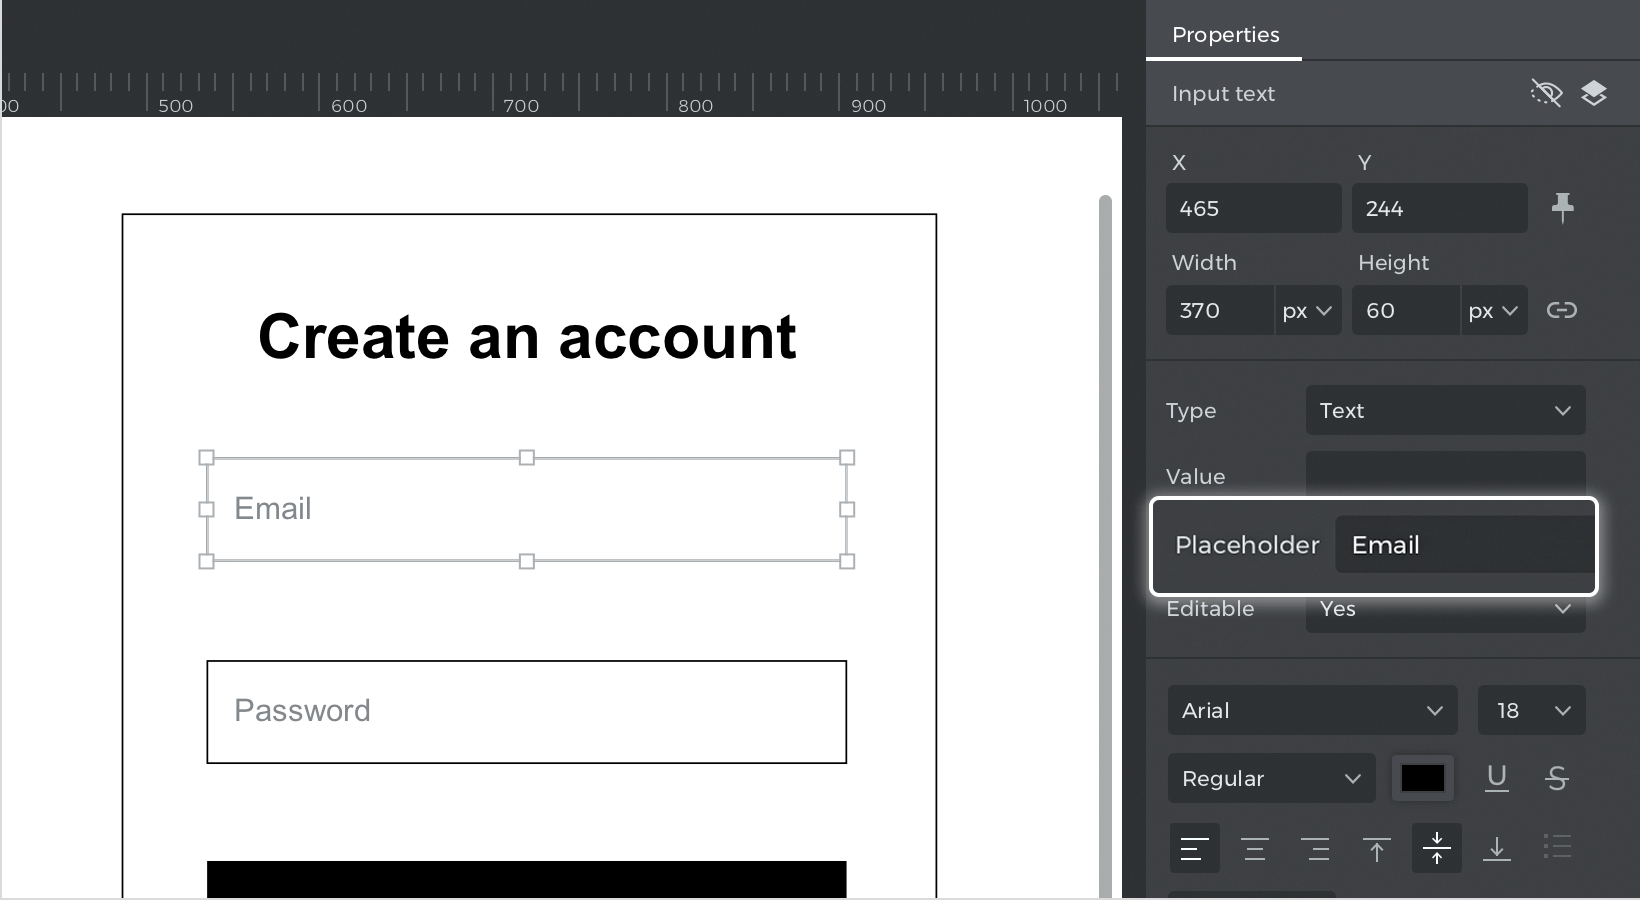

- Add two text elements, placing one below each input text field. Label them “Please enter a valid email” and “Please enter a password”.These will be the error messages you’ll show if the form isn’t fully completed.
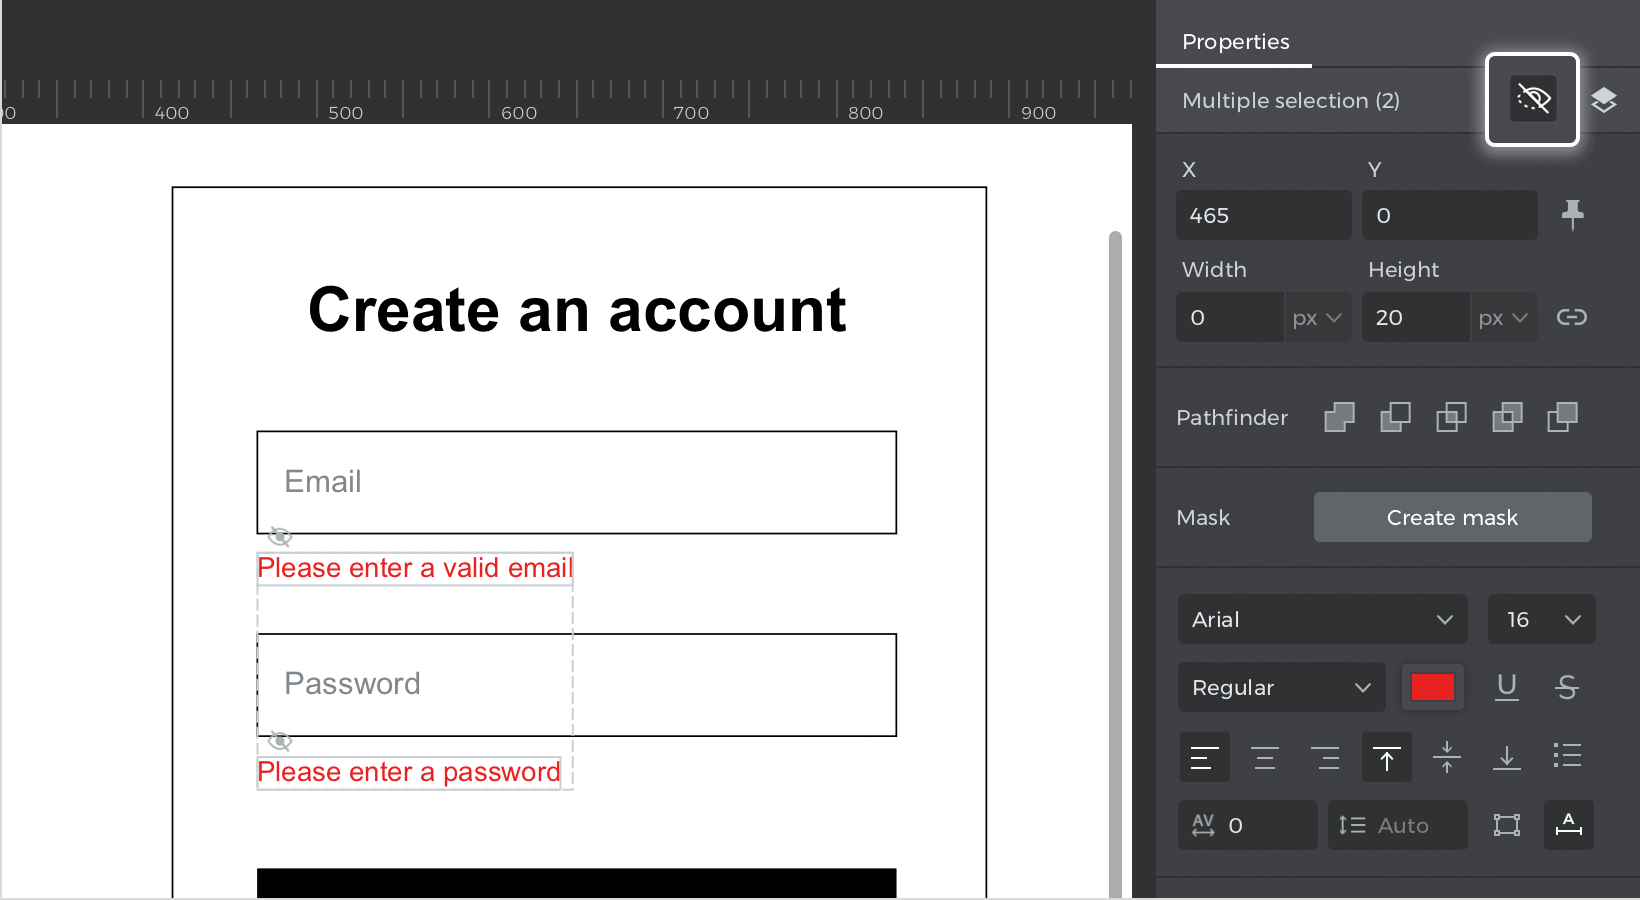
- Select both error messages and mark them as hidden in the Properties palette. You can use Shift to multi-select them on the Canvas.


Create the events
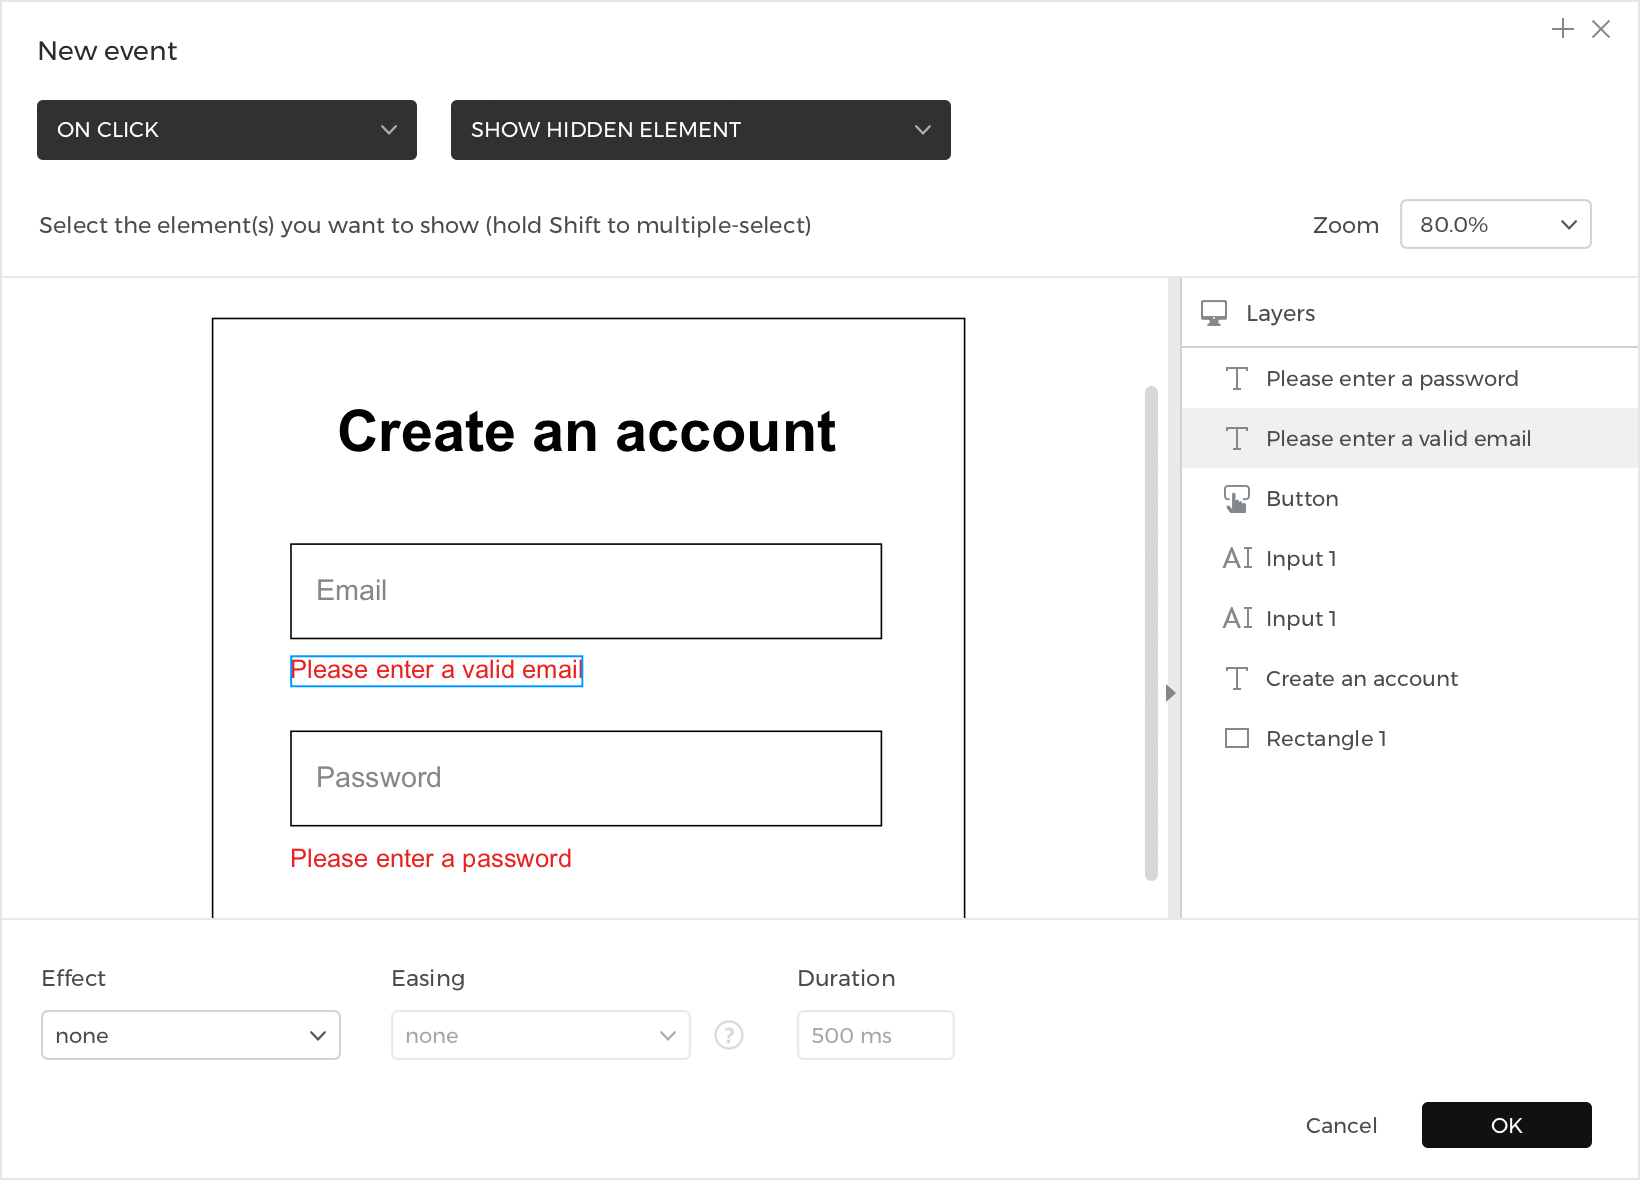
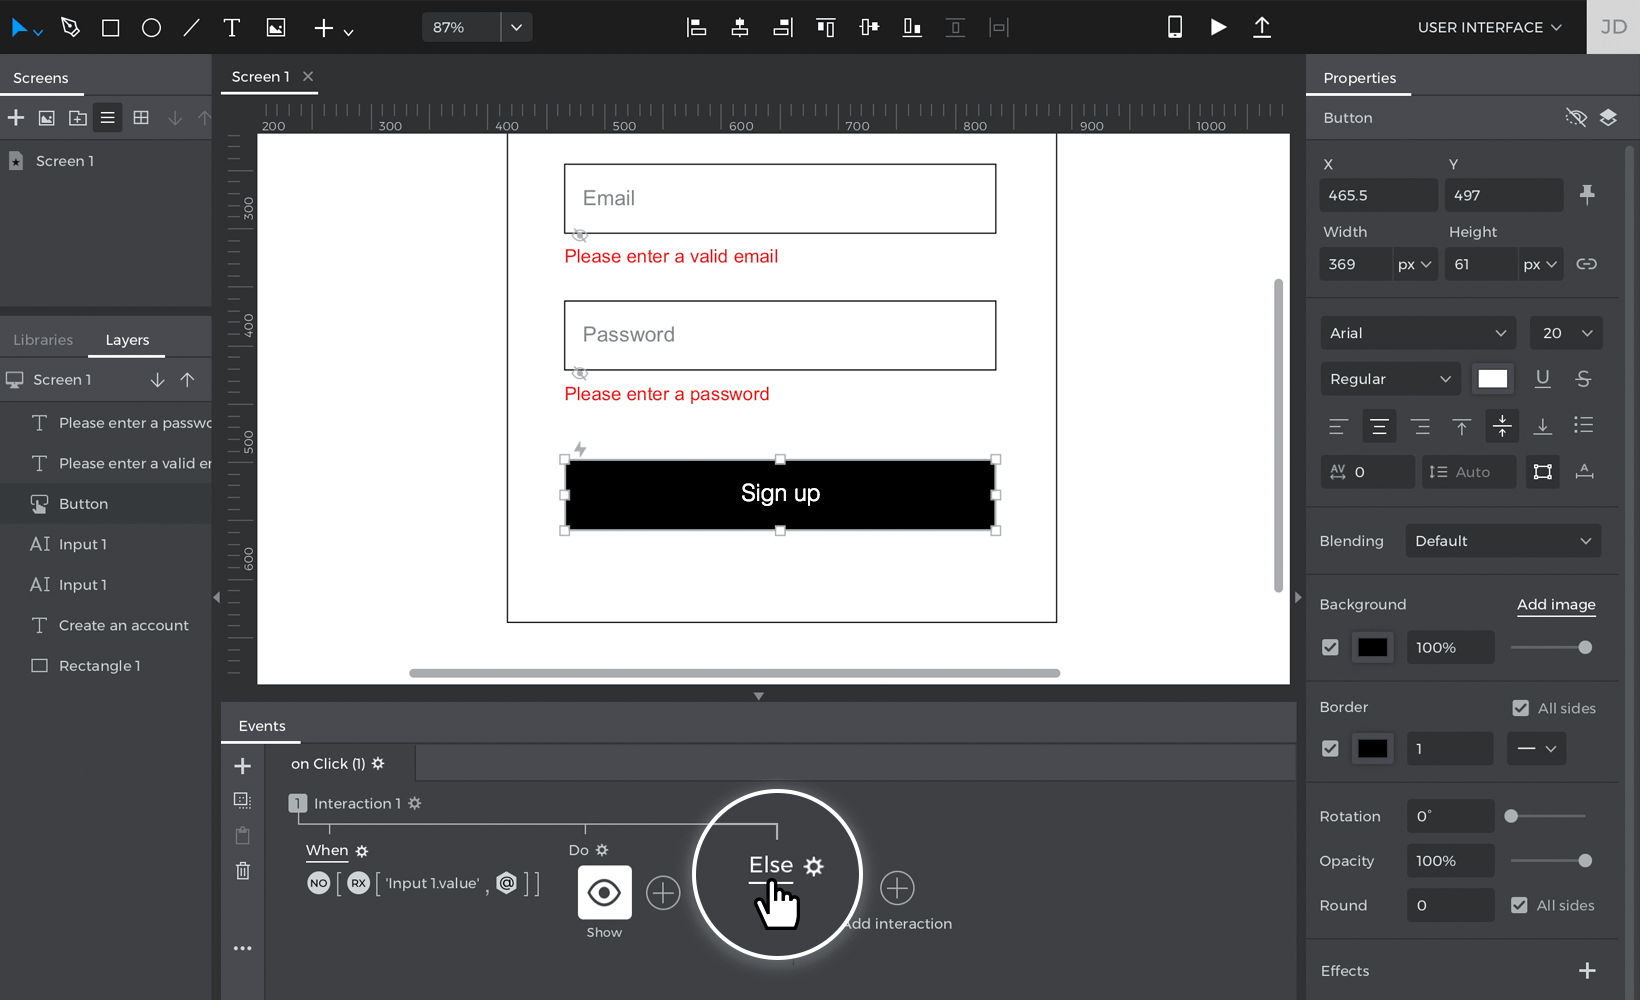
- Select the “Sign up” button, go to the Events palette and click ‘Add event’. Create an On Click + Show event, selecting the “Please enter a valid email” error message to show. Click ‘OK’ to finish building the event.

- Click the ‘add condition’ text link above the event you just created. Follow these steps to build the expression:
- a. Drag a Regular Expression (Reg Exp) logic function to the open space in the expression.
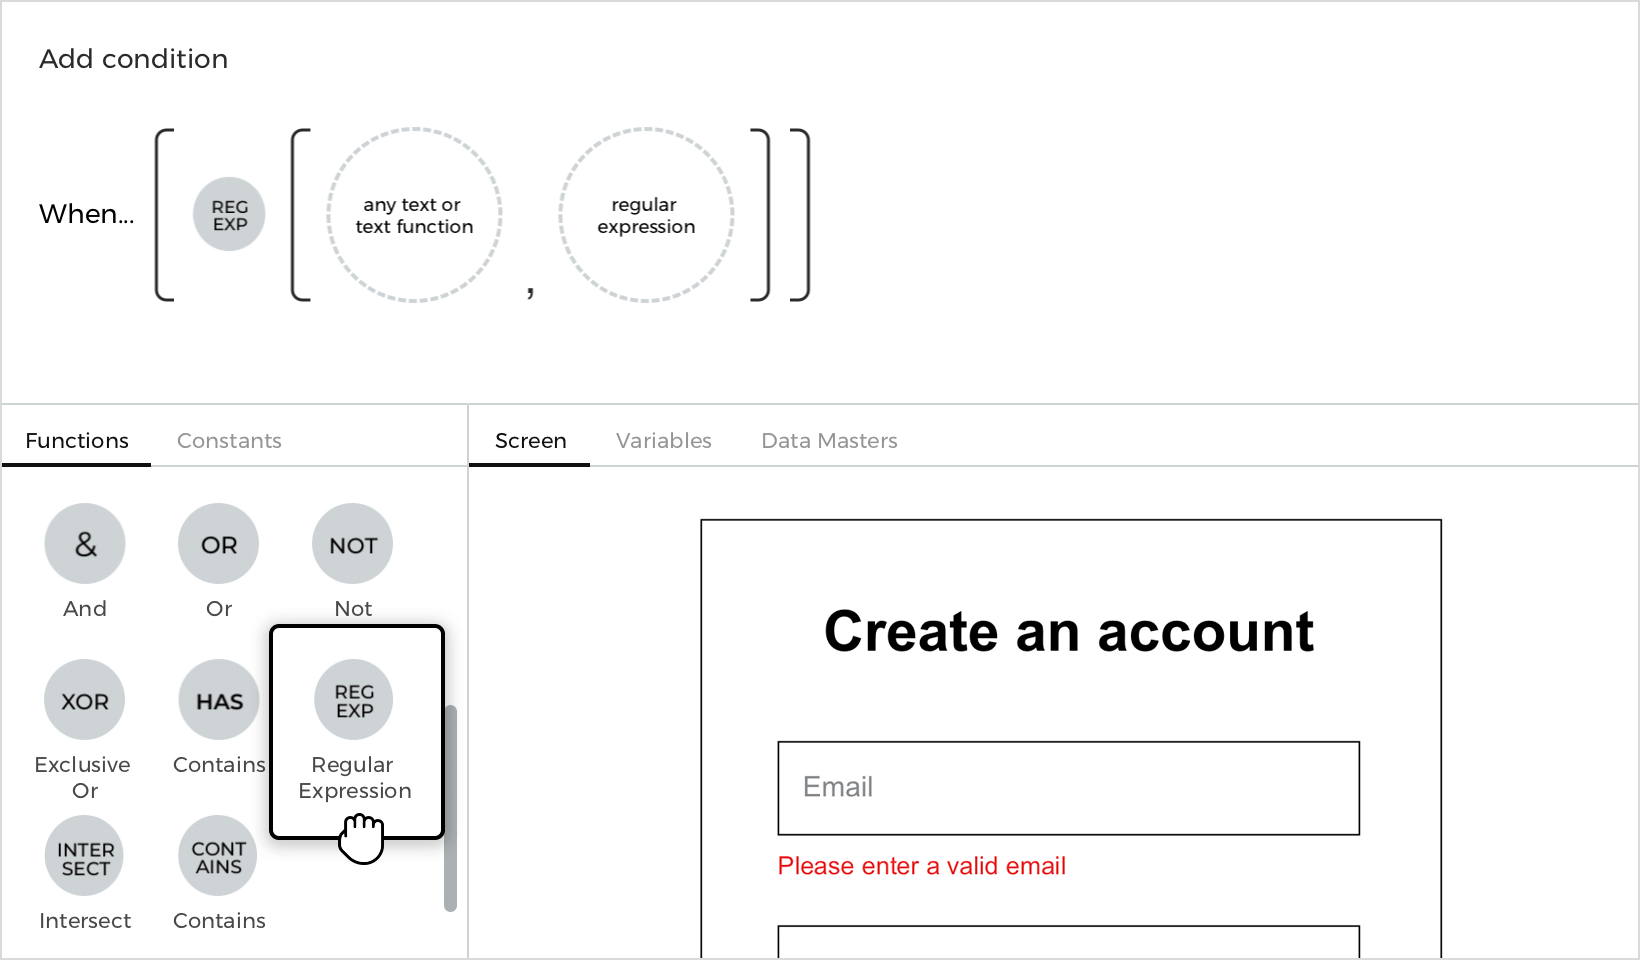

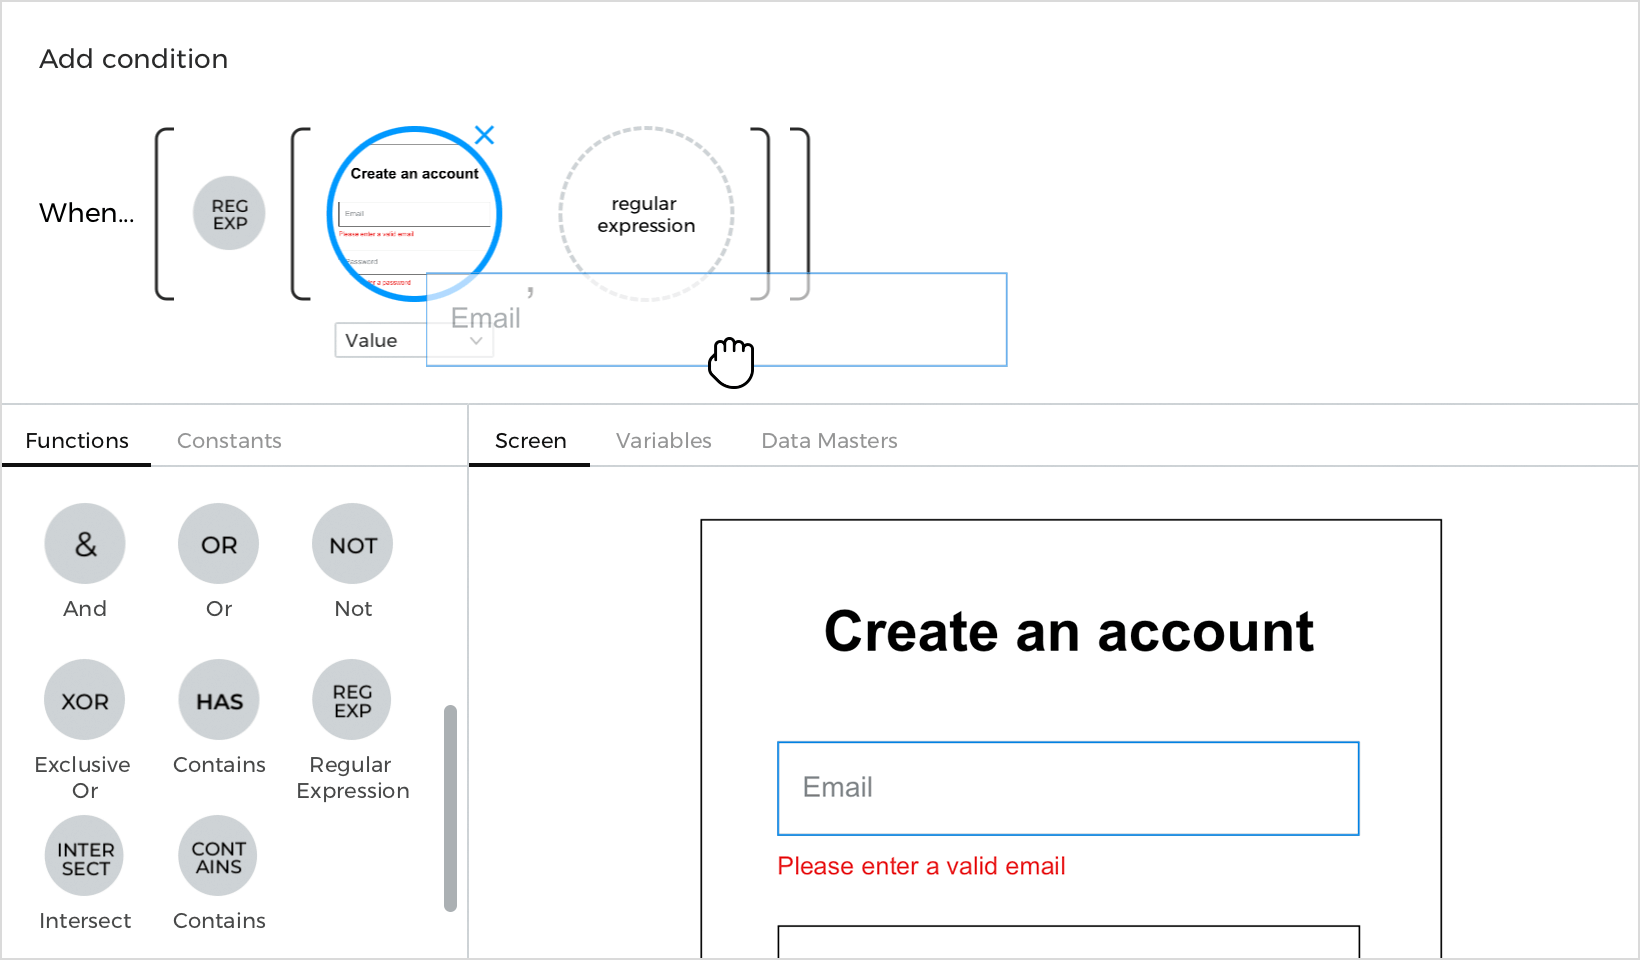
- b. You’ll see two open spaces appear. Drag the “Email” input text field to the open space on the left.
- c. Click to the Constants tab and to the ‘Regular Expressions’ section. Drag the Email (@) constant to the open space on the right.
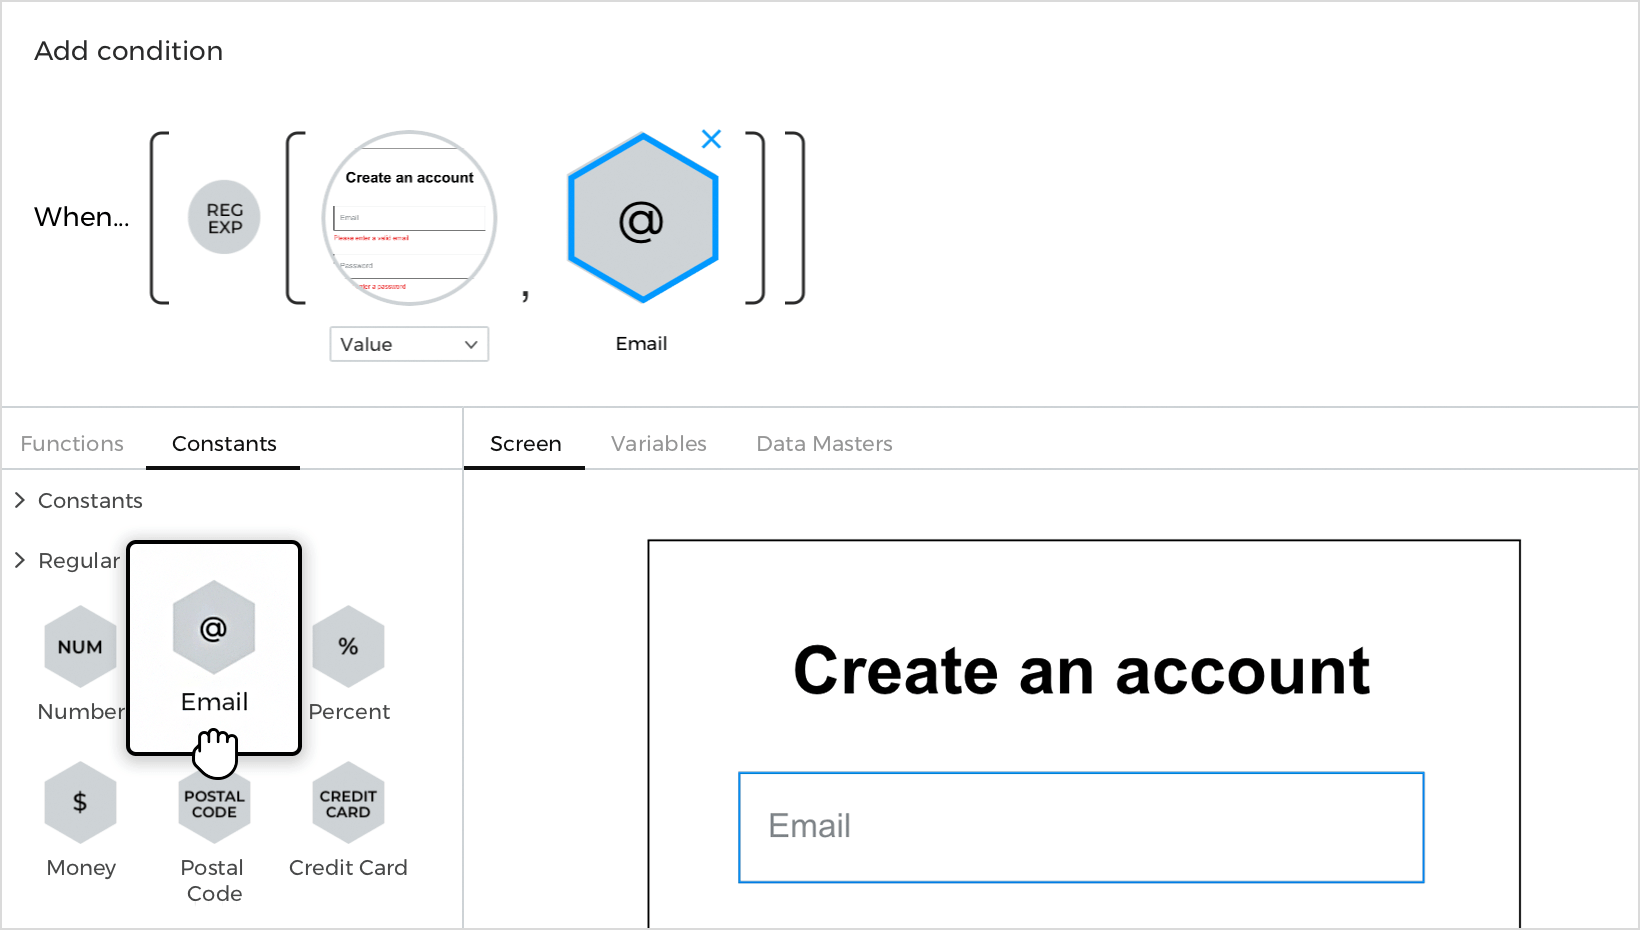

- d. Click back to the Functions tab. Drag a Not logic function in front of the expression. Click ‘OK’ to finish building the expression.
- This condition checks to see if the value you entered in the input text field matches the structure of an email address or not. If it doesn’t match, it will show the error message.
- a. Drag a Regular Expression (Reg Exp) logic function to the open space in the expression.
- Click the ‘Else’ text below the event you just created and build an On Click + Hide event, selecting the “Please enter a valid email” error message to hide.

- Click the ‘+’ button at the top of the Events palette to create a new interaction. Build an On Click + Show event, selecting the “Please enter a password” error message to show.
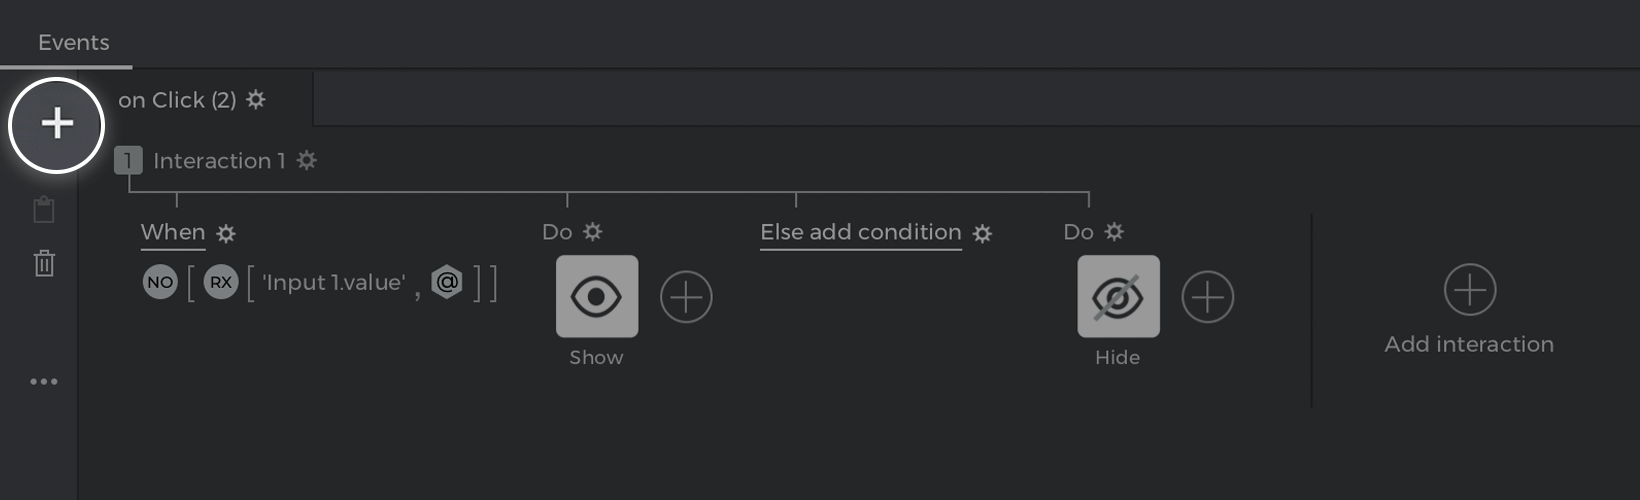

- Click the ‘add condition’ text link above the event you just created, which will open the Conditional Expression builder. Follow these steps to build the expression:
- a. From the Canvas preview, drag and drop the “Password” input text field to the open space in the expression.
- b. Place an Equals (=) logic function next to the input text field.
- c. You’ll see a new open space appear. Double-click on it, but leave it empty. Click ‘OK’ to finish building the expression.
- This condition checks to see if there’s no value entered in the input text field. If so, you’ll see the error message you created appear.
- Tap the ‘Else’ text link below the events you just created and build an On Click + Hide event, selecting the “Please enter a password” error message to hide. This will hide the error message if you have entered some value in the “Password” input text field.


Here’s how your events palette should look:

Click the “Play” button to simulate your project. Fill in one of the input text fields, but leave the other blank. Click the “Sign up” button and you’ll see an error message appear. Enter a value in the input text field and click the button again to see the error messages hide.