Dynamic Panels
Dynamic Panels are widgets that can hold other elements in your prototypes. They’re like mini-Canvases that you can place elements into and switch between when you’re simulating your prototype.
You can use them to mask elements and display different content in the same area of a screen, like navigation tabs and pop-ups.
Each dynamic panel contains one panel by default, but you can add more once you’ve added one to the Canvas. You’ll only be able to view one panel at a time.
Create a dynamic panel
You can find dynamic panels in the Toolbar dropdown under ‘Dynamic content’ or by hitting the D key.

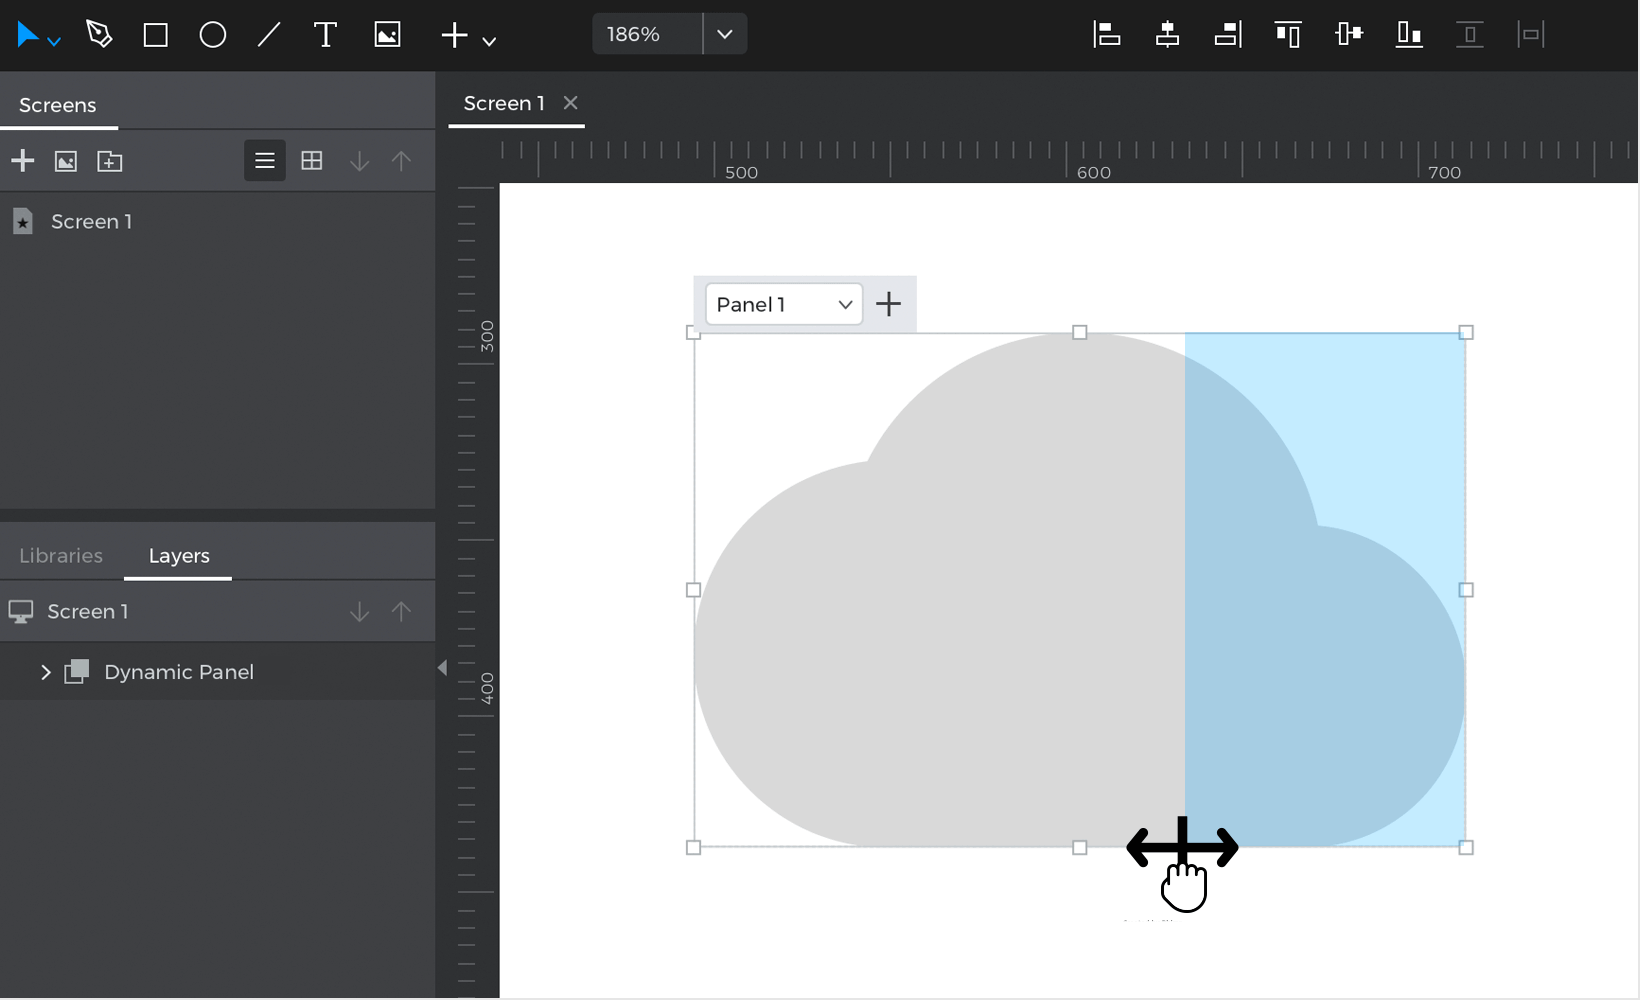
After you’ve placed one on the Canvas, you’ll notice a floating menu near it. You can add more panels by clicking the ‘+’ button in the menu. You can also use this menu or the Layers palette to switch back to view and edit your other panels.
Add, move, and delete elements
Add elements to a panel
Use Command/Control keys
You can place elements into a dynamic panel by holding the Command (Mac) or Control (Windows) key and dragging an element or group of elements inside. You’ll see the panel tint blue when you’re adding an element to it.
Right-click
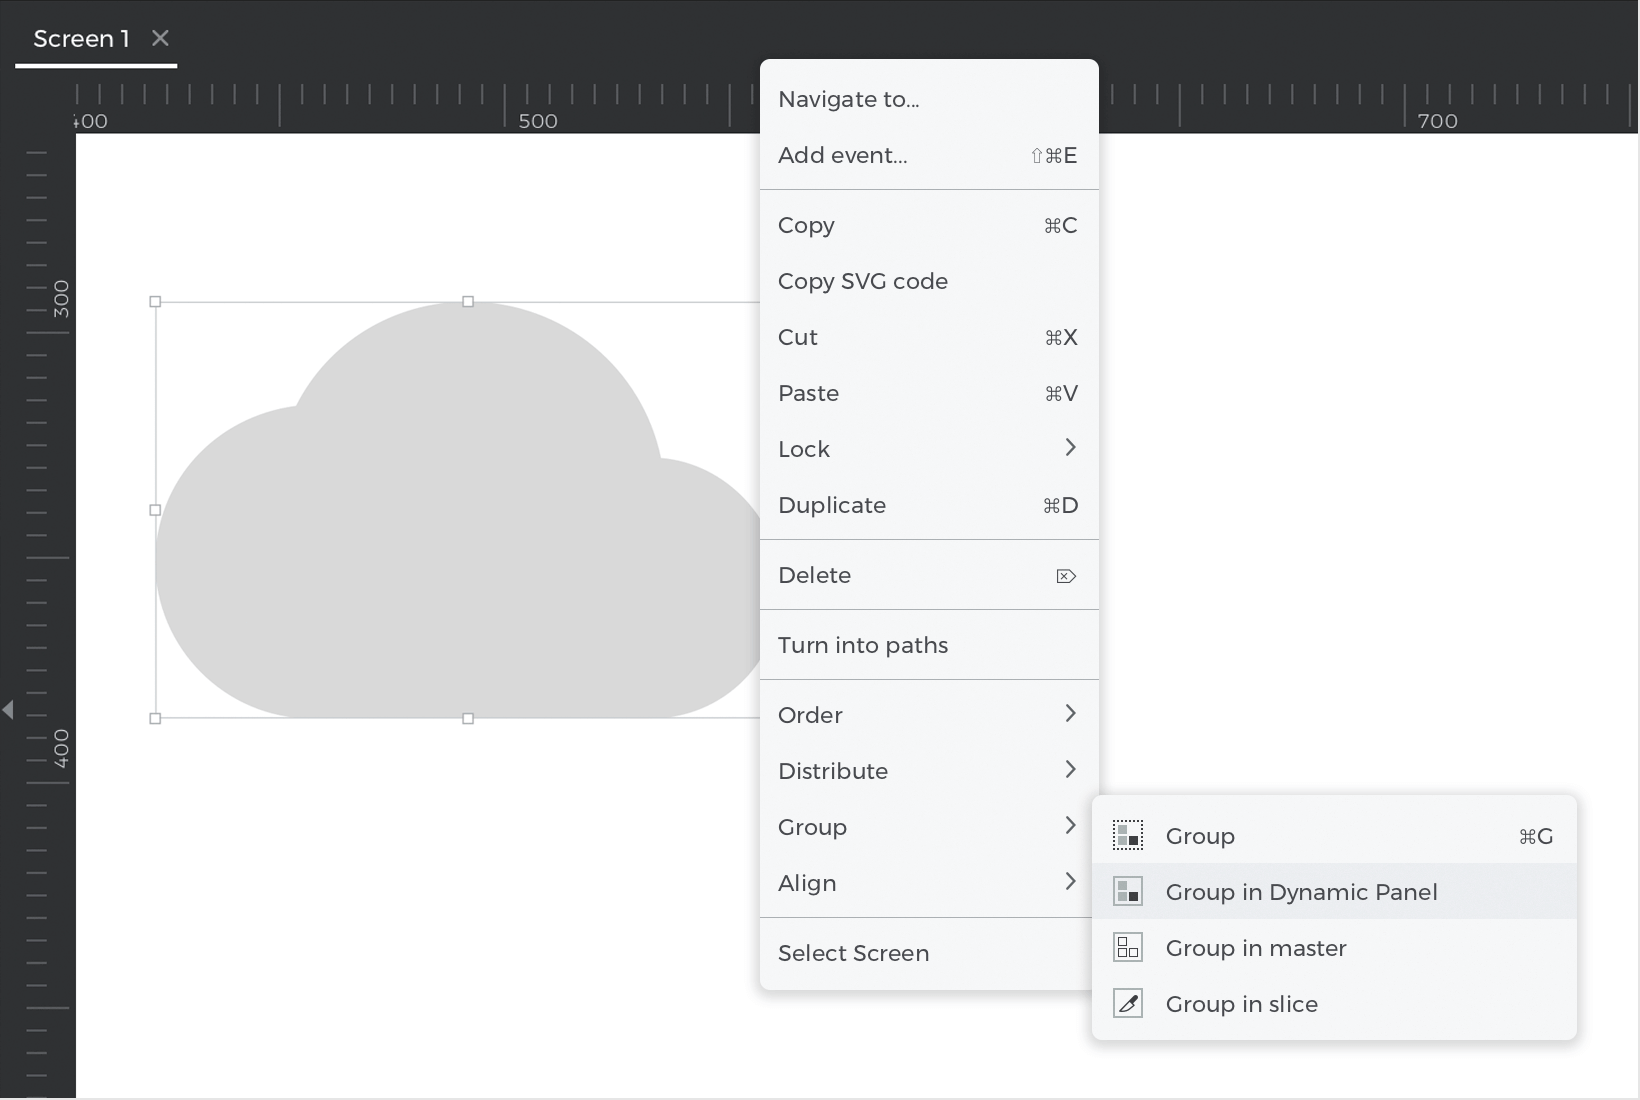
Select an element or group of elements, right-click, go to Group, and then select ‘Group in Dynamic Panel’. All of the elements you selected will now be within a dynamic panel.

Move and delete elements in a panel
Activate the direct selection tool by hitting the A key or choosing it in the Toolbar. The direct selection tool allows you to quickly choose an element inside a dynamic panel or in a group. You can then move that element around within the panel, or place it outside of the panel’s area to remove it from the panel.

Switch back to regular selection by hitting the V key.
Duplicate and remove panels
You can duplicate a panel and the elements inside it by right-clicking on a panel and selecting ‘Duplicate Panel’.
Remove a panel by right-clicking on it and selecting ‘Remove Panel’. Note that all of the elements within that panel will also be removed.
The default panel
Every dynamic panel has a default panel, Panel 1, that will show first when you simulate your prototype. To change another panel to be the default panel:
- Select the dynamic panel
- Go to the Properties palette
- Select a different panel from the ‘Def. (default) panel’ dropdown.
Events with panels
Set Active Panel
While you can use the floating menu to switch between panels while you’re editing, you’ll need to use a Set Active Panel action to switch between them during simulation.
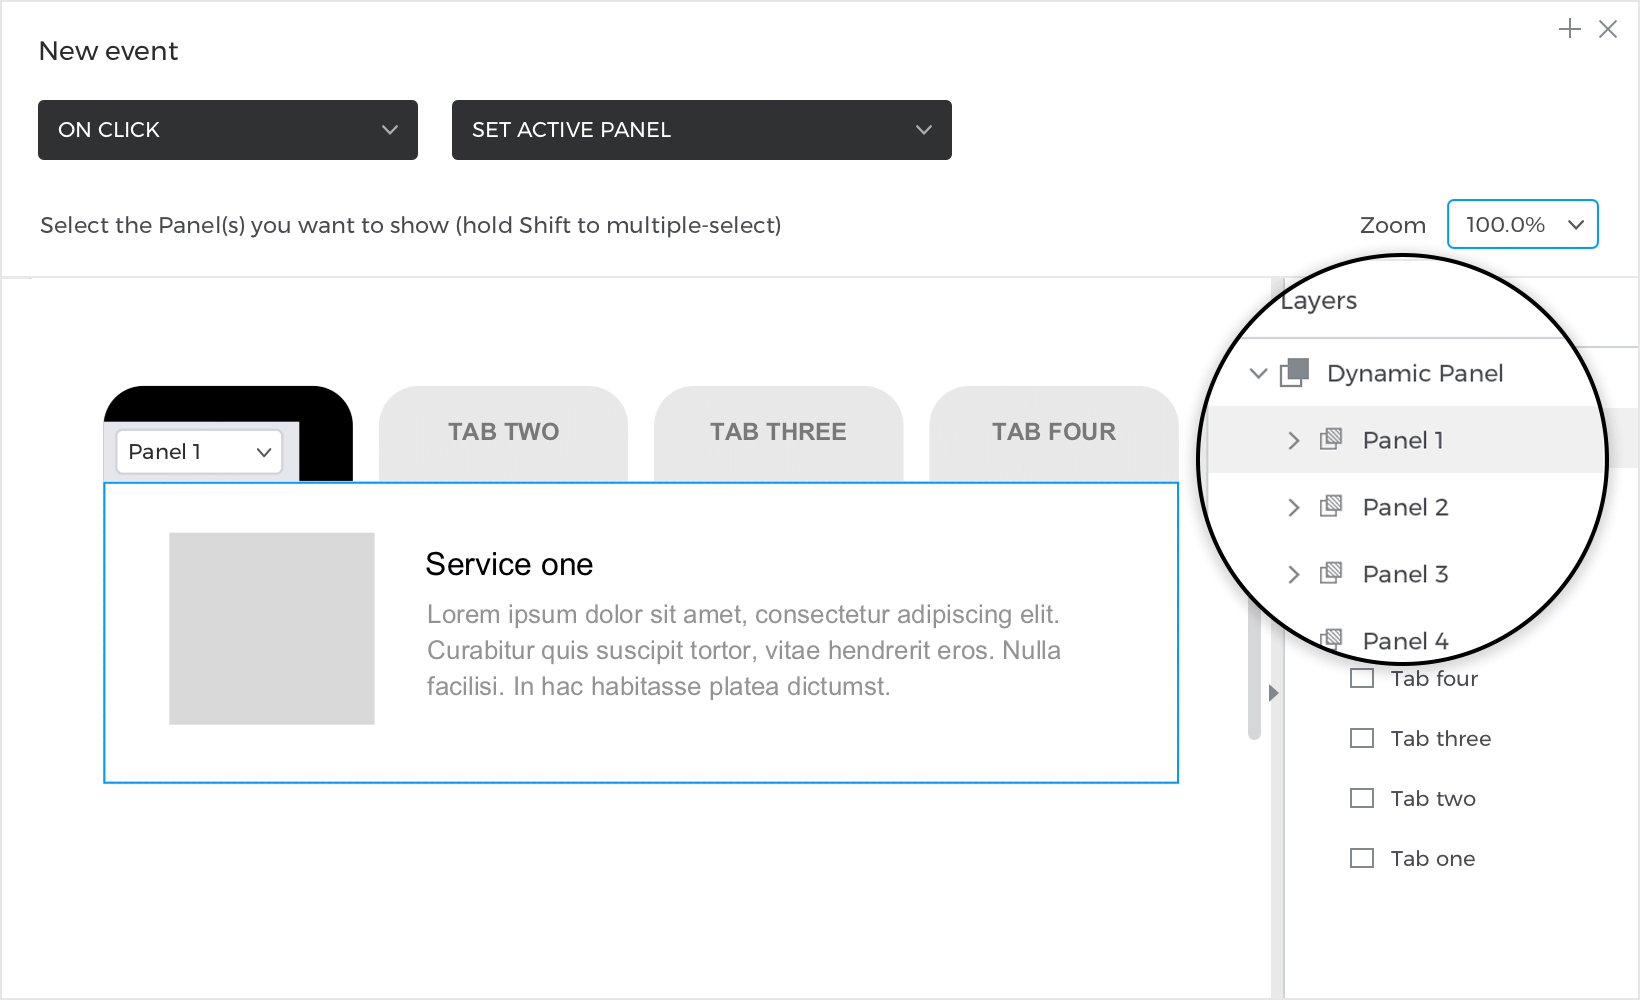
Choose a trigger to start the event (clicking on a button, for example), then find the Set Active Panel action in the Actions dropdown. Once you’ve selected it, you’ll see the Canvas preview, where you can select the panel you’d like to switch to (set as active). You may find it easier to select the panel from the dialog Layers palette.

On Panel Active
You can create events that trigger whenever you switch to a specific panel with the On Panel Active trigger.
On Panel Active is useful for creating repeating events, like slideshows and countdown timers. For example, you can combine Pause actions with On Panel Active + Set Active Panel events to create a slideshow that will switch between panels automatically.
Common uses for dynamic panels
You can use dynamic panels in many different ways – from creating confirmation dialogs and modal windows, scrolling areas, floating headers, slideshows, and so much more. [all these will be linked]
Continue on to the next article learn how to build those common use cases.
Navigation tab menus
In this example, you’ll learn how to create navigation and menu tabs with dynamic panels. You’ll use each tab to switch to different dynamic panels that hold different information.
Design the example
- Drag four Rectangle elements to the Canvas, positioning them horizontally on the Canvas to match the example. These will be the navigation tabs you’ll switch between. Style them as preferred and name them “Tab One”, “Tab Two”, “Tab Three” and “Tab Four”.The rectangle on the left (“Tab One”) will be the default selected tab. Change its background and font color so that it looks selected.
- Drag another rectangle below the tabs and resize it to be larger. This Rectangle will act as the background layer for the window that each tab displays.
- Place elements on top of the rectangle to create the content of your first tab window.
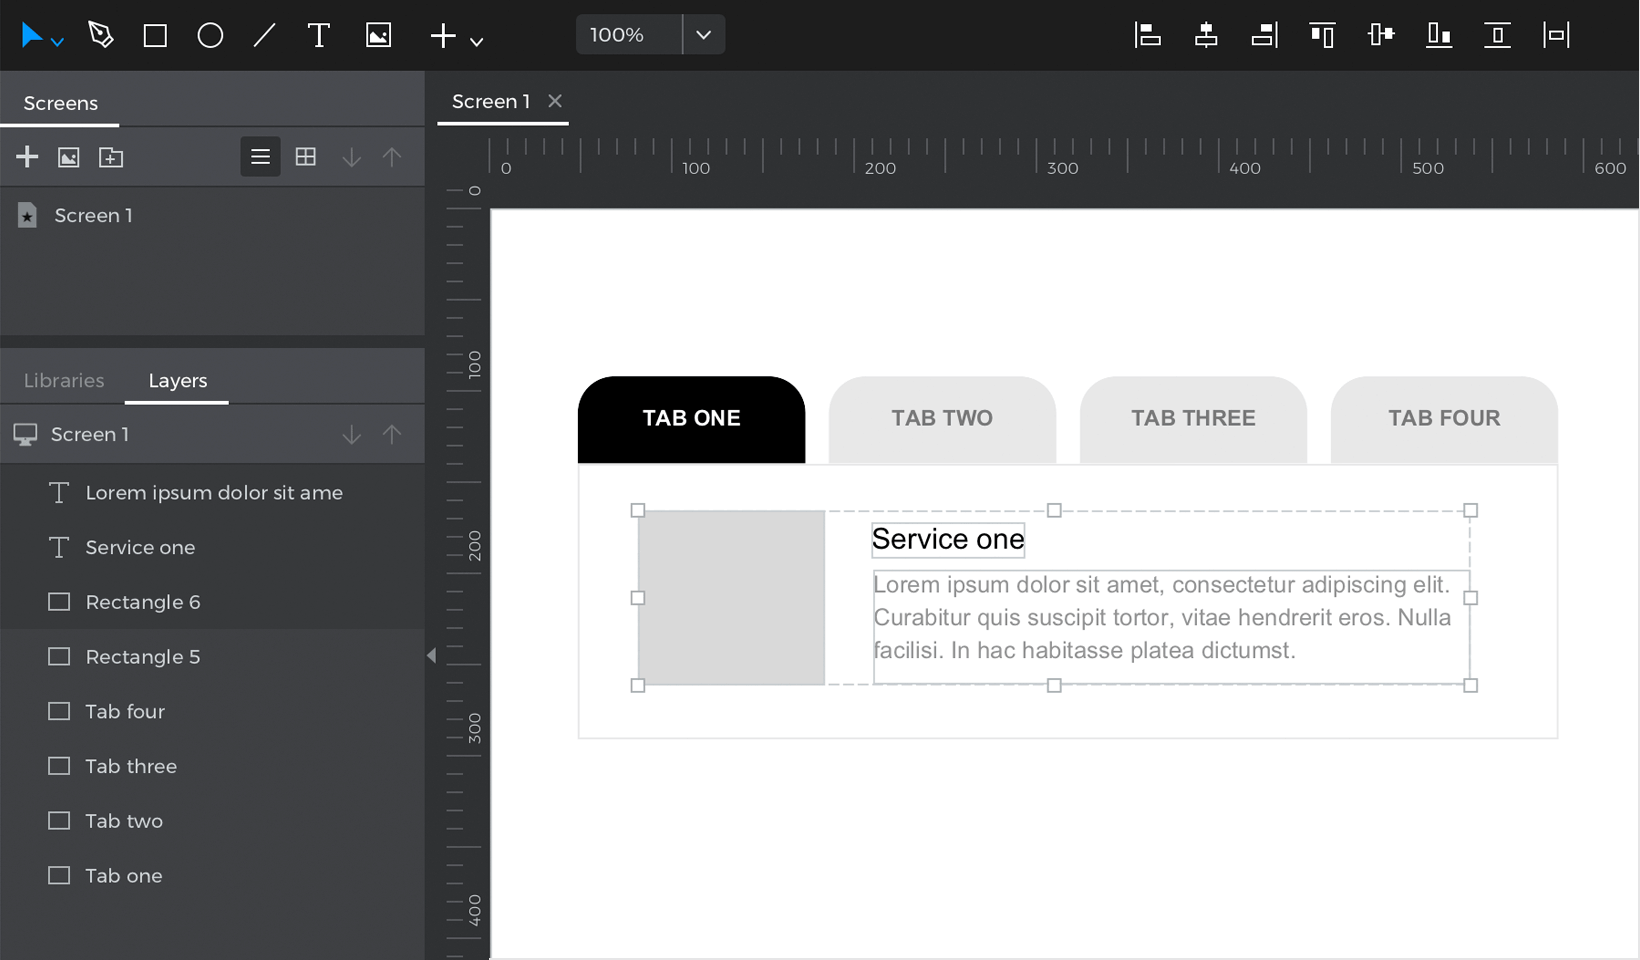

- Select the rectangle and the elements inside the tab window, right-click, go to group, and select ‘Group in Dynamic Panel’. All of the elements except the tabs on the Canvas should now be within a dynamic panel.
- Right-click on the panel and select ‘Duplicate panel’. Duplicate this panel two more times until there are four panels in total.
- Change the window content in each panel as preferred.


Create the events
You’ll need to build some events so you can switch between the tab windows during simulation.
- Select the “Tab One” rectangle, look to the Events palette and click ‘Add event’.
- Create an On Click + Set Active Panel event, selecting Panel 1 to set as active. Now, whenever you click on “Tab One”, you’ll switch to Panel 1.

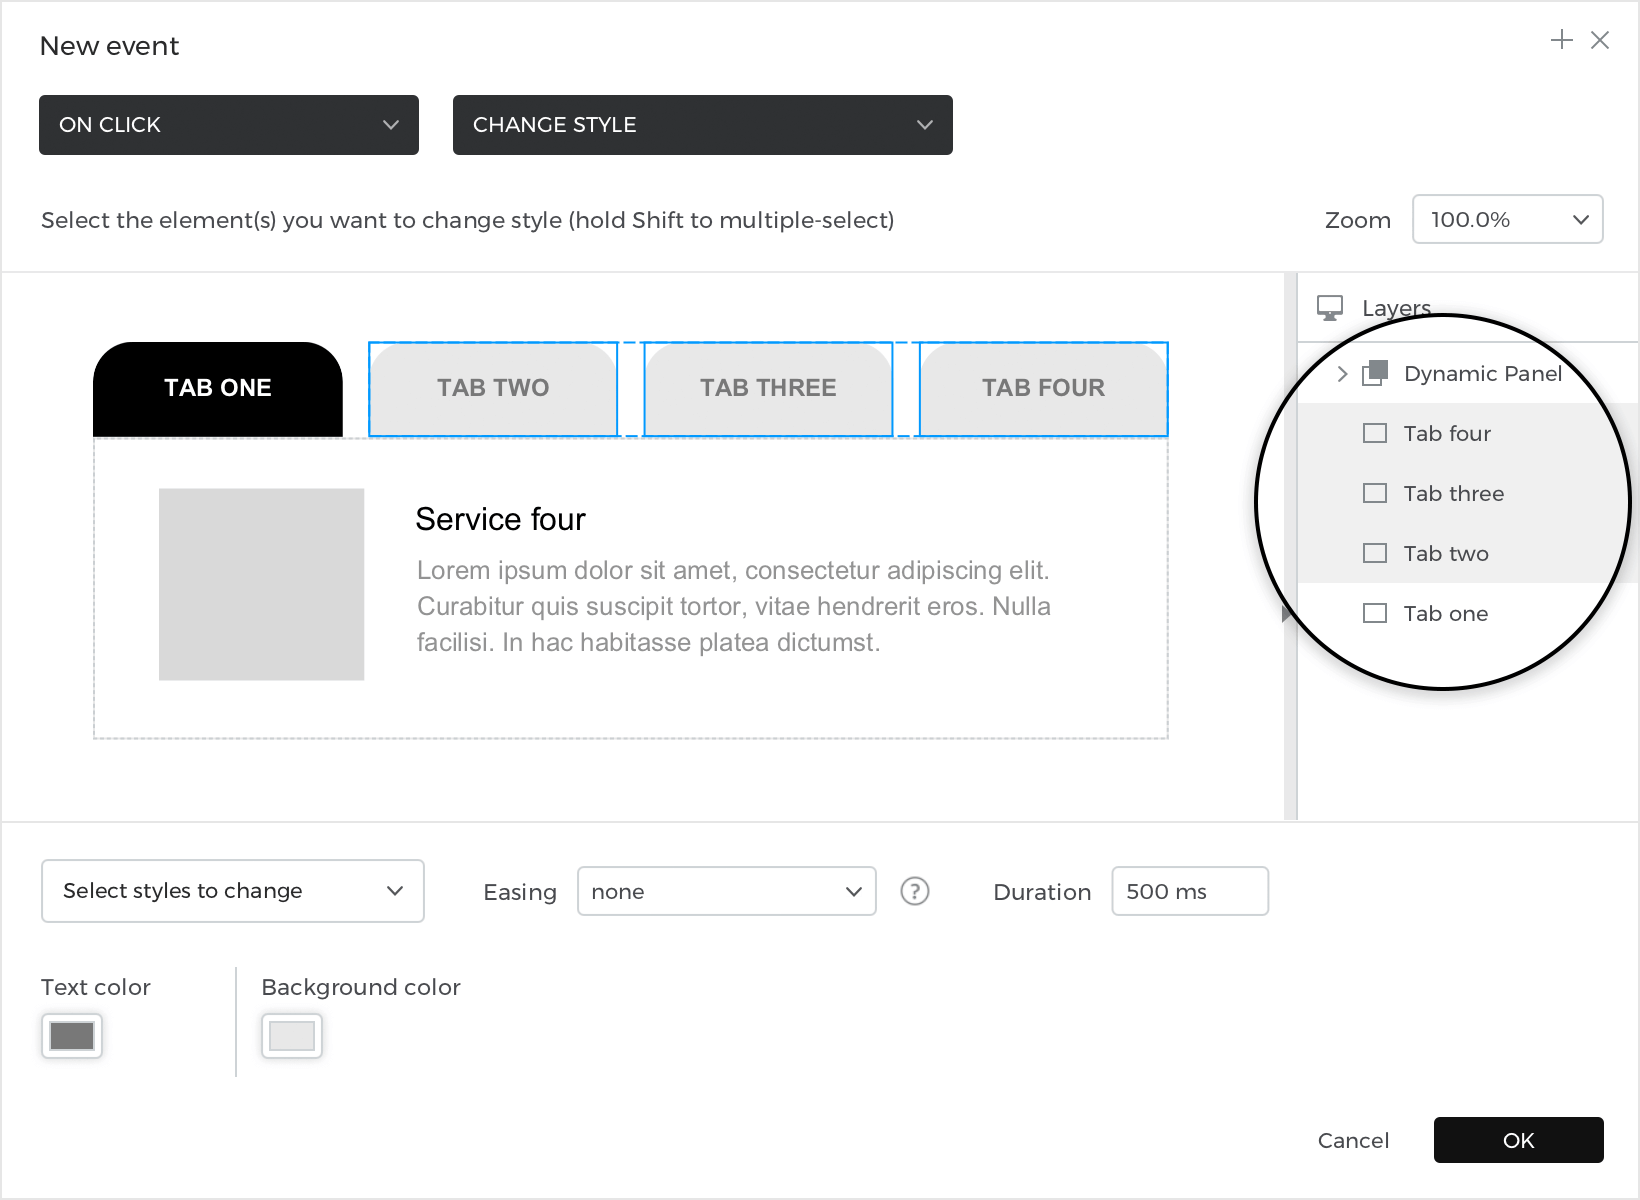
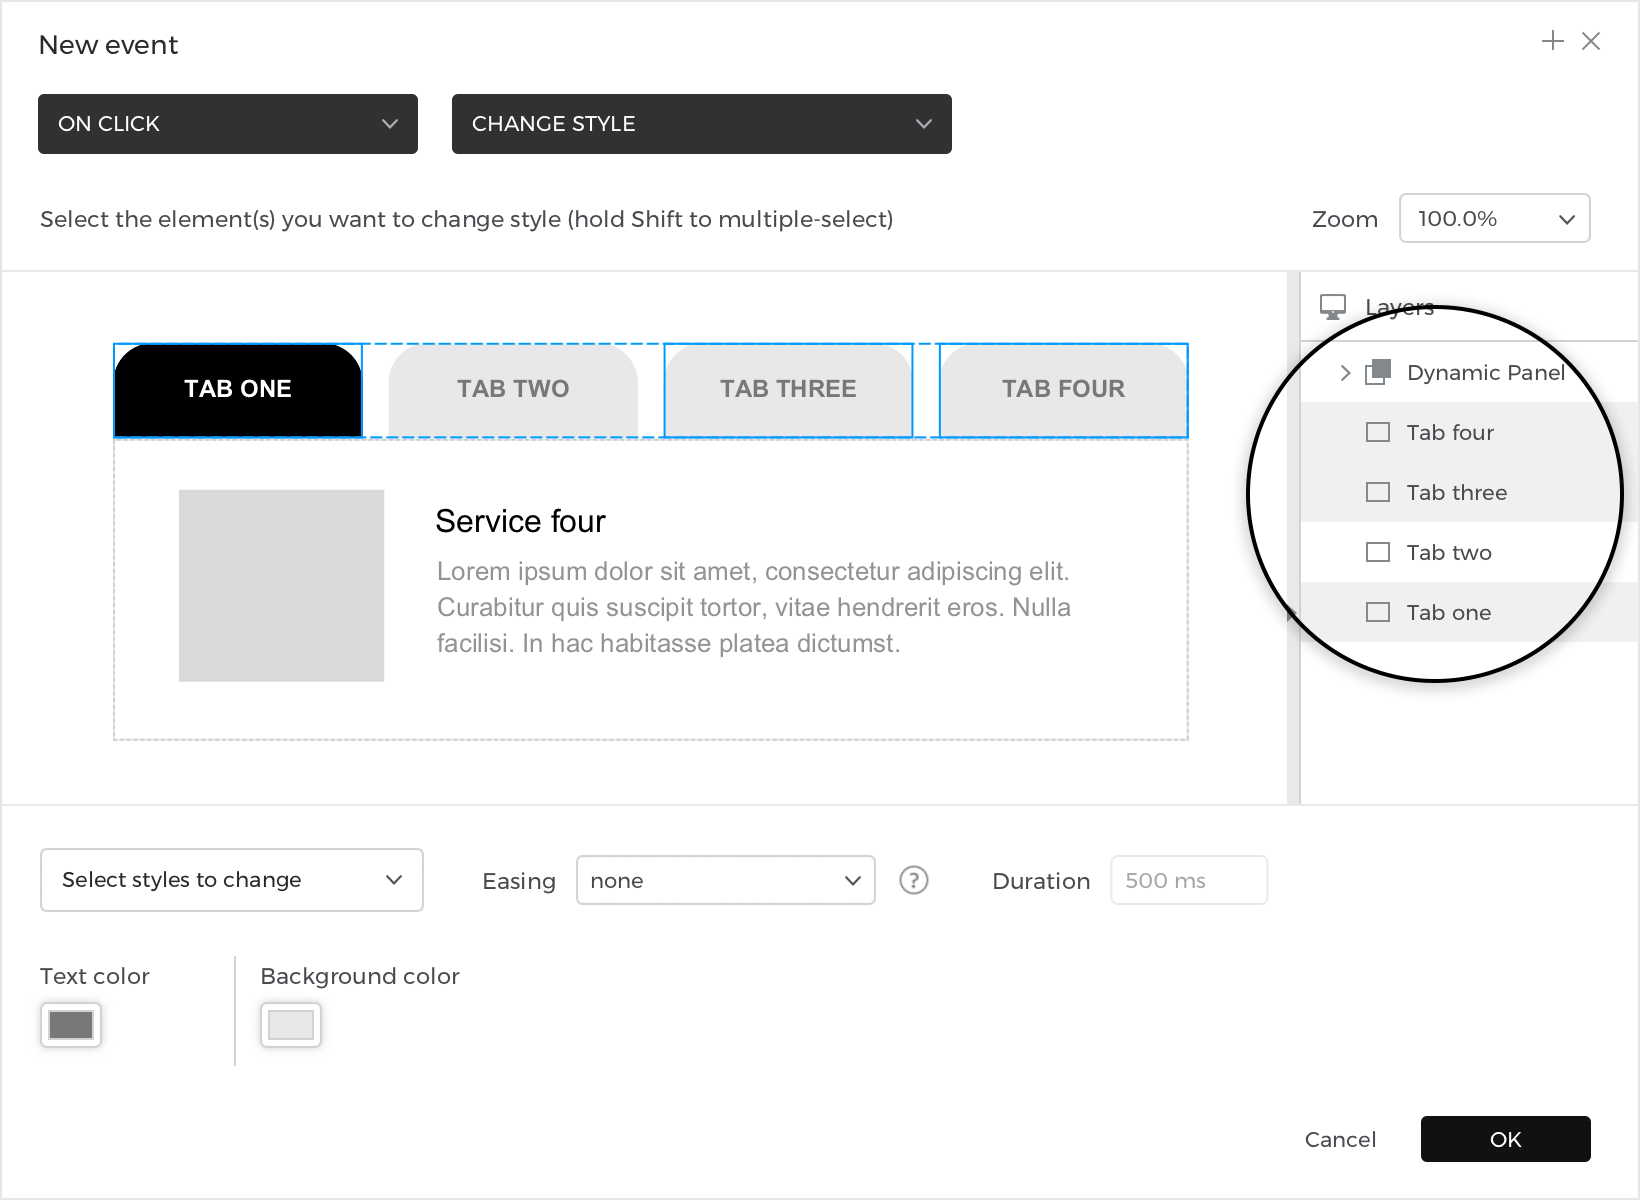
- Look back to the events palette and click the ‘+’ button next to the action you just created. Create an On Click + Change Style event, selecting “Tab One” as the target of the action. For the styles to change, add the background and font colors. Leave the colors as the default.
This action changes “Tab one” to look selected when you click on it.
- Next, you need to create an event to change the style of the other tabs to look unselected when you click on “Tab One”.Click the ‘+’ button next to the action you just created and create another On Click + Change Style event. Select the three other tabs as the targets of the action – you can use Shift to multi-select. Add the background and font colors to change, leaving their coloring as the default.

- Click on the ‘copy’ button at the top of the Events palette to copy all of the actions you’ve created on “Tab One”. Go to “Tab Two” and click the ‘paste’ button to paste them on “Tab Two”.
- Double click on the Set Active Panel action and change the panel that’s set as active from Panel 1 to Panel 2.
- Double click on the Change Style action that changes the style of Tabs two, three, and four. Deselect “Tab two” and select “Tab One” to be included in the action. You should now have Tabs one, three, and four selected to change style.

- Repeat steps 5 through 8 until each of the tabs have the correct actions – i.e. clicking on “Tab Three” sets Panel 3 as active, changes “Tab three” to look selected and Tabs one, two, and four to look unselected.


Click the ‘Play’ button to simulate your prototype. Click on one of the tabs to switch panels and see how that tab changes style to look selected.
Confirmation dialog
You can use dynamic panels to create warning messages and modal windows. In this example, you’ll learn how to create a confirmation dialog using a dynamic panel and Set Active Panel actions.
Design the example
- Design a web or mobile prototype. To match the example, create an Android prototype and place some Rectangle, Text, and Image elements on the screen.

- Place a dynamic panel on the Canvas, covering the entire screen. You can find it in the Dynamic Content section of the Toolbar or by hitting the D key.
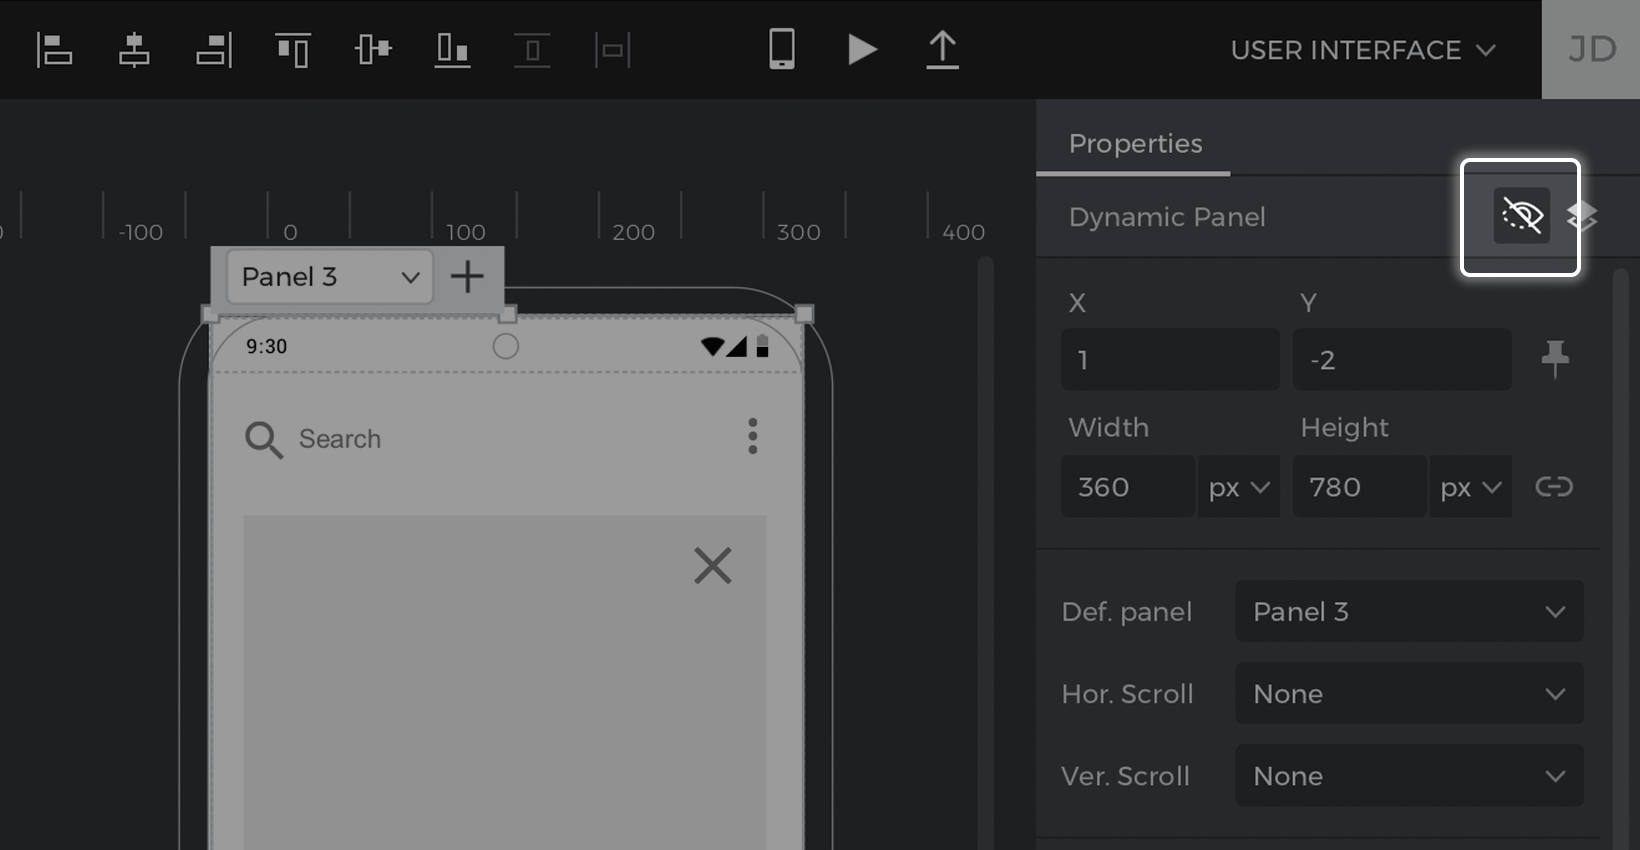
- Mark the dynamic panel as hidden during simulation by tapping the ‘eye’ button in the Properties palette.

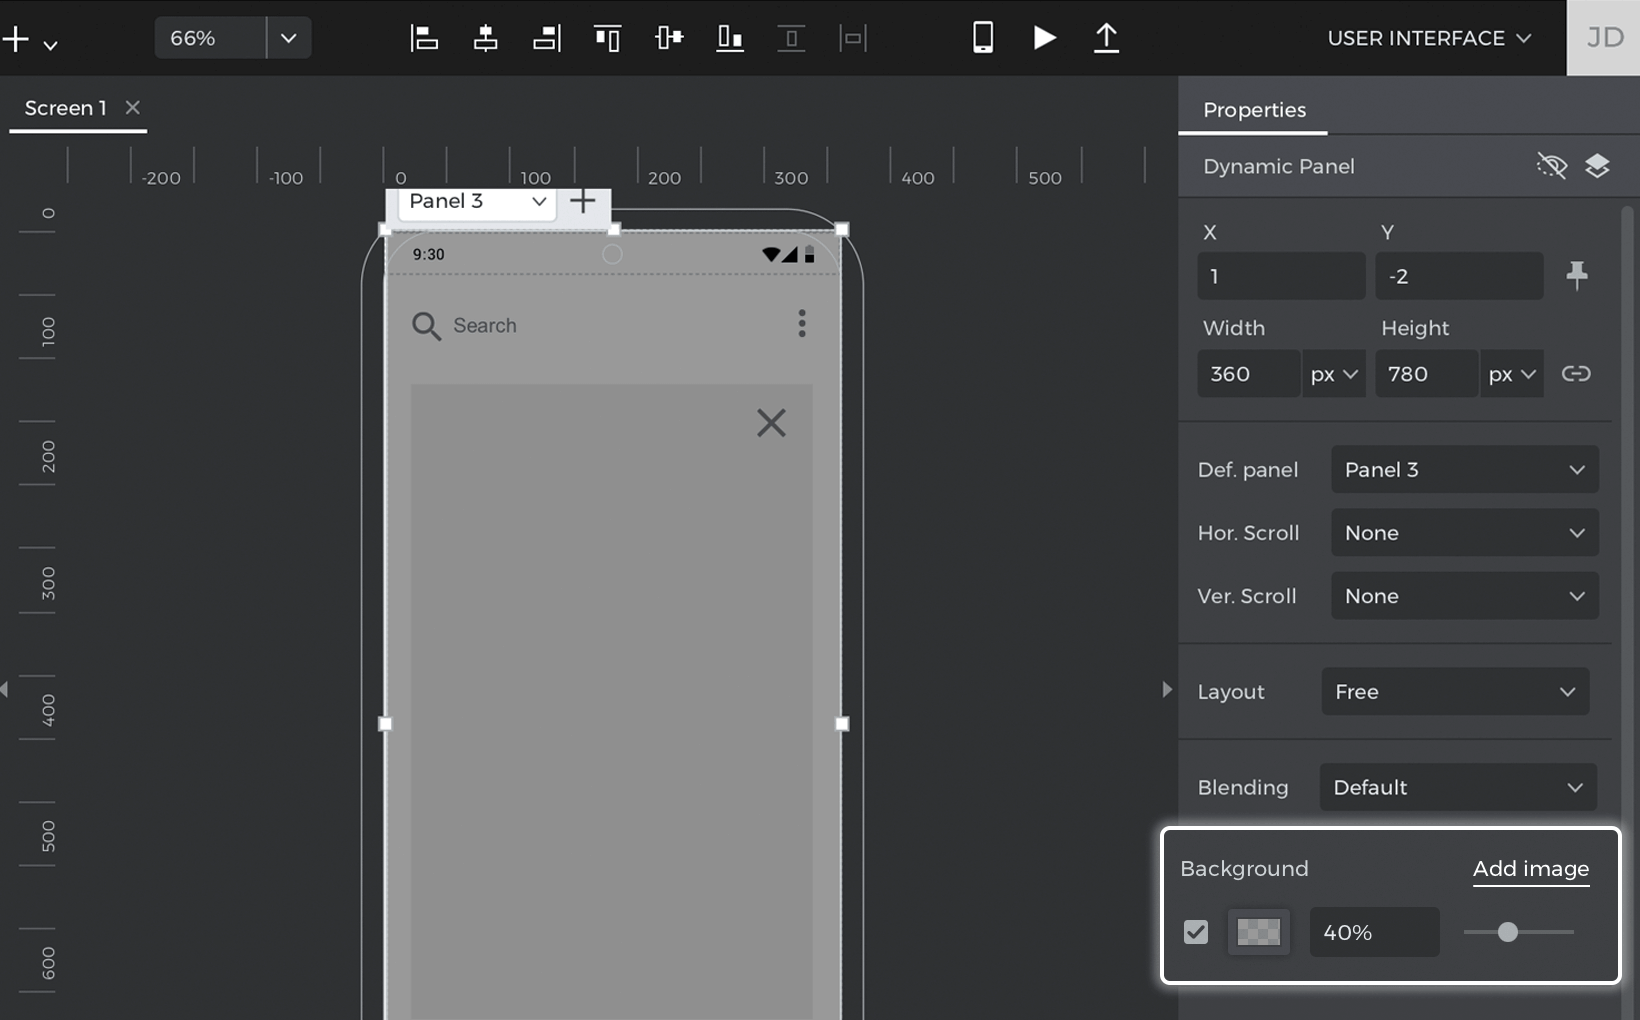
- Give the dynamic panel a black background with 40% opacity. This will be the modal window background.

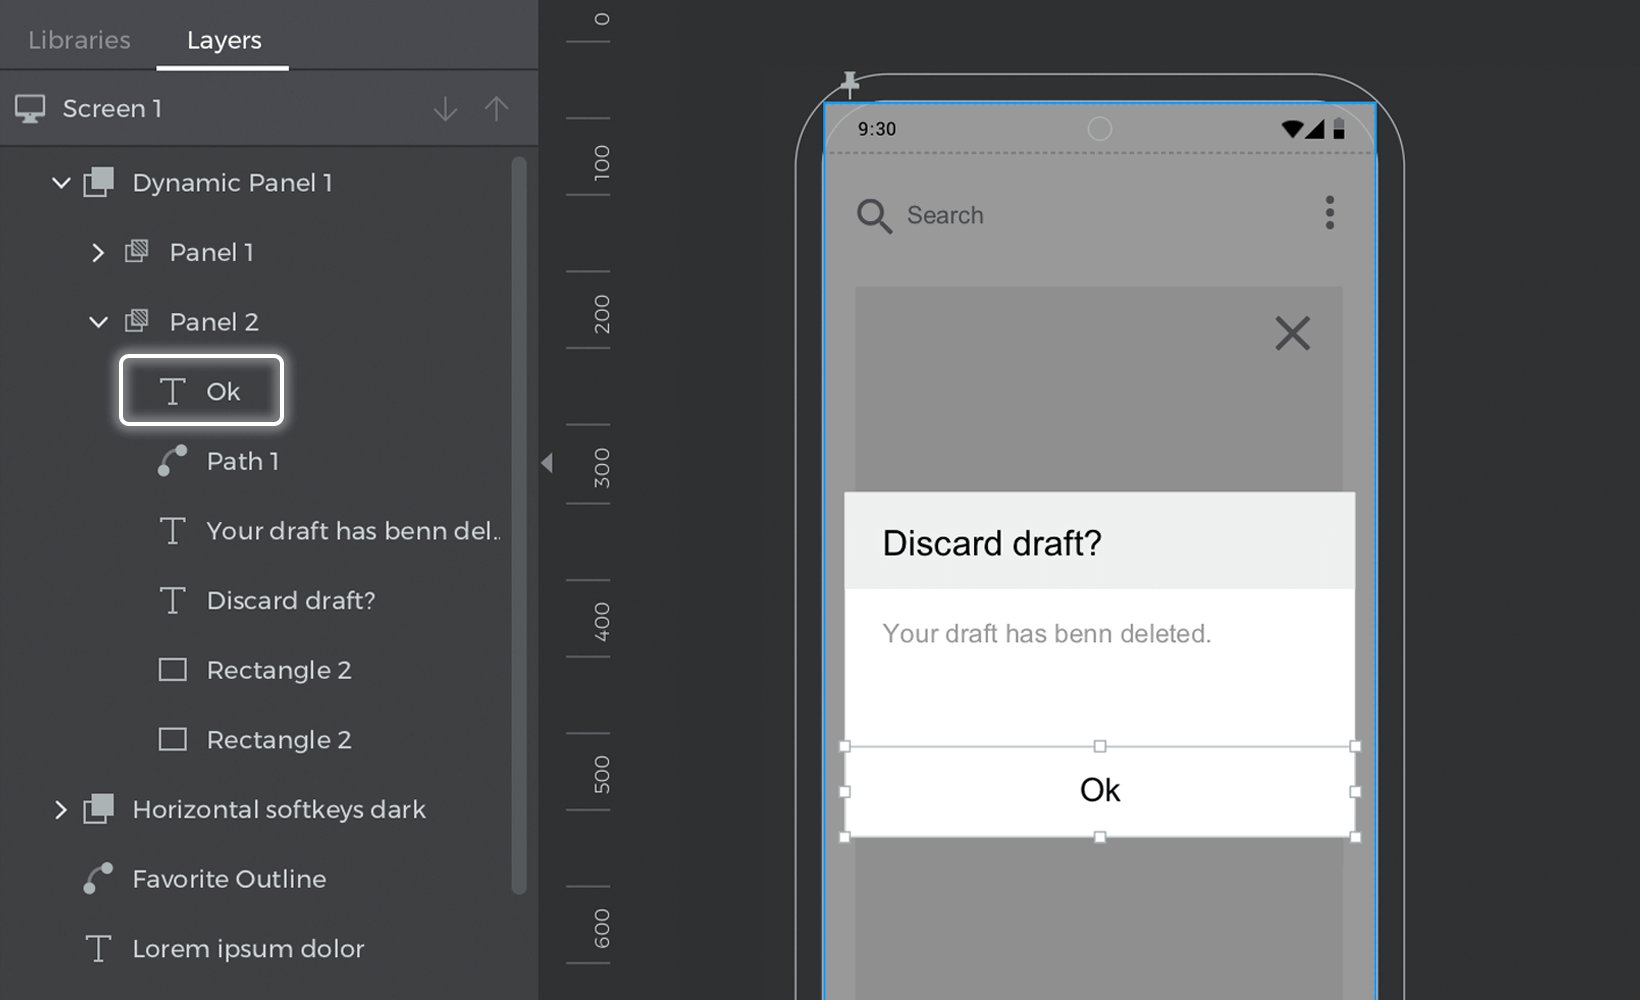
- Place Rectangle and Text elements inside the dynamic panel to create the dialog. You can place them in the panel by holding Command (Mac) or Control (Windows) and dragging the elements inside. To match the example, create “No” and “Yes” texts.


- Right-click on the dynamic panel and select ‘Duplicate Panel’. You should now have one dynamic panel with two sub-panels – Panel 1 and Panel 2.
- Customize the confirmation dialog in Panel 2. To match the example, only include one text element – “OK”


Create the events
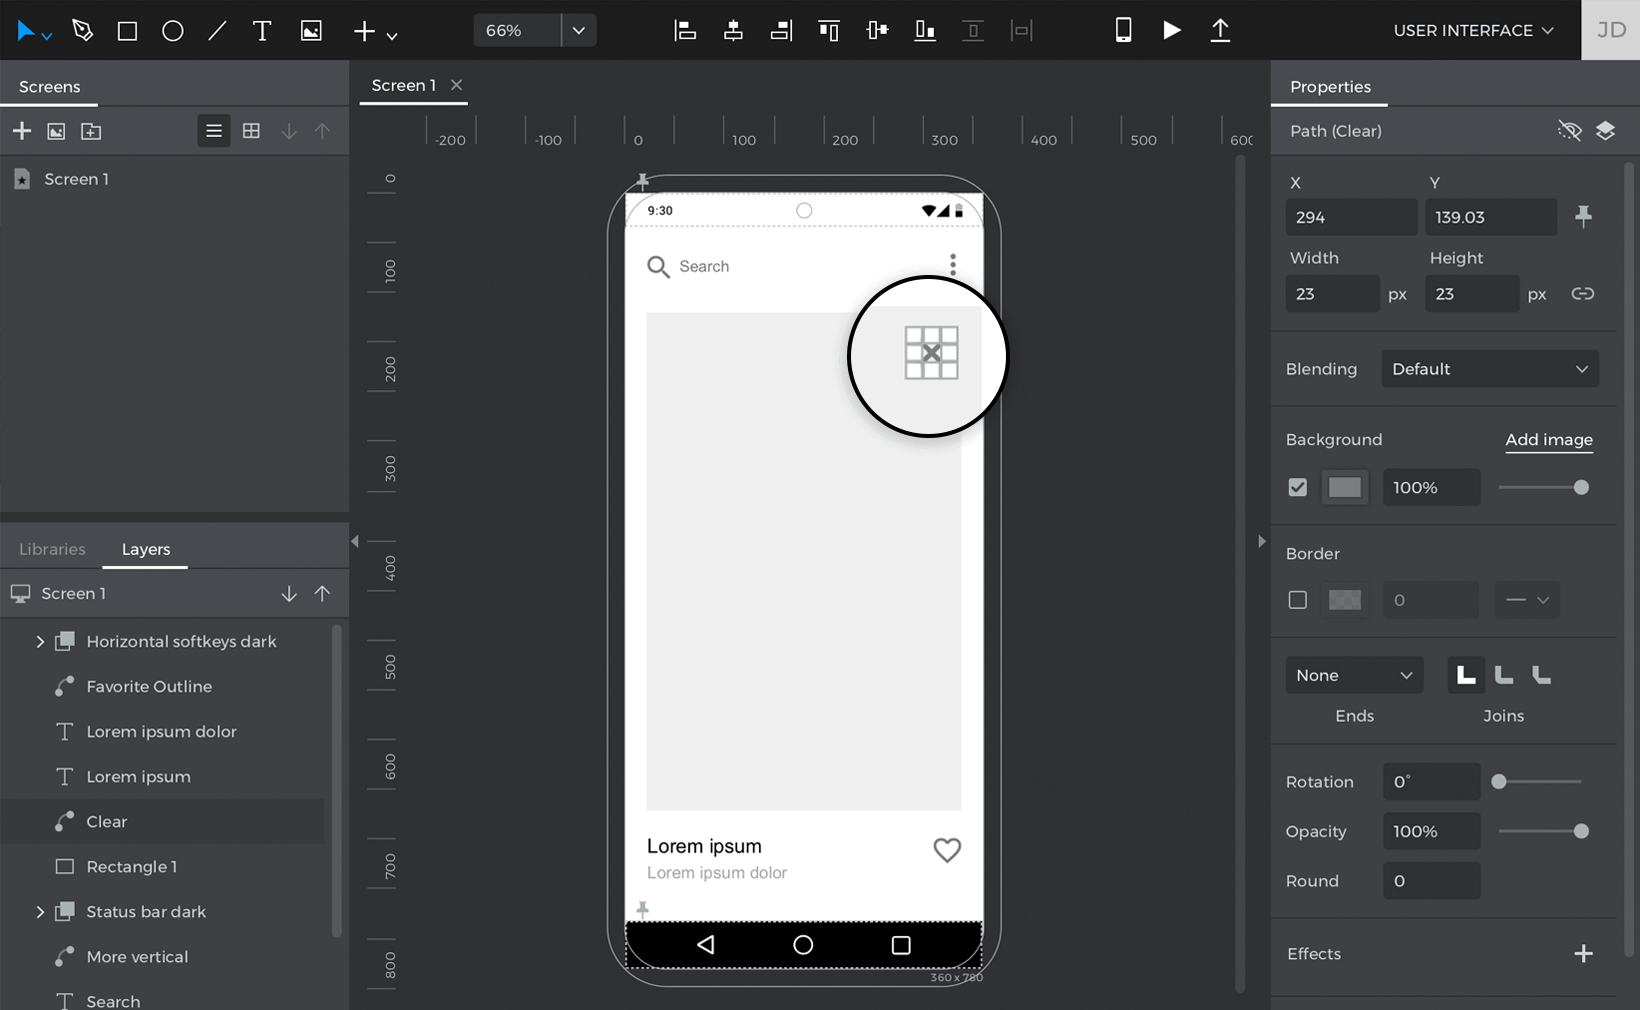
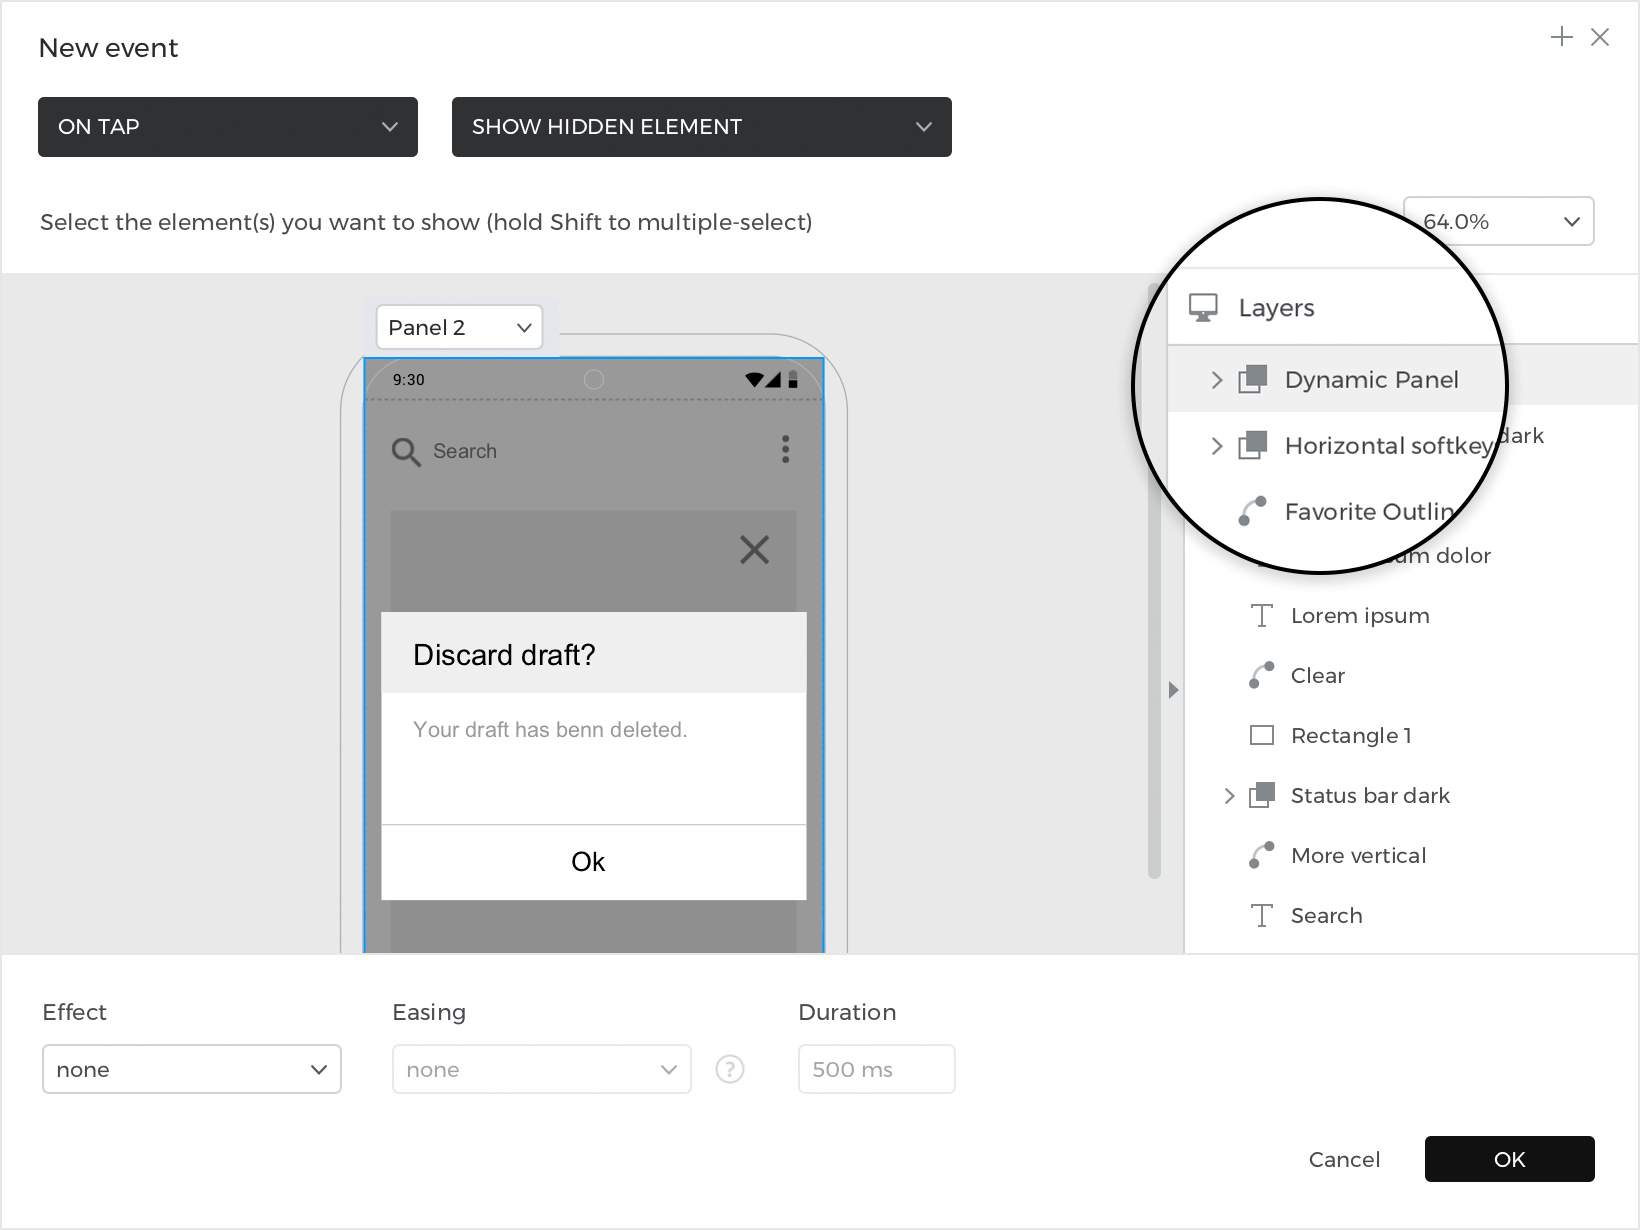
- Select an element that you’d like to show the confirmation dialog. To match the example, select an ‘X’ icon.Go to the Events palette and click ‘Add event’. Create an On Tap + Show Hidden Element event, selecting the dynamic panel in the Canvas preview to show. Add a fade effect and click ‘OK’ to finish building the event.


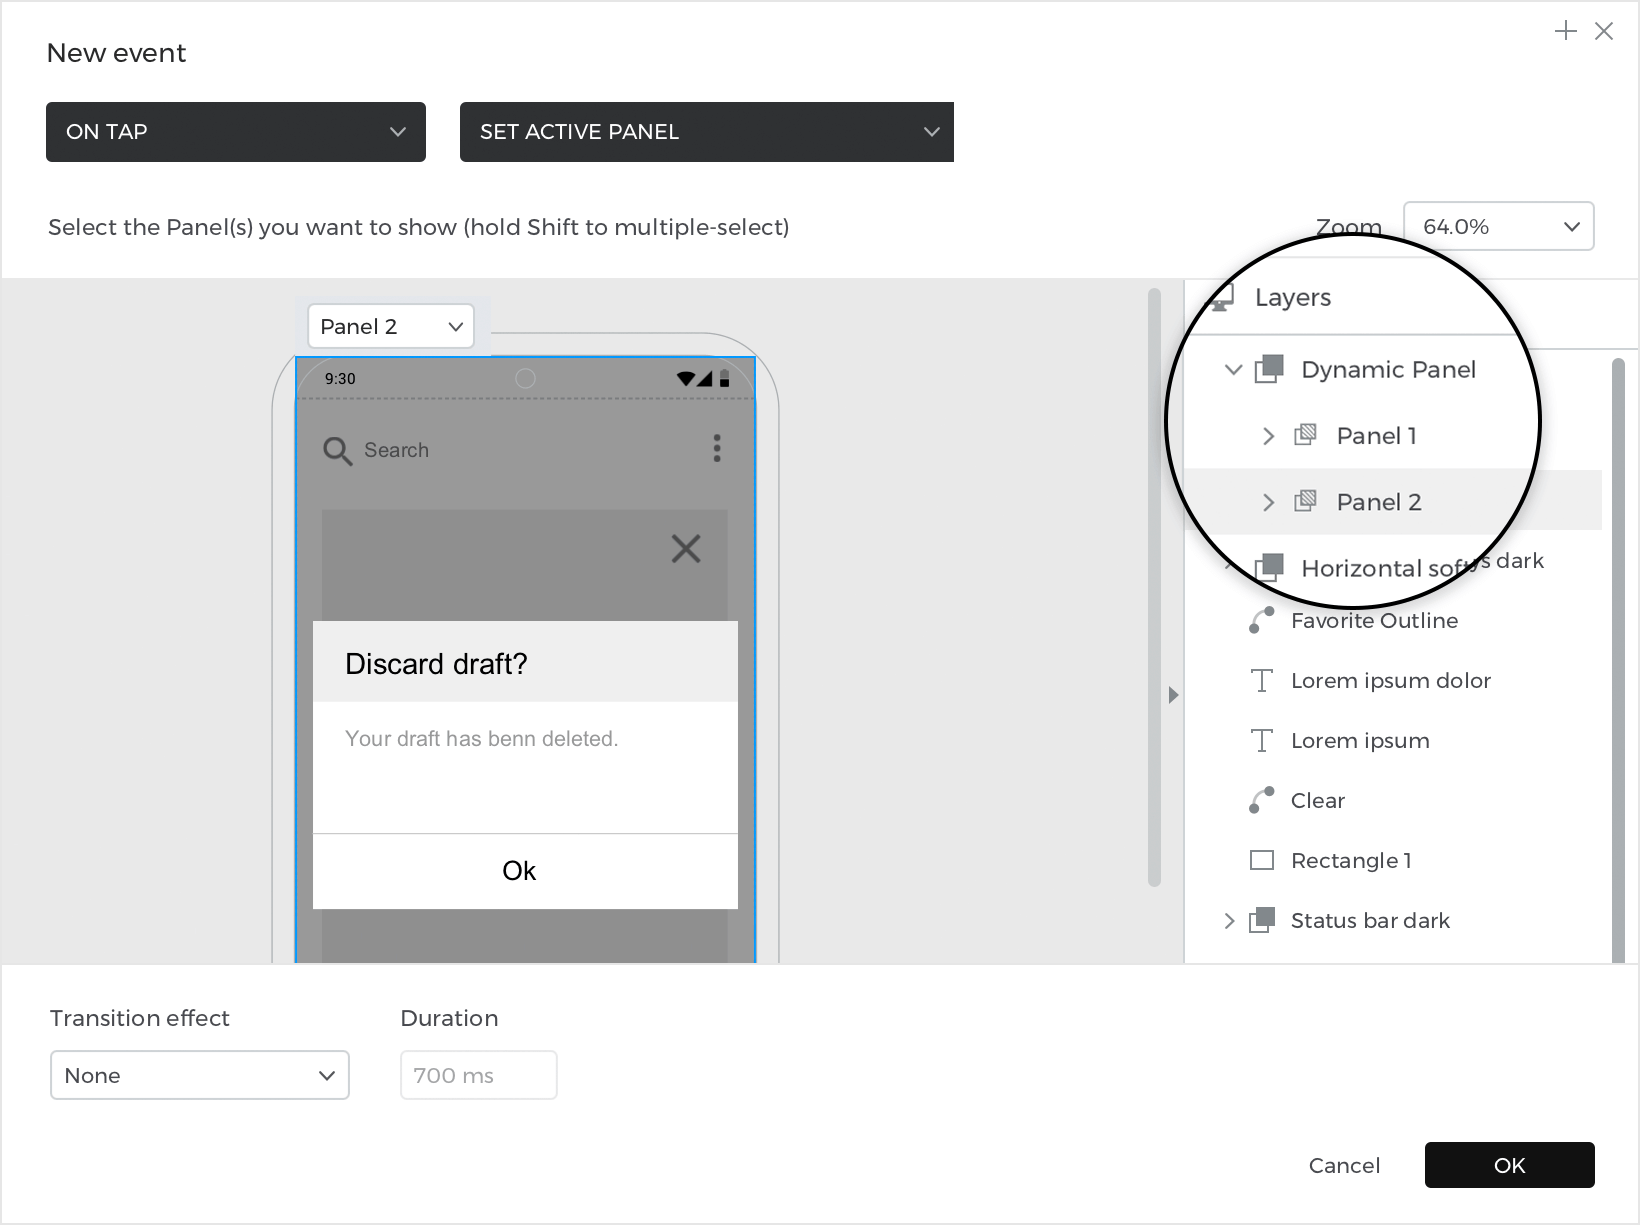
- Now you’ll need an event to switch between the two panels in the confirmation dialog. Select the “Yes” text in the dialog, create an On Tap + Set Active Panel event, and select Panel 2 to be set as active.

- Since you can also select “No” in the confirmation dialog, you need to create an event to hide the dynamic panel. Select the “No” text and create an On Tap + Hide event, selecting the dynamic panel to be hidden with a fade effect.
- Switch over to Panel 2. Select the “OK” text and create an On Tap + Hide event, selecting the dynamic panel to be hidden with a fade effect.

Click the ‘Play’ button to simulate your prototype. Click on the ‘X’ icon and you’ll see the confirmation dialog appear. Click the “No” text to hide the dialog, or the “Yes” text to switch to the next panel. Then, click the “OK” text to hide the dialog.
Drag and drop items
In addition to working as mini-Canvases, dynamic panels also have special properties as a container. This means you can insert elements into them while simulating. You can use this functionality to drag and drop elements between two dynamic panels.
Design the example
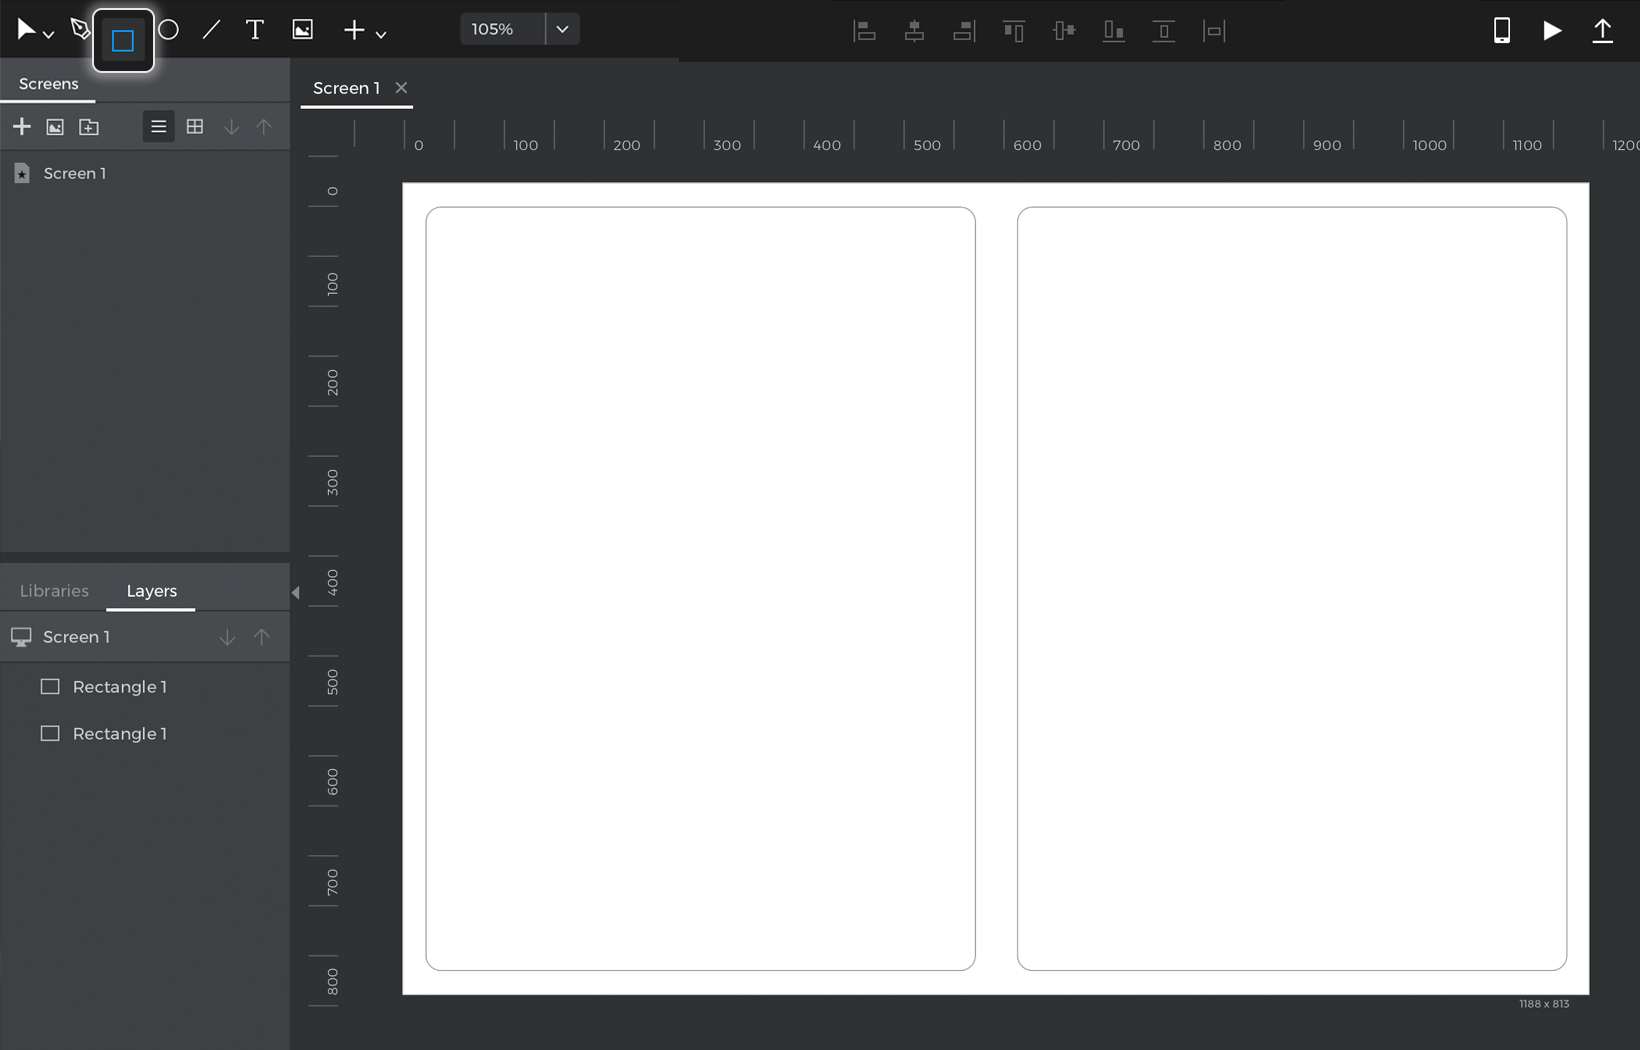
- Add two Rectangles to the Canvas and resize them until they’re both the height of the Canvas and about half of its width. These rectangles will serve as the background.

- Place a Dynamic Panel on the Canvas. Look to the Properties palette and select ‘Vertical’ from the ‘Layout’ dropdown. This will give the panel a vertical layout, which means that the elements you place into it will stack above and below each other.
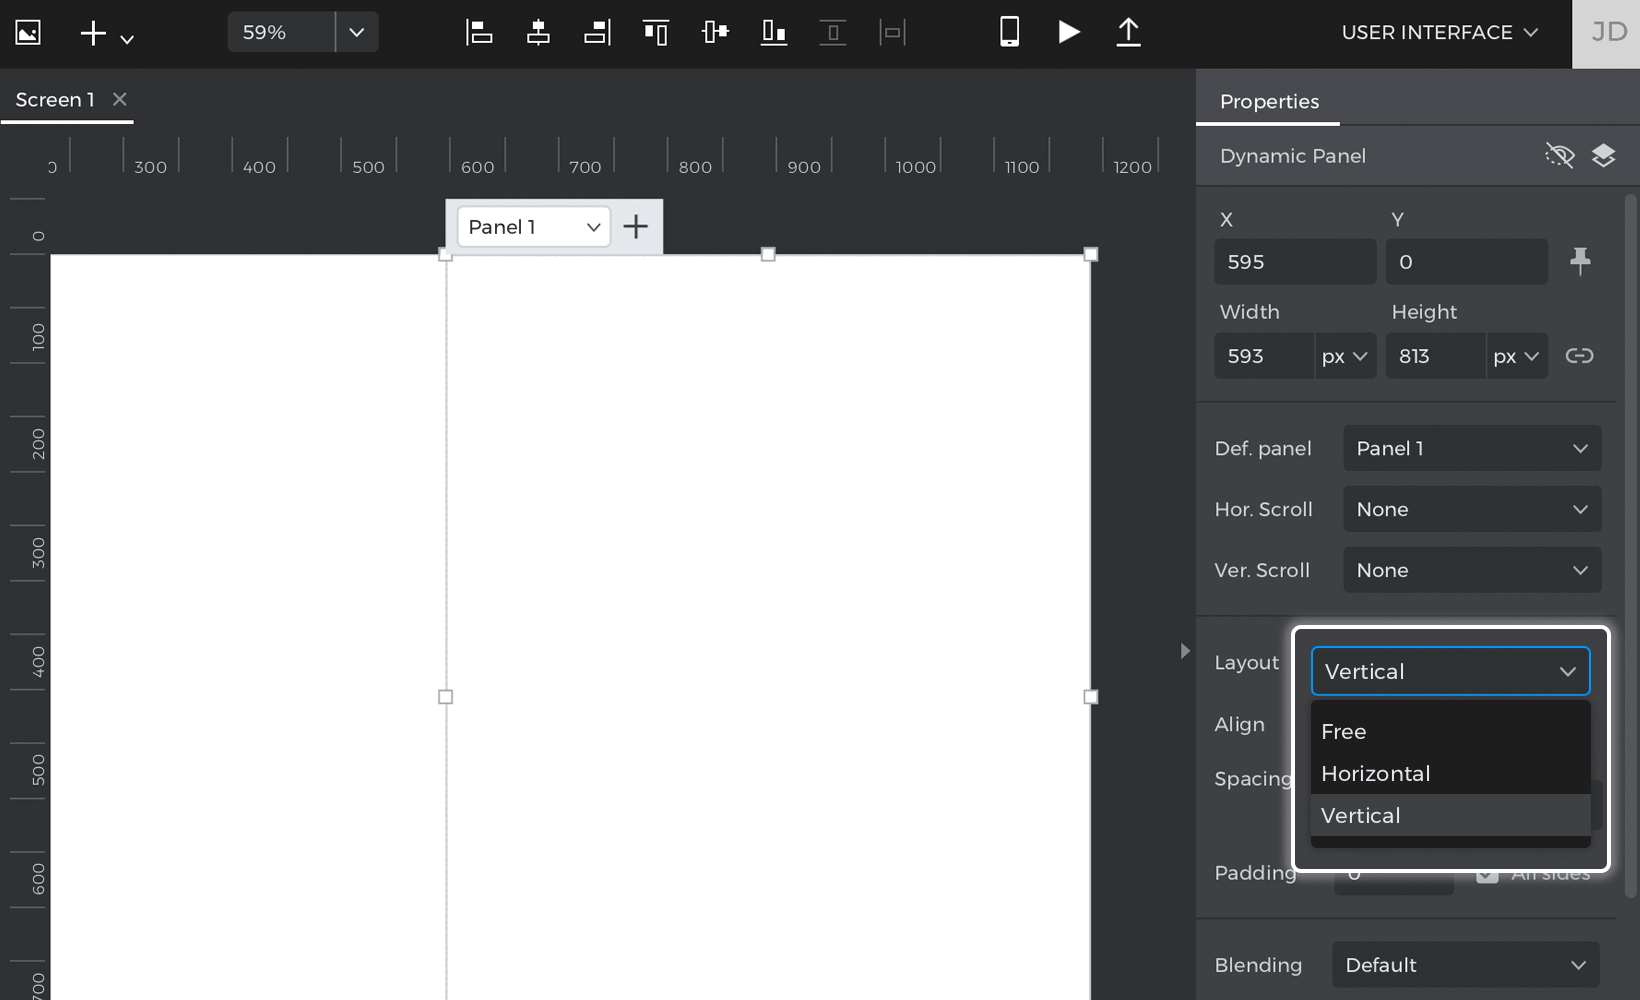

- Still in the Properties palette, change the dynamic panel’s alignment to centered and add some vertical spacing.
- Duplicate the dynamic panel so you have two different dynamic panels on the Canvas. Place one panel on the left of the screen and one on the right. Resize each of them until they both take up the entire height of the Canvas and half of its width.
- Drag a few images or icons into the dynamic panel on the left. You’ll notice them fall into place stacked above and below each other.


Create the events
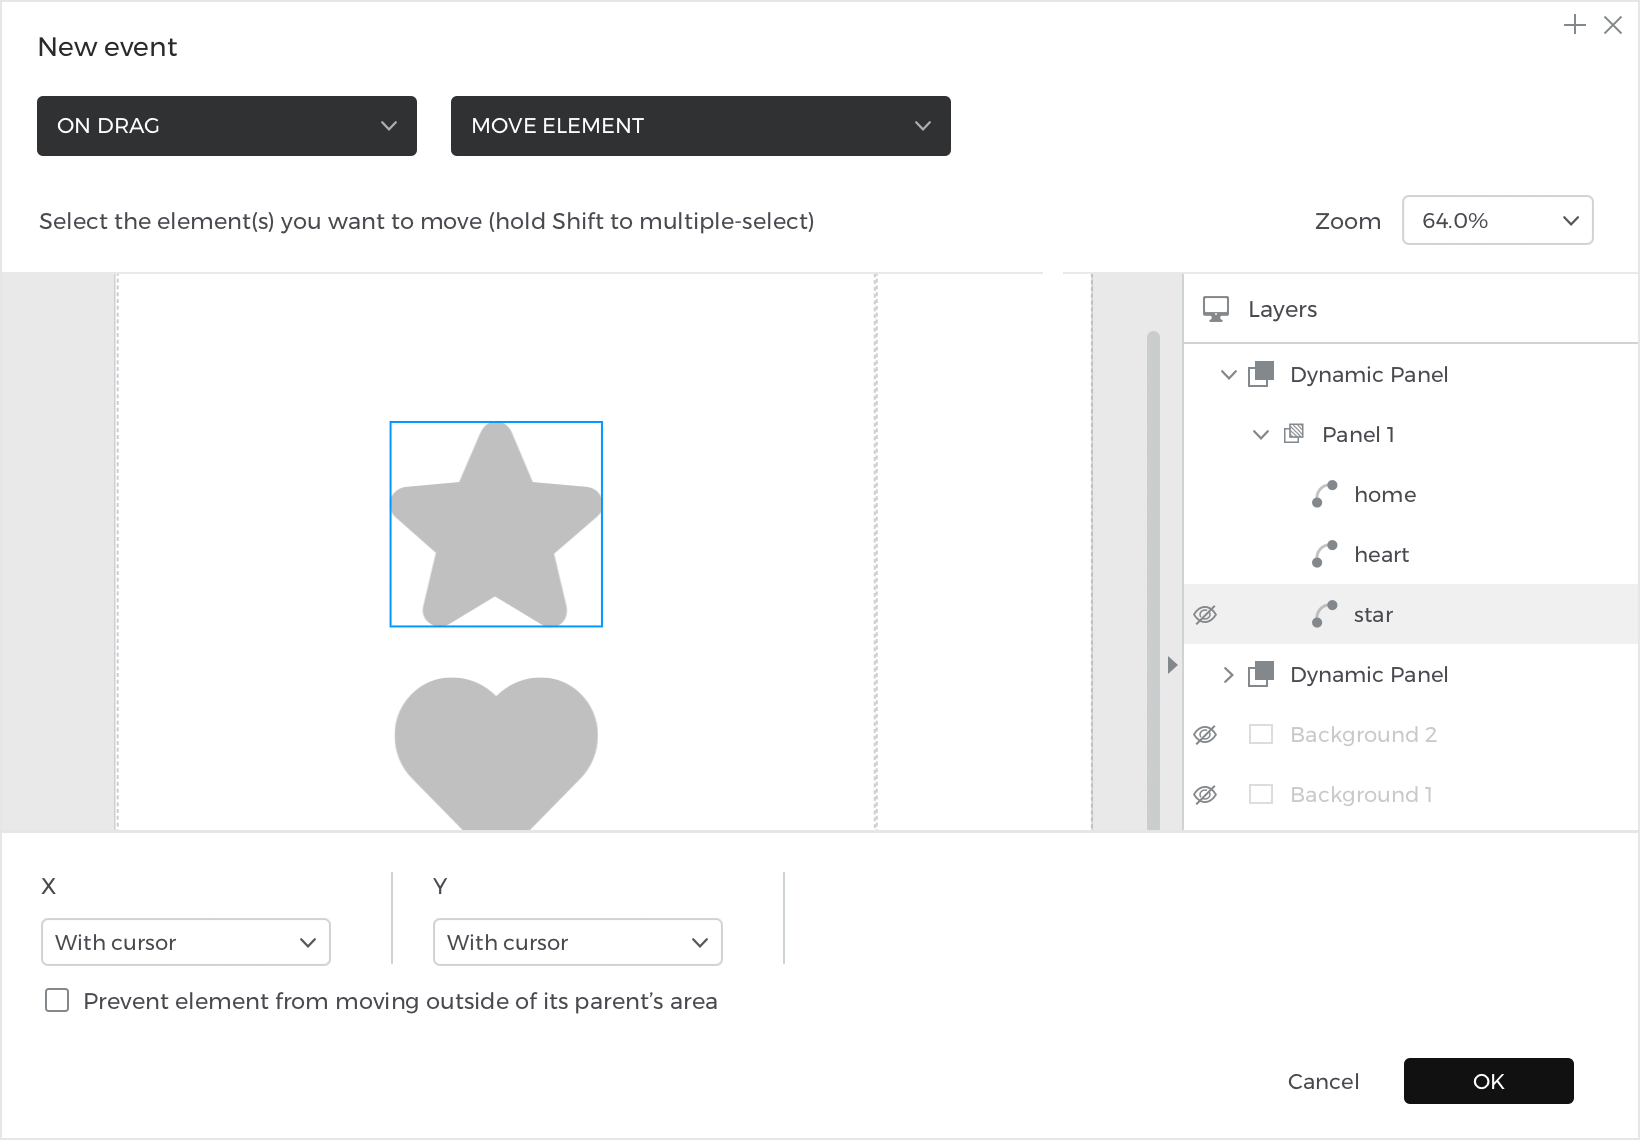
- Active the direct selection tool A to select one of the images in the dynamic panel on the left. Create an On Drag + Move event, selecting that image as the target to move.For the movement, select ‘With cursor’ for both the X (horizontal) and Y (vertical) positions. Now, this image will move with your mouse when you drag it during simulation.

Click ‘OK’ to finish building this event. - Click the ‘+’ button at the top of the Events dialog to create another interaction for the image. Follow these steps to build the interaction:
- a. Choose an On Drag Stop trigger.
- b. You’ll see a new field appear where you can choose the drop target. This works as a mini-condition that will trigger the resulting action when you stop dragging over this target.Click the ‘gear’ button to open a Canvas preview where you can select the drop target. Select the dynamic panel on the right.
- c. You can now select an Insert element into container action. You’ll see two Canvas previews appear. In the top preview, select the image.In the bottom preview, select Panel 1 from the dynamic panel on the right. Click ‘OK’ to finish building the event.
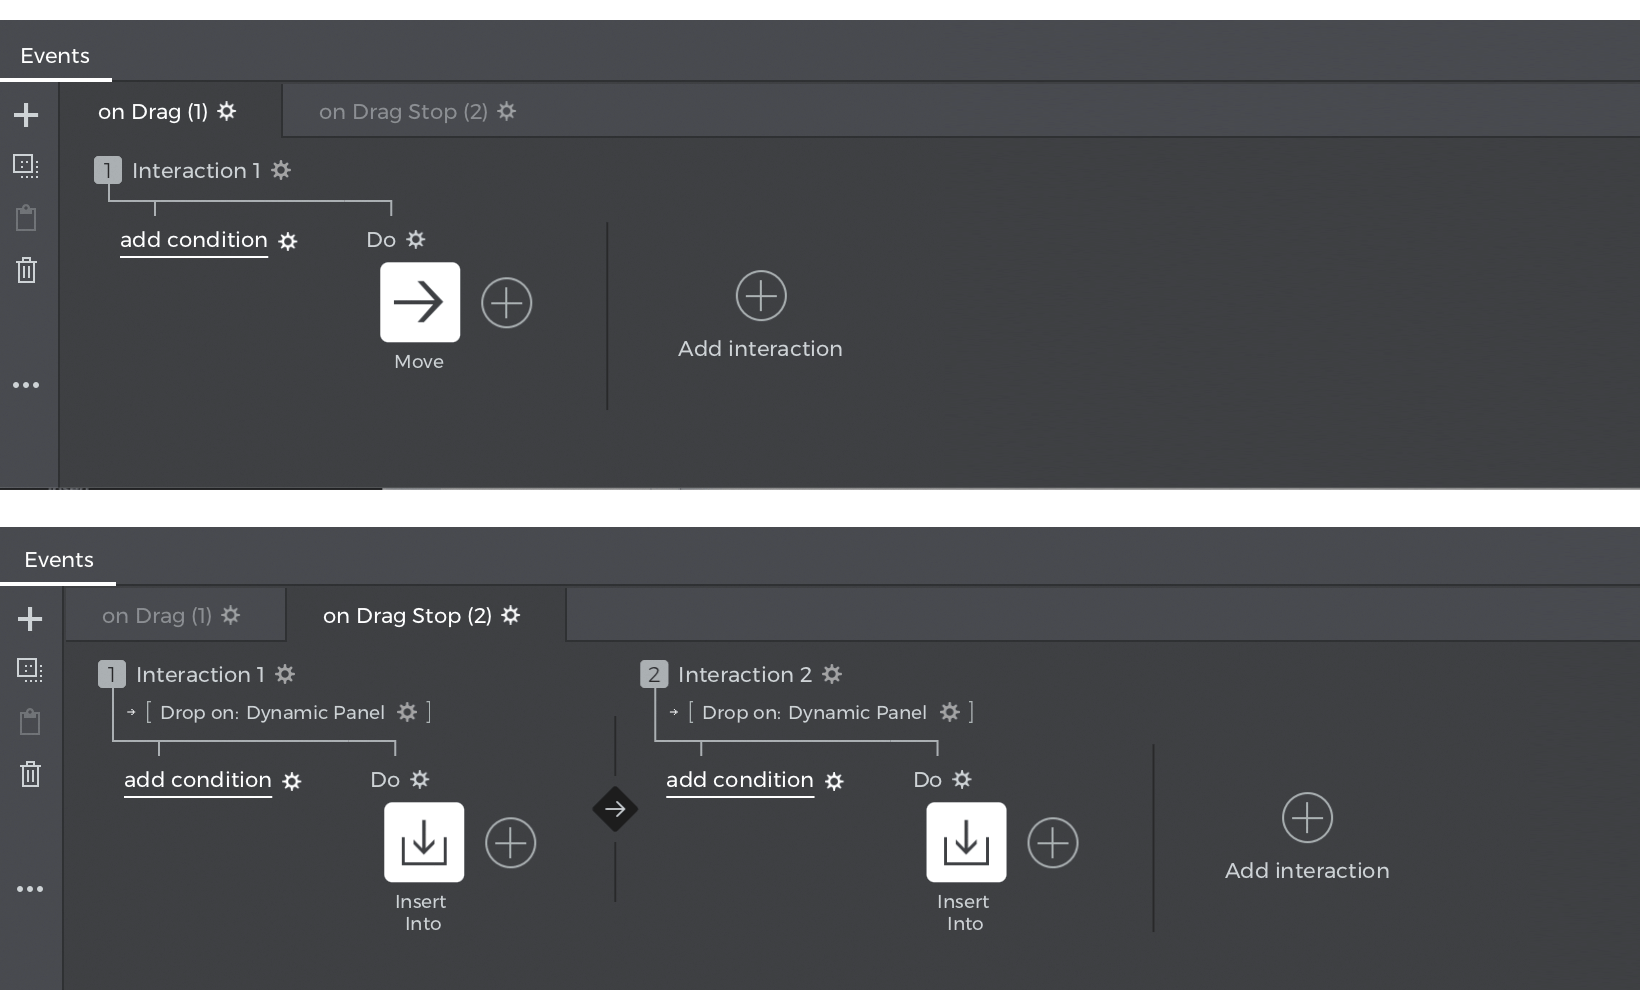
- Click the ‘+’ button again to create another interaction. Create another On Drag Stop + Insert element into container event. This time, select the dynamic panel on the left as the drag stop target as well as the container to insert the image into.


You should now have three different interactions in your events palette. - Now, you can copy those events over to the other images in the dynamic panel. Click on the ‘copy’ button in the Events palette. Select another image in the dynamic panel and click the ‘paste’ button in the Events palette. Repeat this until you’ve pasted the events on all of the images.


Click the ‘Play’ button to simulate your prototype. Drag images between the panels and you’ll see them placed into the panel while the remaining images in each panel will automatically move to be centered.
Mask images
You can use dynamic panels to mask images in your prototypes. Here’s how:
- Select an image on the Canvas.
- Right-click on it, go to Group, and then select ‘Group in Dynamic Panel’.

- You’ll see that the image is now within a dynamic panel, and you can use the indicators to resize the panel around the image. You can also move the image around inside the panel.