Creating specifications document templates
With Justinmind, you can easily generate specification documents, which serve as functional specification components of your prototypes.
These specification documents are generated in .docx format and provide a formal print deliverable of your prototype that you can then distribute to stakeholders or colleagues.
You can also create your own specification document templates of your Justinmind prototypes in Microsoft Word. Note that only Windows computers will be able to create the framework needed to create a custom document.
Documentation templates can be built using Microsoft Word (version 2007 onward).
Configuring Microsoft Word
To create a specifications document template, you’ll need to open an existing specifications document from an existing Justinmind project and convert it into a template.
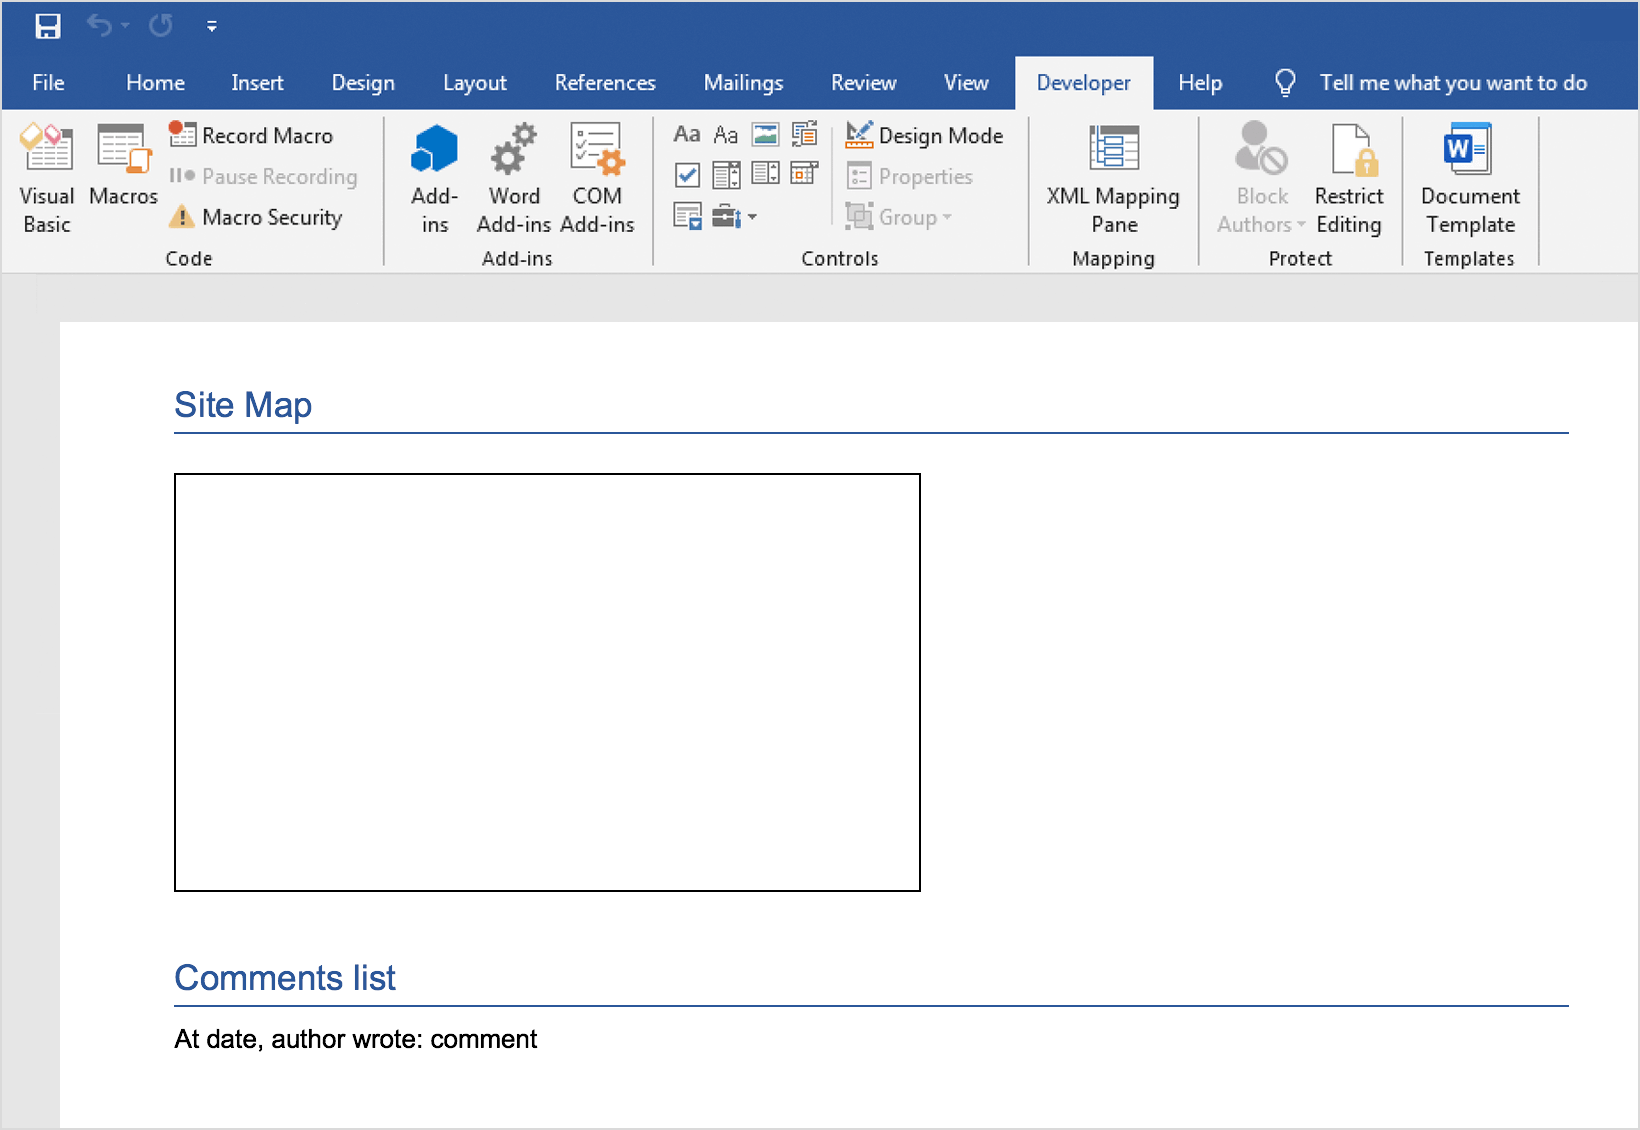
To get started, go to the “Developer” tab in Microsoft Word:
If this tab is hidden, you can retrieve it by going to File>Options>Customize Ribbon and moving the “Developer” tab from left to right.
XML tags for specifications document templates
To create a specifications document template, you’ll need to maintain a hierarchy of XML tags in order to retrieve the correct data from your prototype.
A list of tags in a Justinmind-created XML file will help you define your document template. To access this file, navigate to where Justinmind was installed on your computer, go to the “templates” folder and open the “hierarchy.xml” file.
The parent node is “PrototyperInfo”.
The child nodes are:
- Logo: the prototype’s logo
- ProjectName: the prototype’s name
- CreationDate: the date the prototype was generated
- NavigationMap: the prototype’s sitemap
Each of these categories contains at least one item. Inserting one of these tags, will trigger a recursive loop, printing all included items.
- Screens: all the screens from the prototype
- Templates: all the templates from the prototype
- Scenarios: all the scenarios from the prototype
- DataMasters: all the data masters from the prototype
- Comments: all the comments from the prototype
- Requirements: all the requirements from the prototype
Screen/Template items
Screens
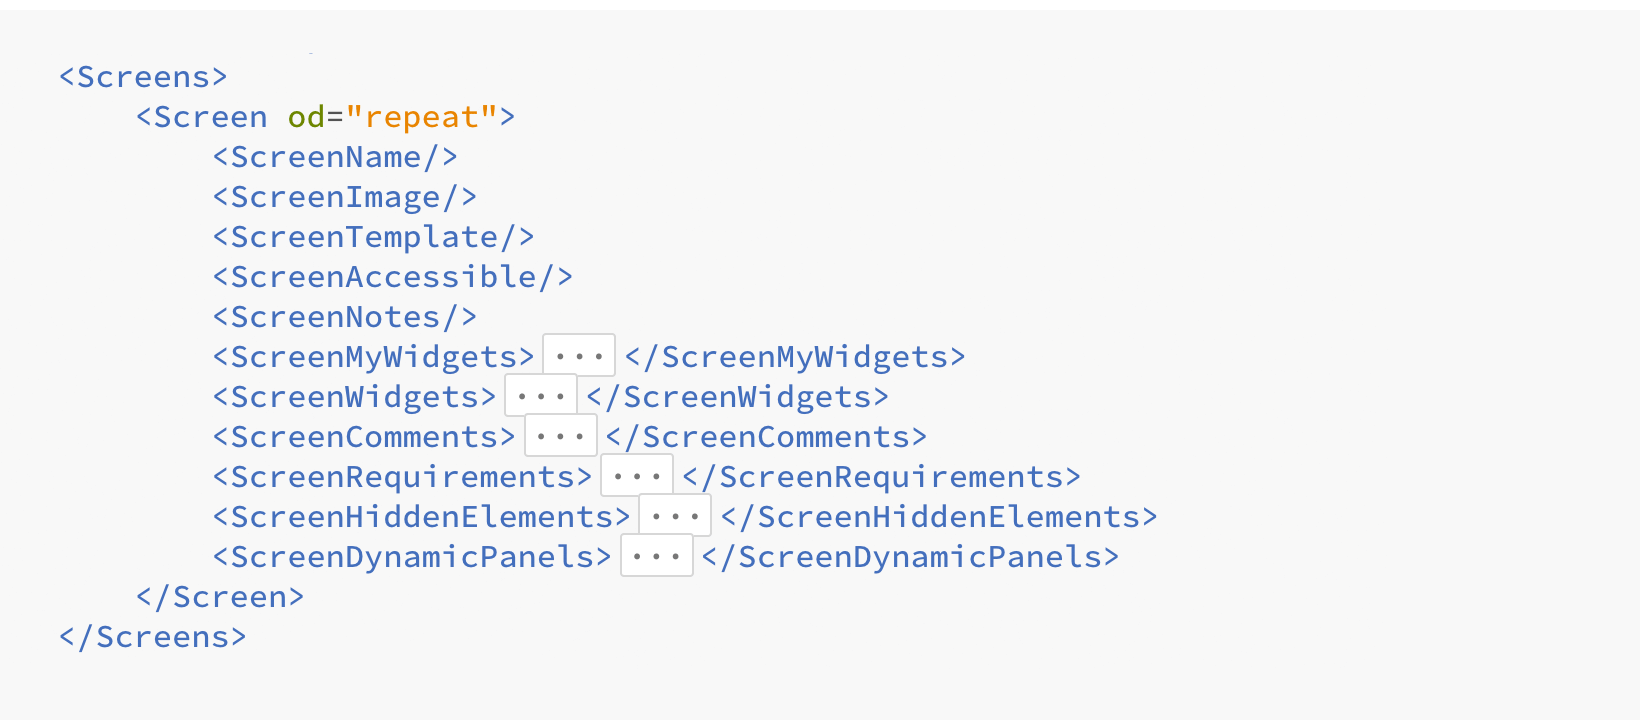
- Screen: a description of a prototype’s screen, which will be repeated for every screen in the prototype. The repeat attribute allows for the repetition of content.
- ScreenName: inserts the screen’s name.
- ScreenImage: inserts an image of the screen.
- ScreenTemplate: replaces the selected text with the name of the screen’s template.
- ScreenAccessible: substitutes the selected text in relation to whether or not the current screen is linked to the home screen.
- ScreenNotes: substitutes the selected text with the screen’s description.
- ScreenMyWidgets: inserts the screen’s UI elements (widgets on the canvas that don’t form part of the Basic Widget Library).
- ScreenWidgets: returns a description of UI elements that contain events.
- ScreenComments: inserts the screen’s comments.
- ScreenRequirements: inserts the screen’s requirements.
- ScreenHiddenElements: inserts the screen’s hidden elements.
- ScreenDynamicPanels: inserts the screen’s dynamic panels’ additional panels.
- ScreenMenus: inserts the screen’s Menu UI elements.
- ScreenTrees: inserts the screen’s Tree UI elements.
ScreenMyWidgets

- hasScreenMyWidgets: determines whether there are MyWidgets in the screen. Find more on “Has” tags here.
- ScreenMyWidget: places MyWidgets elements information in the screen. The repeat attribute allows for the repetition of content.
- ScreenMyWidgetName | ScreenMyWidgetRelatedTo | ScreenMyWidgetMarkerID: returns the MyWidget name, image and number related to the screen markers (if present).
ScreenWidgets

- hasScreenWidgets: determines whether there are elements that contain events in the screen. Find more on “Has” tags here.
- ScreenWidget: inserts the elements that contain events in the screen. The repeat attribute allows for the repetition of content.
- ScreenWidgetScreenshot: inserts an image corresponding to the element which holds an event.
- ScreenWidgetMarkerID: returns the number the associated element has in the screen when markers are active.
- ScreenWidgetEvent: repeats all the events associated with this element.
- ScreenWidgetEventType: returns the name of the event (e.g. On Click, On Page Load etc.).
- ScreenWidgetInteraction: repeats all the interactions within a given event.
- ScreenWidgetInteractionName: returns the name of the interaction.
- ScreenWidgetConditionBlock: returns all interactions within a given event.
- ScreenWidgetConditionClause: returns an “if”, “else if” or “else” indicating the execution order in the interaction, as seen in the Condition builder in the Events palette. ScreenWidgetConditionDescription: describes the condition.
- ScreenWidgetAction: a description of an action and images. The repeat attribute allows for the repetition of content.
- ScreenWidgetDescription: describes this action.
- ScreenWidgetActionTarget: a description of target element images. The repeat attribute allows for the repetition of content.
- ScreenWidgetActionTargetImage: returns an image of each target element for this action.
ScreenComments

- hasScreenComments: determines whether there are comments in a given screen. Find more on “Has” tags here.
- ScreenComment: returns the comments node. The repeat attribute allows for the repetition of content.
- ScreenCommentAuthor | ScreenCommentDate | ScreenCommentContent: returns the author, date and comment content for each comment.
- ScreenCommentRelatedTo: returns an image of the element that contains the comment.
- ScreenCommentMarkerID: returns the number this comment has in the screen when markers are active.
ScreenRequirements

- hasScreenRequirements: determines whether there are requirements in given a screen. Find more on “Has” tags here.
- ScreenRequirement: a general description of the requirement. The repeat attribute allows for the repetition of content.
- ScreenRequirementCode: returns the requirement’s code.
- ScreenRequirementCreationDate: returns the creation date.
- ScreenRequirementAuthor: returns the requirement’s author.
- ScreenRequirementCurrentVersion: states the currently active version number.
- ScreenRequirementRelation: returns an image of the element that is associated to a requirement. The repeat attribute allows for the repetition of content.
- ScreenRequirementRelatedTo: prints an image of each element associated to a requirement, such as screens, templates, scenarios or components.
- ScreenRequirementMarkerID: returns the number the associated element has in the screen when markers are active.
- ActiveVersion | Author | Date | Type | Name | Source | Description | Comment | FitCriteria | Test | Justification: describes the current version.
- ScreenRequirementVersion | Name | Author | CreationDate | Type | Name | Source | Description | Comment | FitCriteria | Test | Justification: returns a general description, which repeats itself for every requirement version.
ScreenHiddenElements
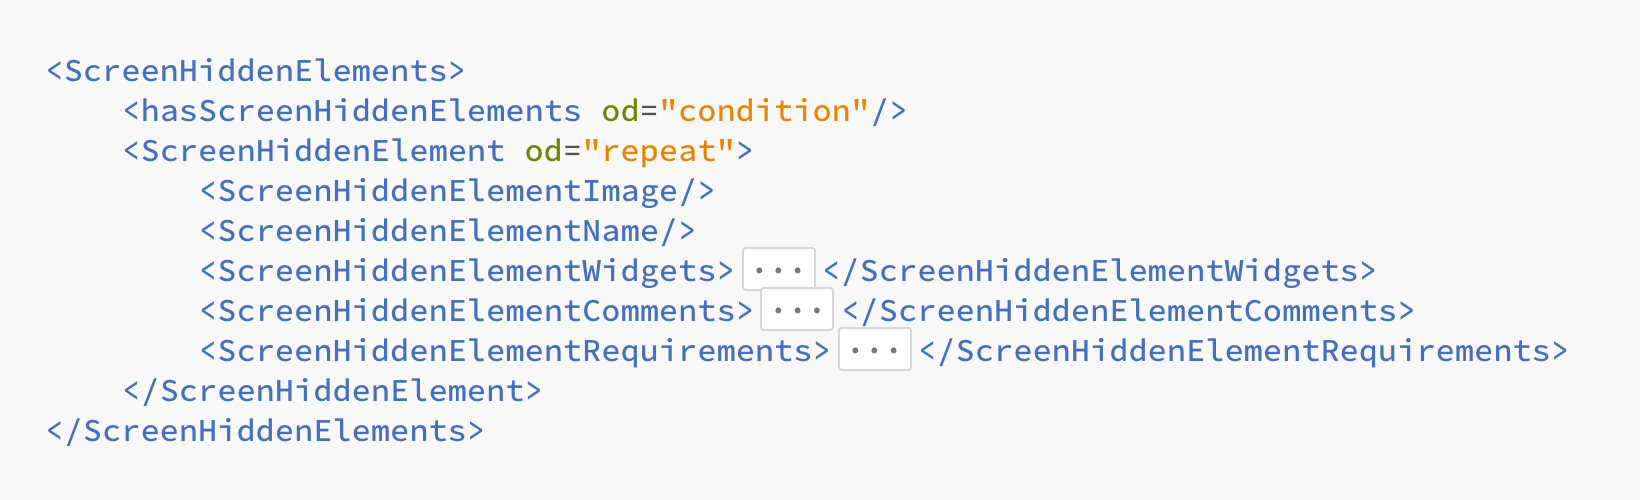
- hasScreenHiddenElements: determines whether there are hidden elements in given a screen. Find more on “Has” tags here.
- ScreenHiddenElement: The repeat attribute allows for the repetition of content below.
- ScreenHiddenElementImage: returns an image of the hidden element.
- ScreenHiddenElementName: returns the element’s name.
- ScreenHiddenElementWidgets: returns the element’s events.
- ScreenHiddenElementComments: returns the element’s comments.
- ScreenHiddenElementRequirements: returns the element’s requirements.
ScreenDynamicPanels

- hasScreenDynamicPanels: determines whether there are any dynamic panels in a given screen. Find more on “Has” tags here.
- ScreenDynamicPanel: a general description of the screen’s dynamic panel(s). The repeat attribute allows for the repetition of content.
- ScreenDynamicPanelImage: returns an image of the dynamic panel.
- ScreenDynamicPanelName: returns the name of the panel.
For all remaining Dynamic Panel items, see “ScreensDynamicPanel” (link to in the “Screens” section above). Note that these items are for Dynamic Panels only.
Scenarios
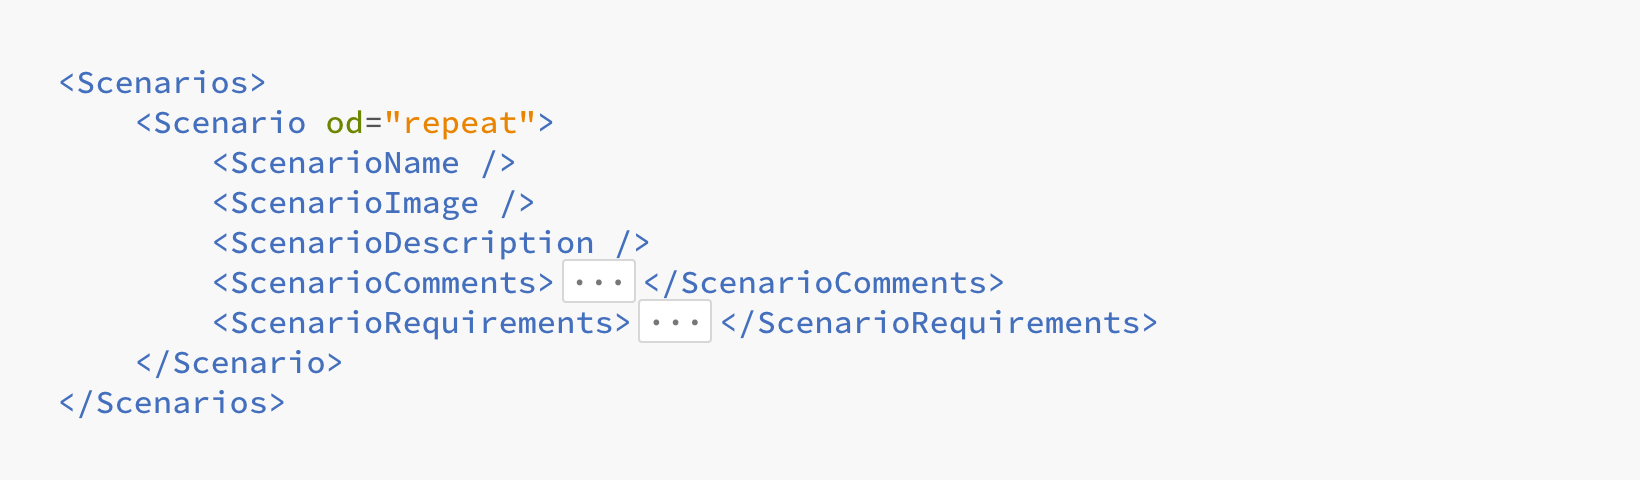
- Scenario: The repeat attribute allows for the repetition of the content below.
- ScenarioName: returns the scenario’s name.
- ScenarioImage: returns a screenshot of the scenario.
- ScenarioDescription: returns a description of the scenario.
- ScenarioComments: returns a list of the comments related to the scenario. For more information about the tags, go to the Comments section (link to “Comments” below) and refer to the xml hierarchy for the specific names.
- ScenarioRequirements: returns a list of the requirements related to the scenario. For more information about the tags, go to the Requirements section (link to “Requirements” below) and refer to the xml hierarchy for the specific names.
DataMasters
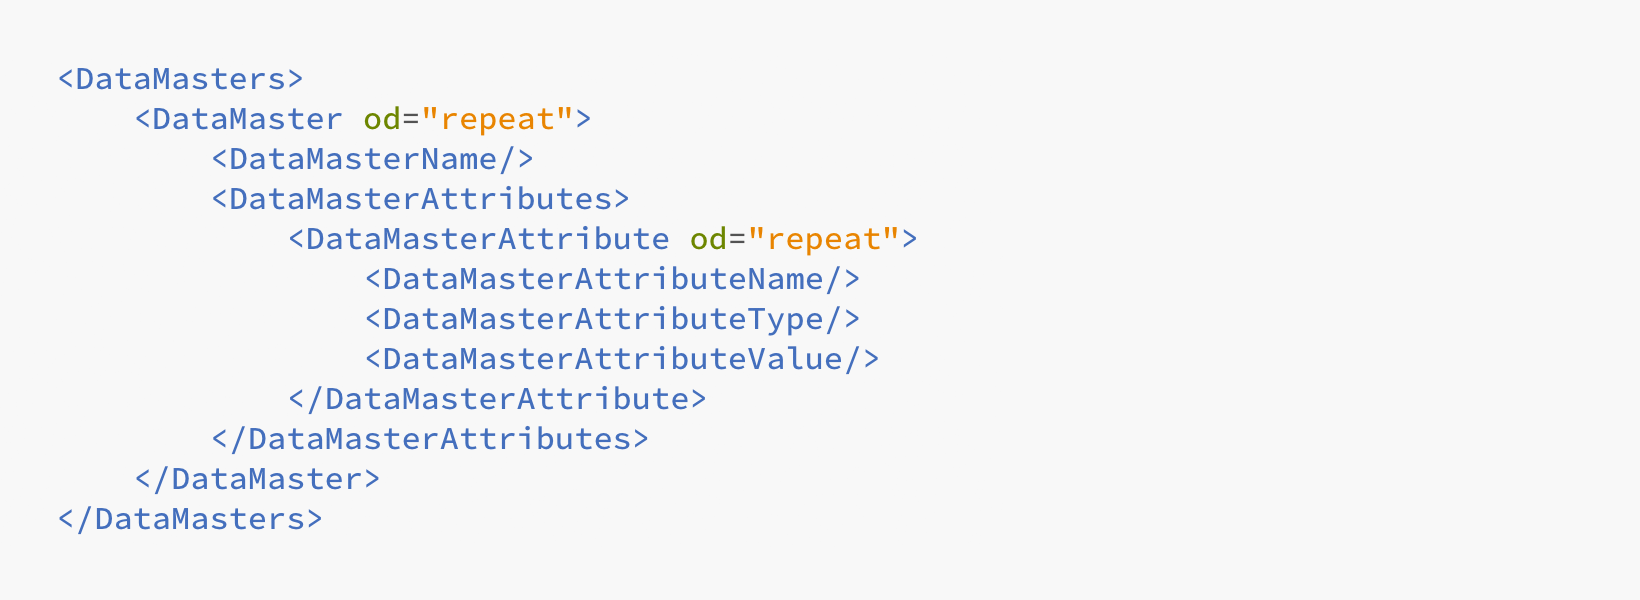
- Data Master: a description of a data master. The repeat attribute allows for the repetition of content.
- DataMasterName: inserts the data master’s name.
- DataMasterAttribute: returns the Data Master’s Fields.
- DataMasterAttributeName | DataMasterAttributeType | DataMasterAttributeValue: returns a general description of the Data Master Field names, types and values (if any).
Comments

- Comment: a general description of a prototype’s comment. The repeat attribute allows for the repetition of content.
- CommentAuthor | CommentDate | CommentContent: a general description of the comment’s author, creation date and content.
- CommentRelatedTo: returns an image of the element which has the comment.
Requirements

- Requirement: a general description of a prototype’s requirement. The repeat attribute allows for the repetition of content.
- RequirementCode: returns the requirement’s code.
- RequirementCreationDate: returns the creation date.
- RequirementAuthor: returns the requirement’s author.
- RequirementCurrentVersion: returns the currently active version number.
- RequirementRelatedTo: references the UI element, screen, template or scenario associated with the requirement.
- ActiveVersion | Author | Date | Type | Name | Source | Description | Comment | FitCriteria | Test | Justification: a general description of the requirement’s version, author, date, type, name, source, description, comments, FitCriteria, tests and justification.
- RequirementVersion: a general description of the requirement’s version. The repeat attribute allows for the repetition of content.
- Number | Author | Date | Type | Name | Source | Description | Comment | FitCriteria | Test | Justification: requirement descriptors for all the requirement versions.
Conditions in tags
Has tags
“Has” tags are Boolean (true/false) statements that will be determined depending on the content within your prototype’s screens. The value of “Has” tags will appear automatically when elements, events or prototype components appear in a prototype’s screen. For instance, if there are comments within a screen, the value of the “Has” tags will reflect this.
Other tags
Tags that start with “<Include” allow you to stop empty categories from being printed, without having to manually remove them in the generated document. The value of these tags is determined in the “Customized document” dialog, in Justinmind’s editor.
For instance, if you don’t want to include data masters in your prototype, you can exclude them from your document template using the “<Include” tags and de-select them in the “Customized document” dialog.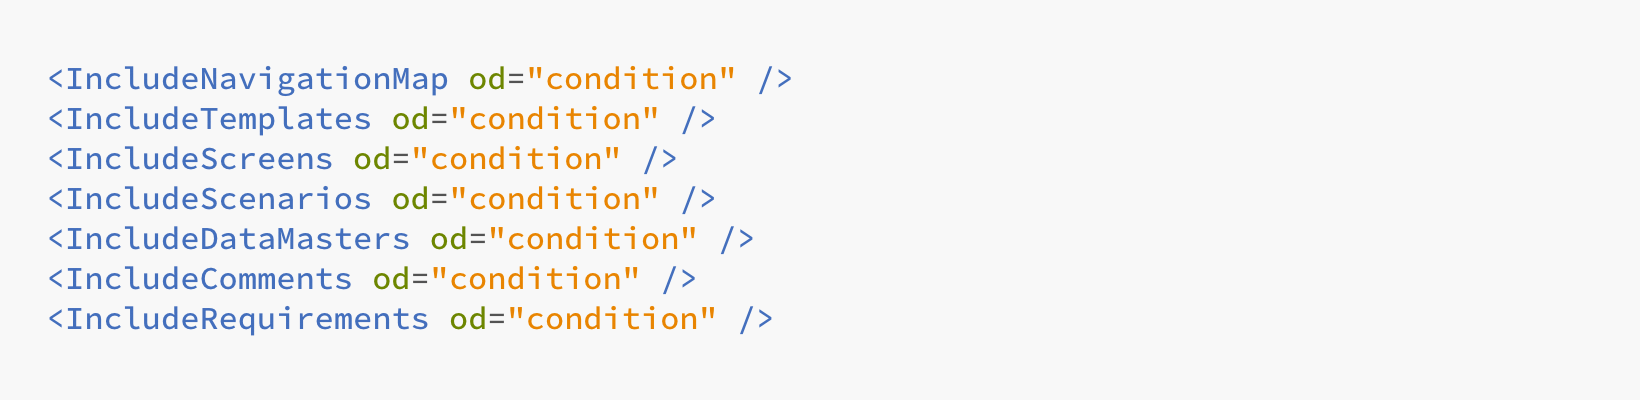
Creating your specifications document template
Open the specifications document you want to transform into a template or write your own from a blank document, using the above layout. Once you have your document, setting up as a template is easy. There are two elements you can retrieve from your prototype to use in your document template: text and images.
In Microsoft Word’s “Developer” tab, you will see a group called “Controls”. From the “Controls” group, you’ll be using the following items:
- Rich text: used to display formatted text
- Plain text: used to display plain text and text with line breaks
- Image: used to display images
To include one of these items in your document template:
Highlight the text or select the image you want to associate to your prototype’s data. Then, select one of the items listed above (rich text, plain text or image). A container should appear including all of your selected elements. In the upper left-hand corner of this container, you’ll find a mini tab. If you click on it, all of its contents will turn blue and the tab will appear to be selected.
You can replace the names of the control items with your tags in the “Properties” section of the “Controls” group. The following dialog will appear:
There are two main input fields within the dialog: “Title” and “Tag”. Replace each of these with one of your tags in order to establish a link between your prototype’s data and the elements in your document.
To remove the control from the document, select the element inside the control and right click it. Select “Remove Content Control”.
Examples of template creation
Here are three template examples:
- Printing your sitemap and all of your prototype’s comments
- Printing all prototype screens and comments
- Printing all screens, including all Dynamic Panel panels
Printing your sitemap and all of your prototype’s comments
- Open a new document in Microsoft Word and insert an image. This image will represent the prototype’s site map. Below this image, add text that represents the comment, the comment’s author and the date the comment was made.

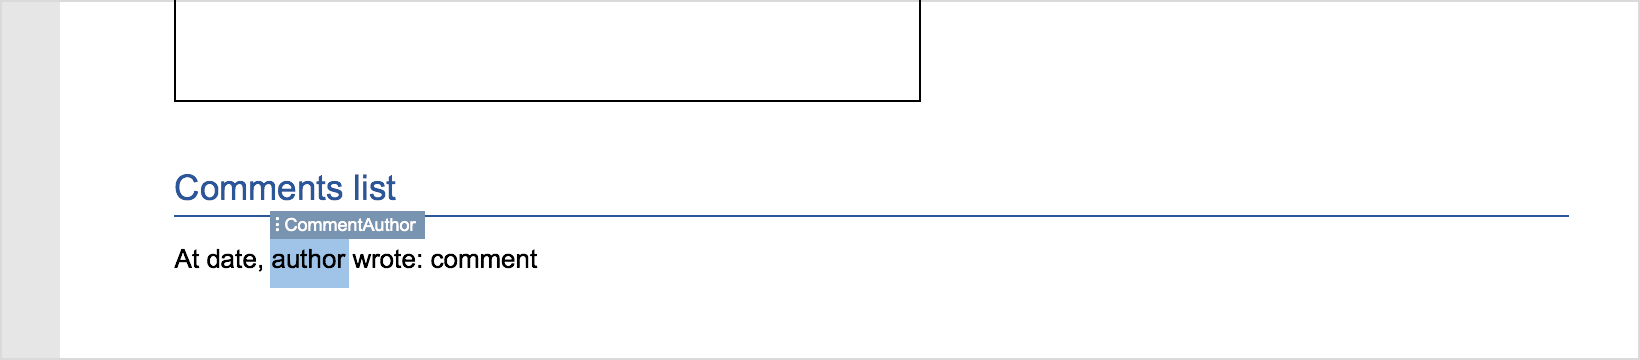
- Next, add an “Image” control to the image.Then, add “Plain text” to the text below the image and customize it as preferred. Give the text a title (e.g. “Comment List” as in our example). The title must follow the xml tag hierarchy, so refer to the Comment node in our hierarchy.xml.
In this example, the sitemap node is the parent node. Replace the “Title” and “Tag” input text fields with “NavigationMap” in “Properties”.
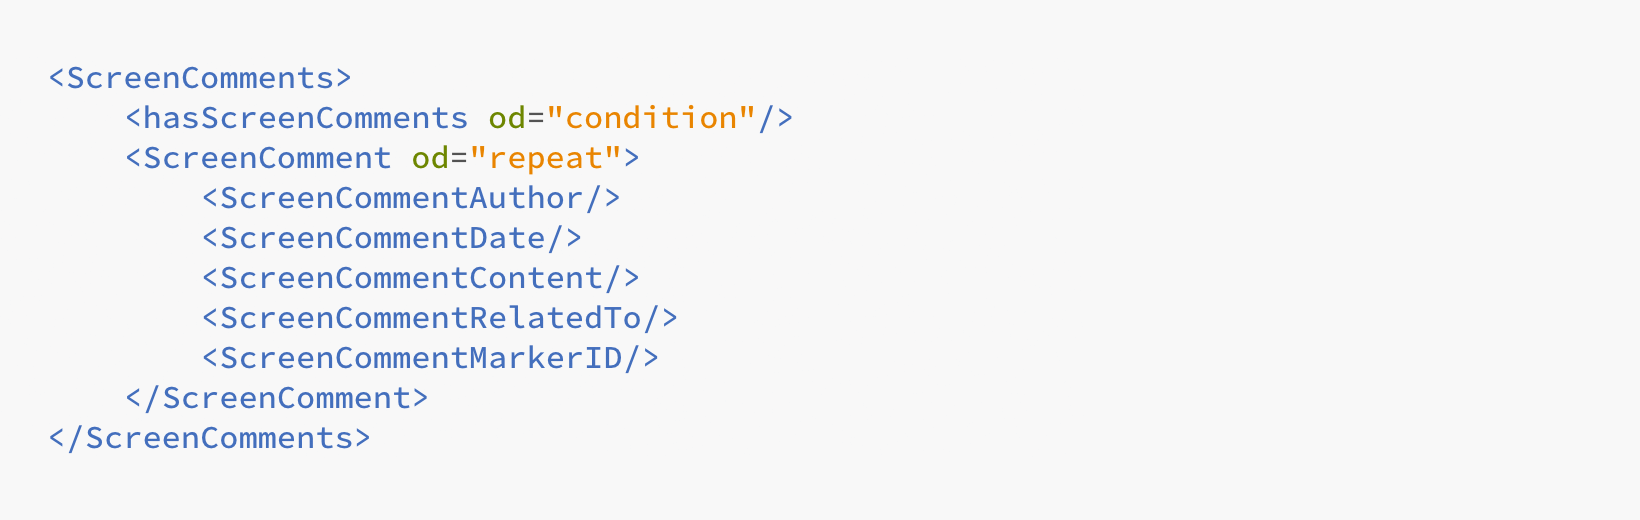
For the comments, this is the hierarchy:
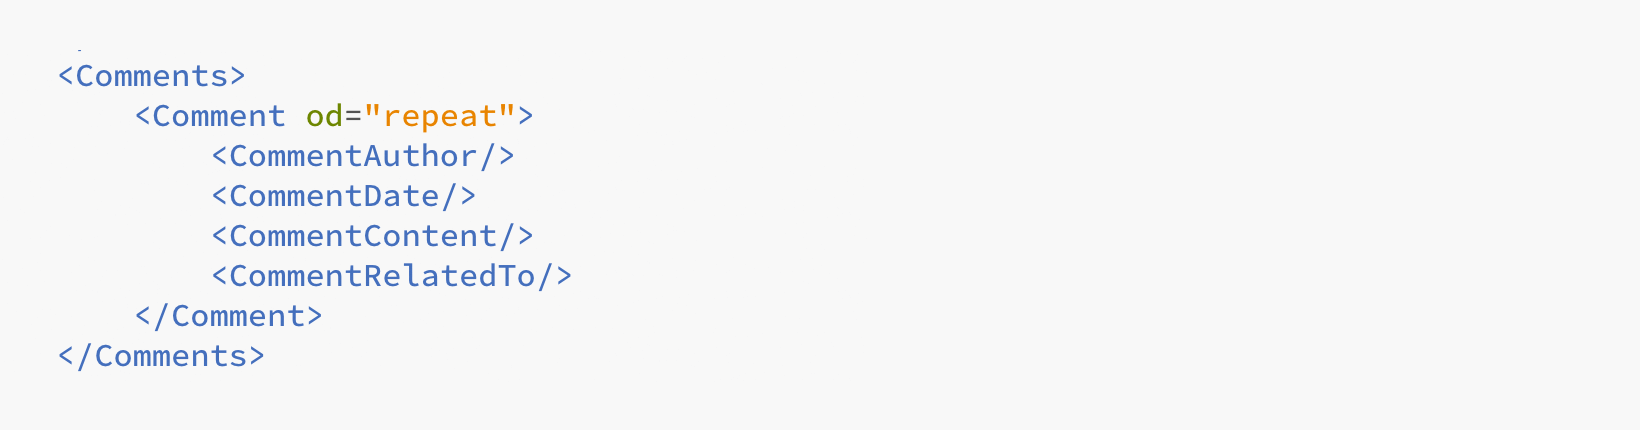

- For the author’s name, we’ll use the “CommentAuthor” tag, for the date, “CommentDate” and for the comment, “CommentContent”:

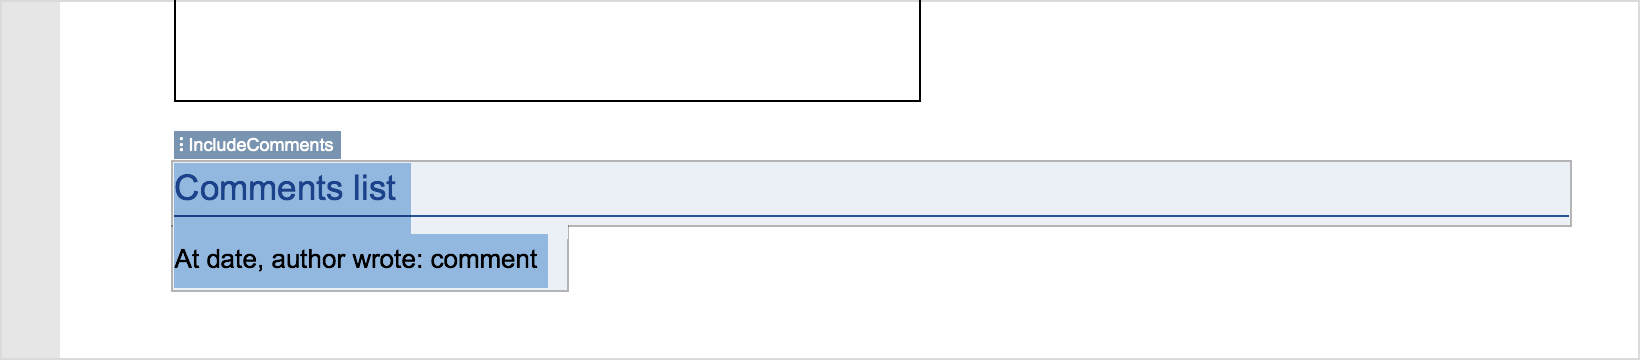
- Next, you’ll need to add a “Rich text” control to the element to add all of the prototype’s comments. Use the “Comment” tag, which includes the repeat attribute. This indicates, that the control is going to be repeated for all of the prototype’s comments.
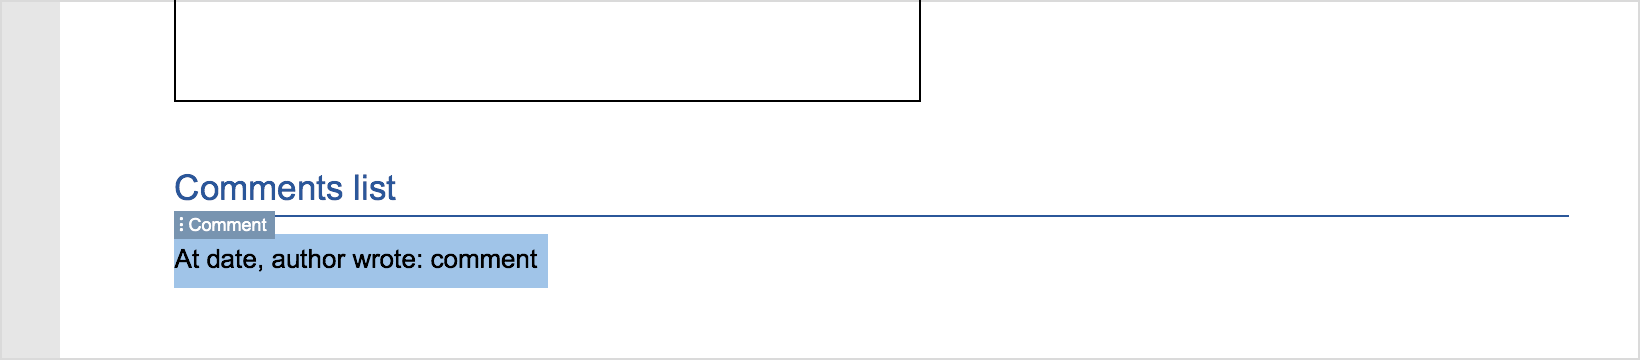
- You can add a condition, which will ensure the comment element is not printed if there are not comments present. To do so, add a “Rich text” control to all the elements that you don’t want to print unless they include. Use the “IncludeComments” tag.
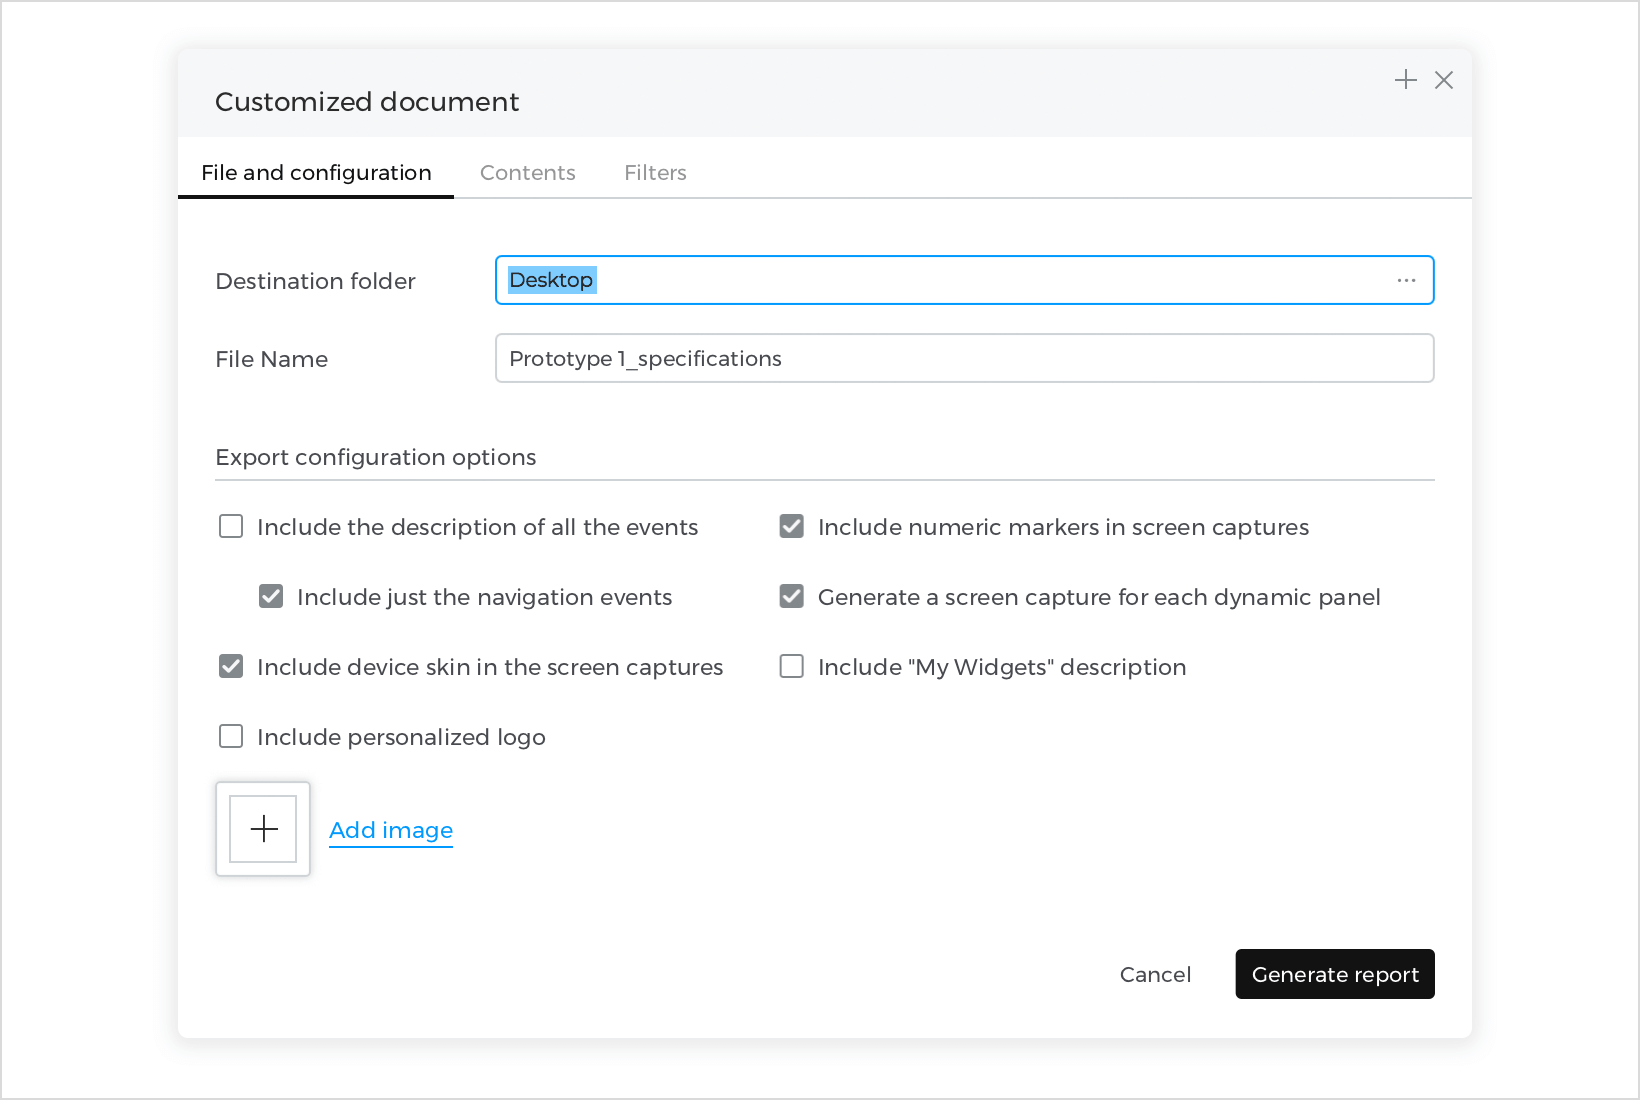
- Now save the Word document and import it into Justinmind. To do so, go to the “File” main menu option and then “Export to document” and “Customized Document”. Go to the “Contents” tab and select the “User Defined” radio button. Select your document template from your folders and click “Generate Report”.

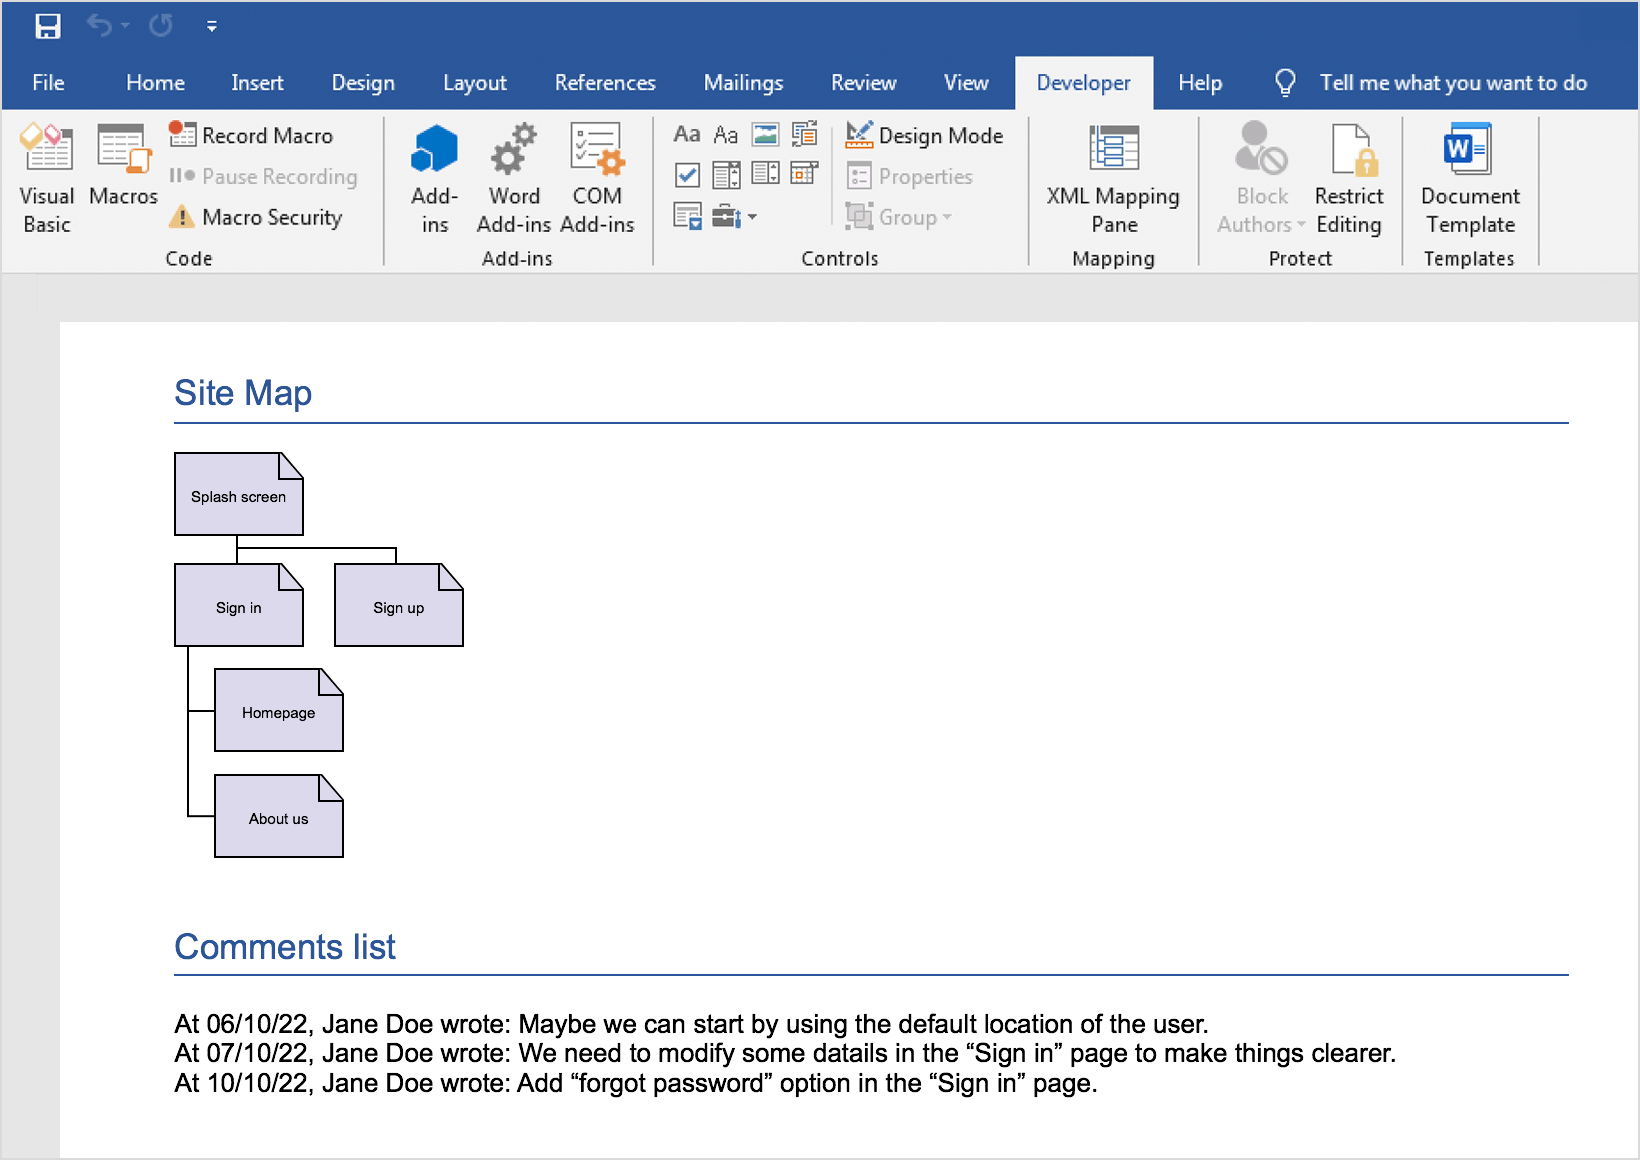
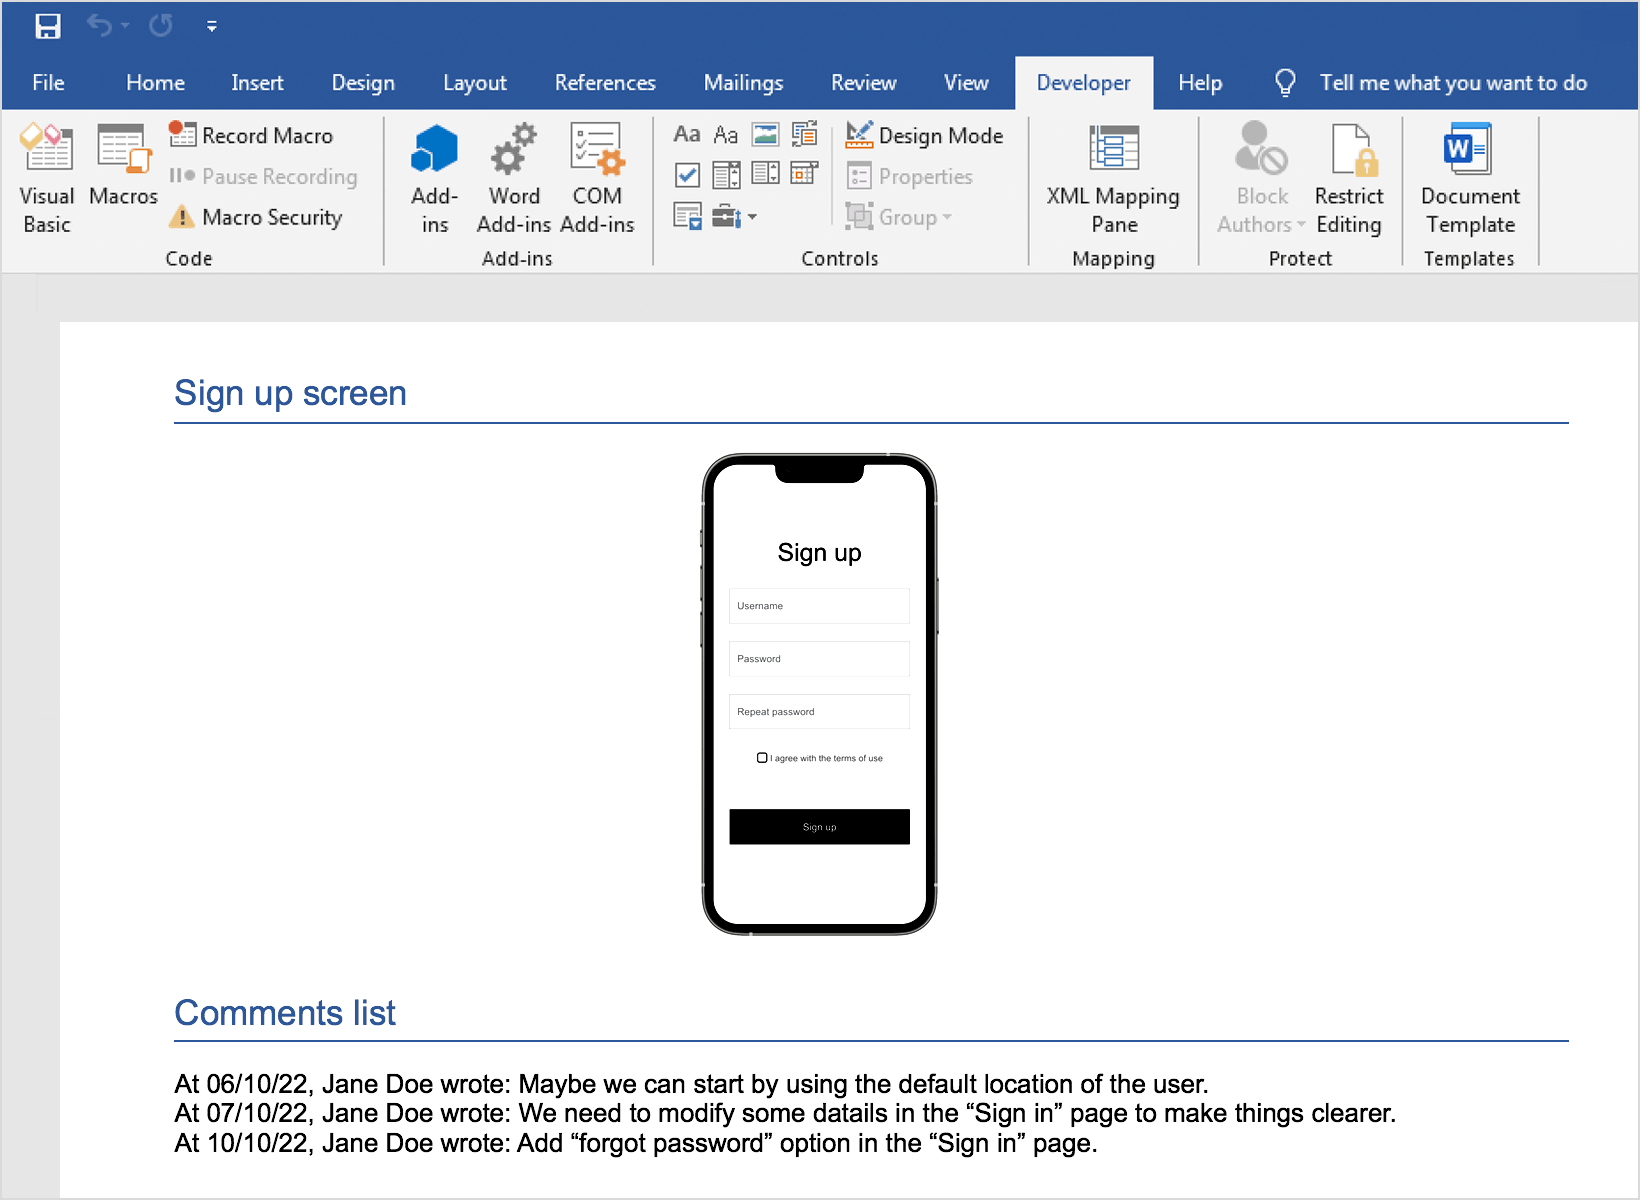
- If your prototype includes comments, your final document should look something like this:


Printing all prototype screens and comments
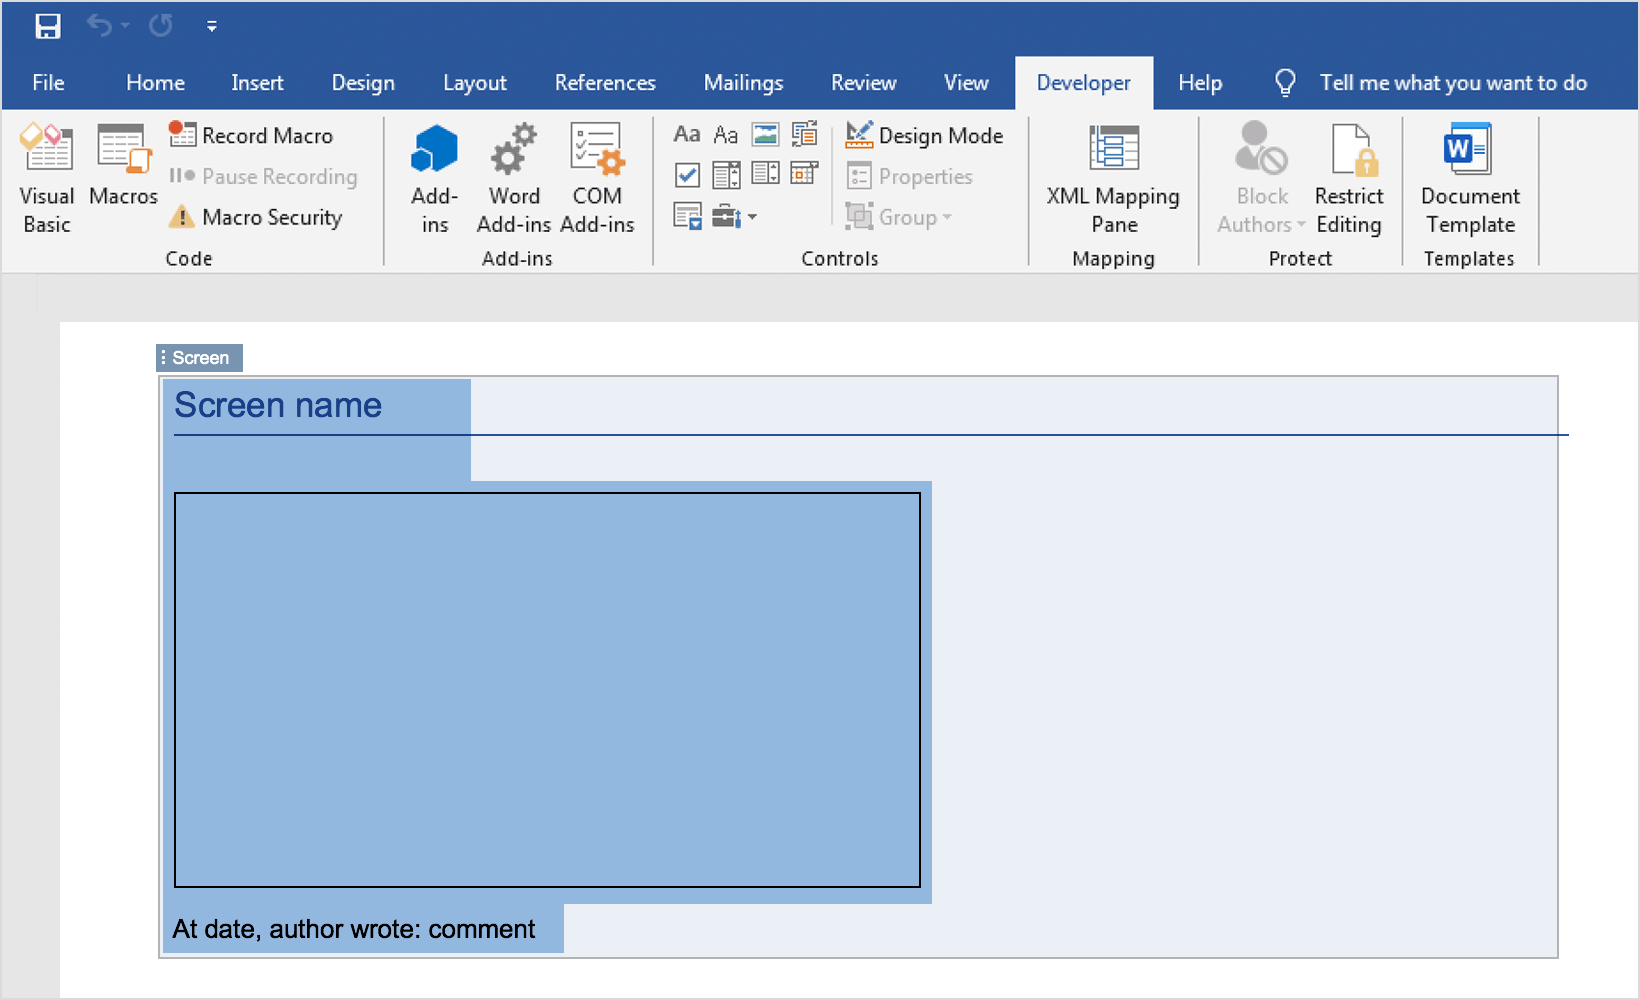
- Open a new document in Microsoft Word, fill it with a large image and add text above it. This image will represent your prototype’s current screen and the text the screen’s name.
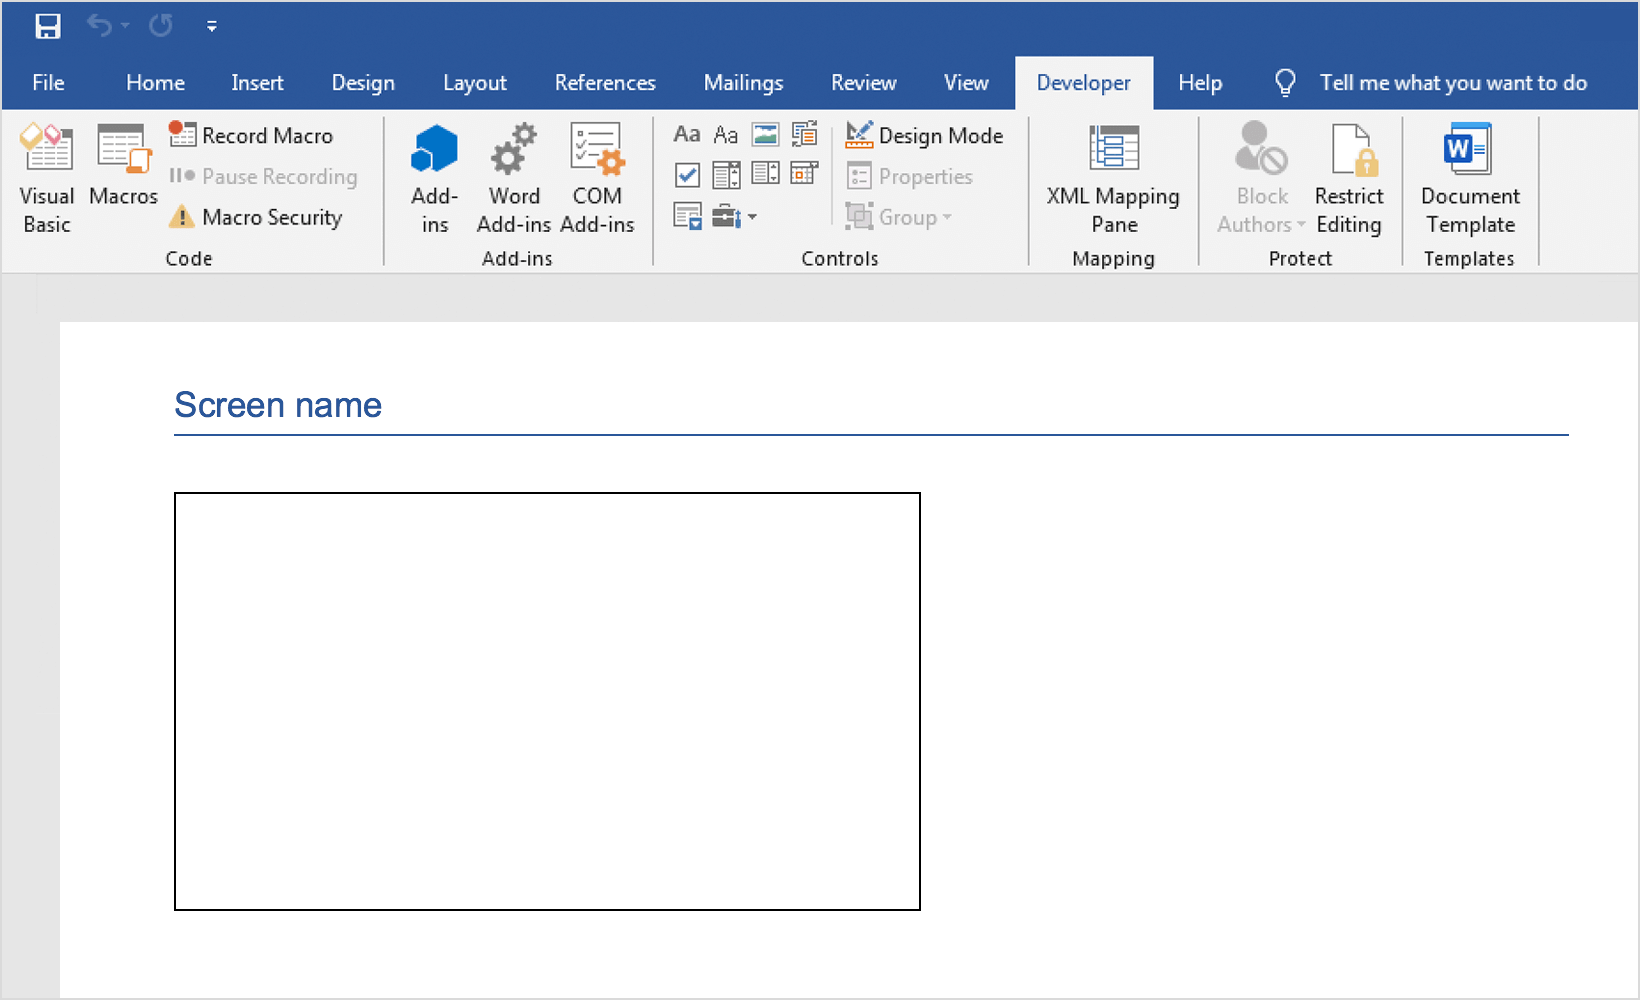

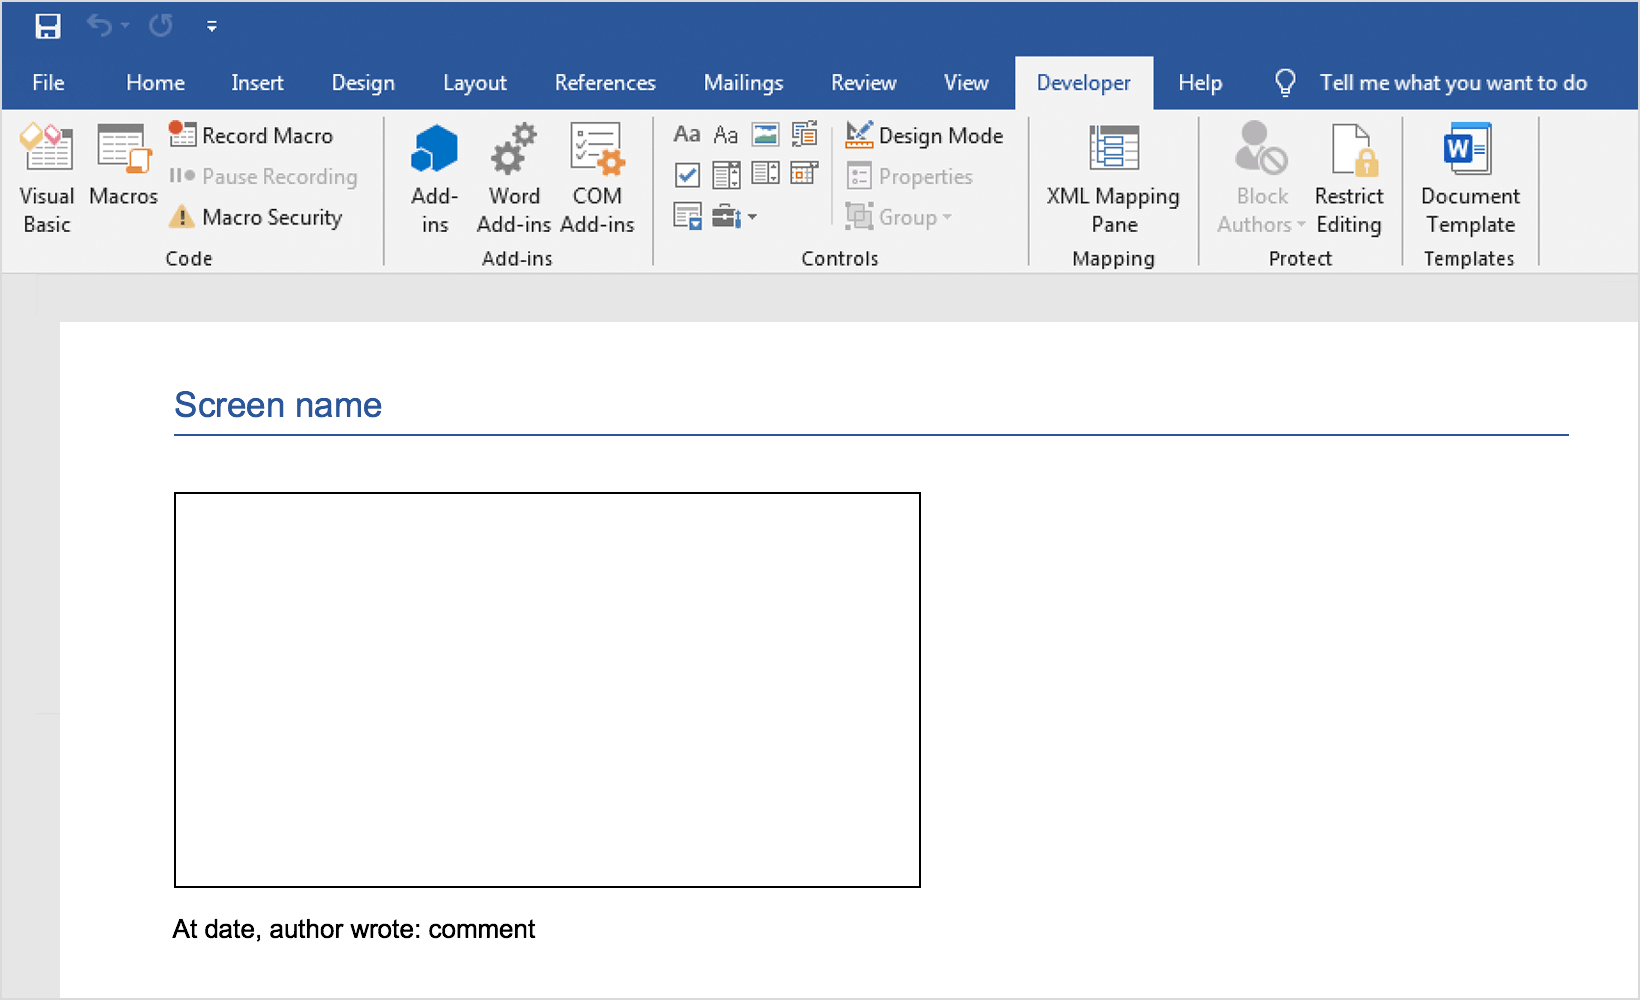
- Beneath the image, insert text to represent this screen’s comments. Customize as preferred.
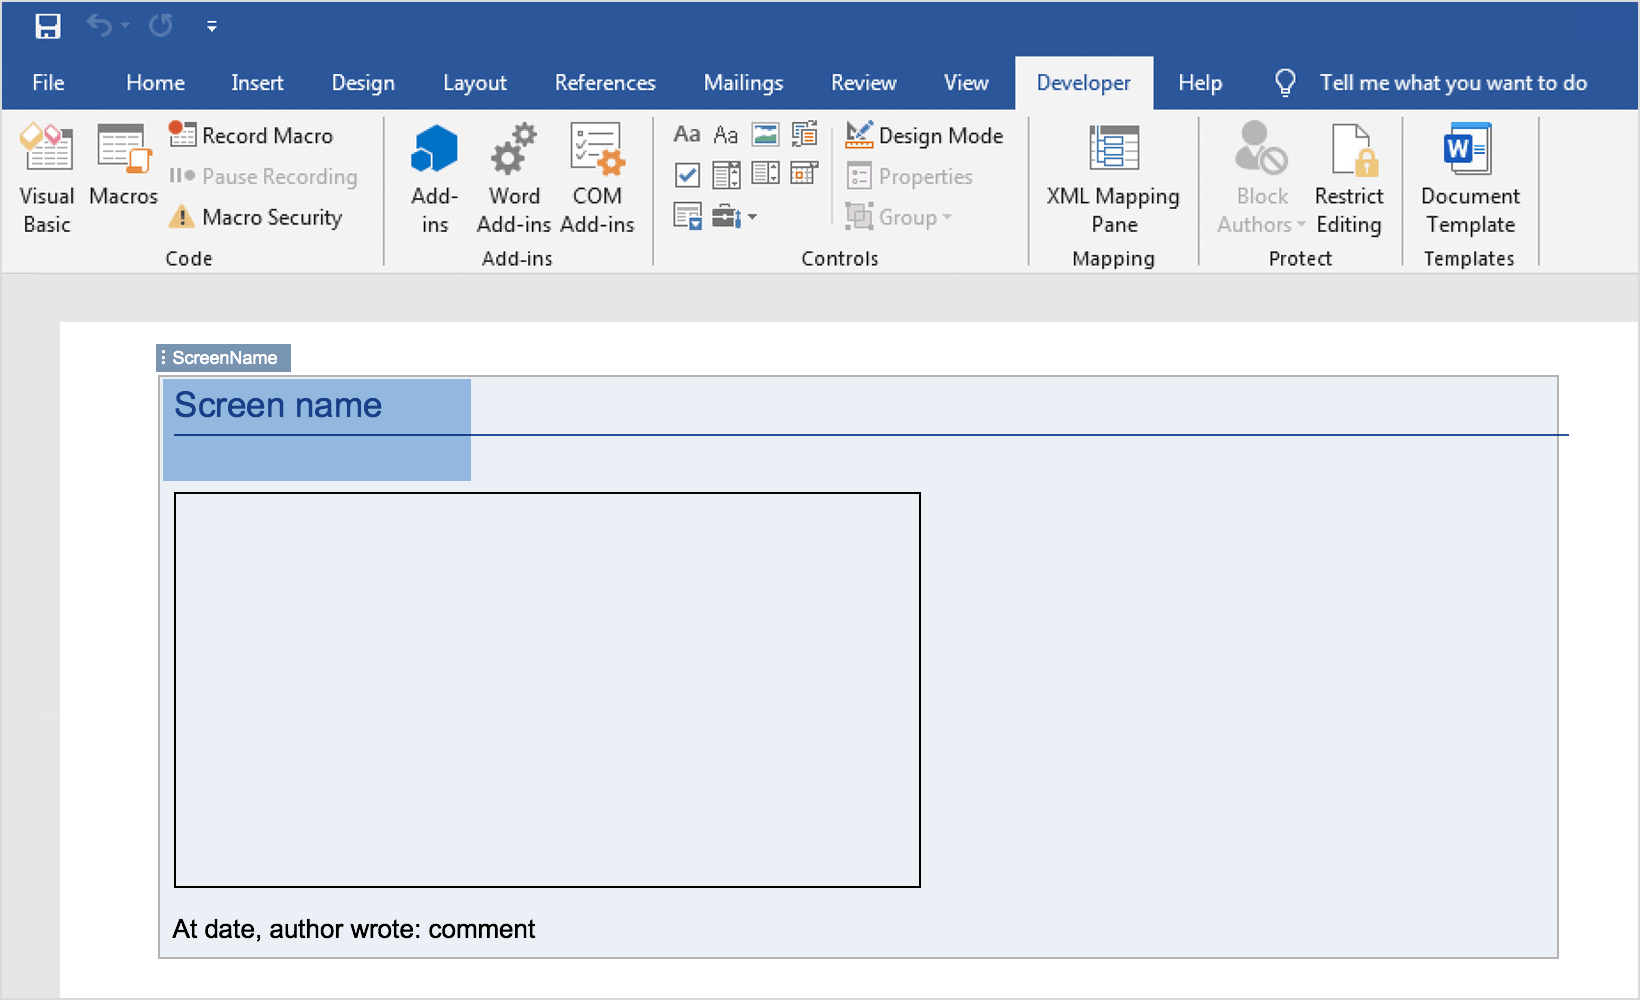
- Add an “Image” control to the image and a “Plain text” control to the screen name. Refer to the Screens node in our hierarchy.xml.For the screens, this is the hierarchy:

- So, for the screen’s name, we’ll use the “ScreenName” tag and for the image, “ScreenImage”:
- For the comment, we’ll divide up the text to represent the marker value and the comment text. Add a “Plain text” controls to each part, just like in the last example. The tag names should be “ScreenCommentContent”, “ScreenCommentDate” and “ScreenCommentAuthor”:

- Once you’ve completed the controls, you’ll need to add global controls around the elements so that they are repeated. Add “Rich text” controls to the comments and to each elements in the document that represents a screen. Use the “ScreenComment” tag which includes the repeat attribute to surround all the elements which include a comment and the “Screen” tab, which also includes the repeat attribute:
- Now save the Word document and import it into Justinmind. To do so, go to the “File” main menu option and then “Export to document” and “Customized Document”. Go to the “Contents” tab and select the “User Defined” radio button. Select your document template from your folders and click “Generate Report”.
- Your document should look something like this:


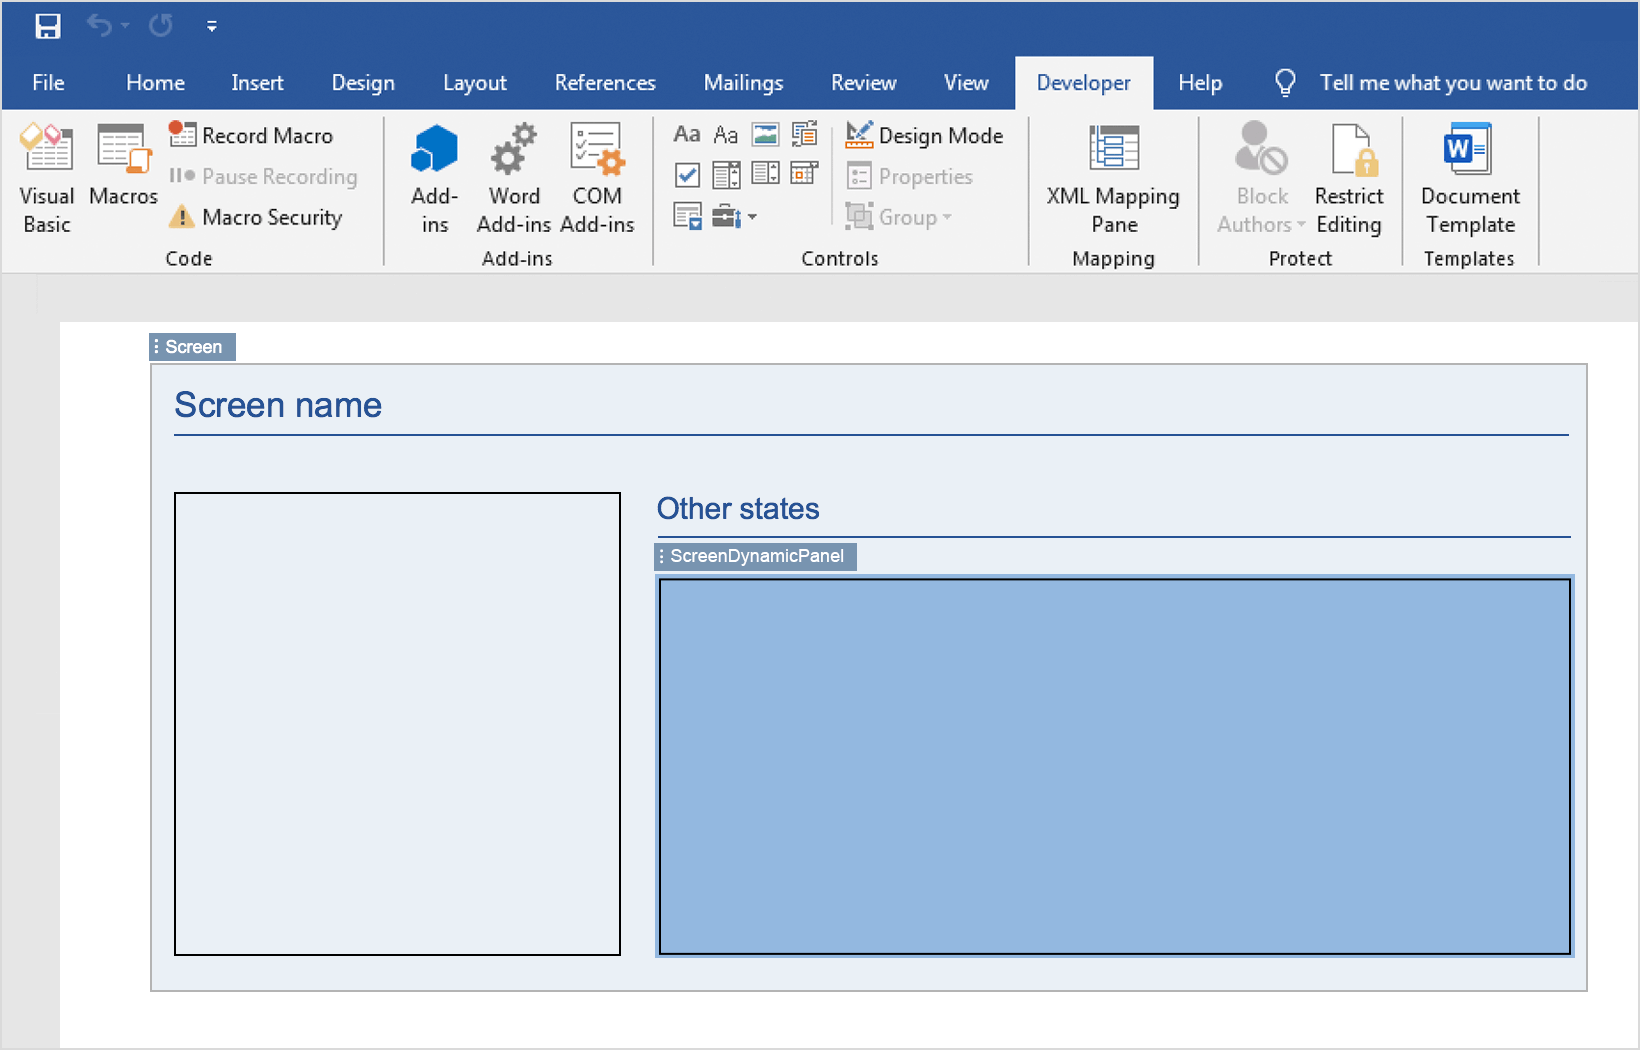
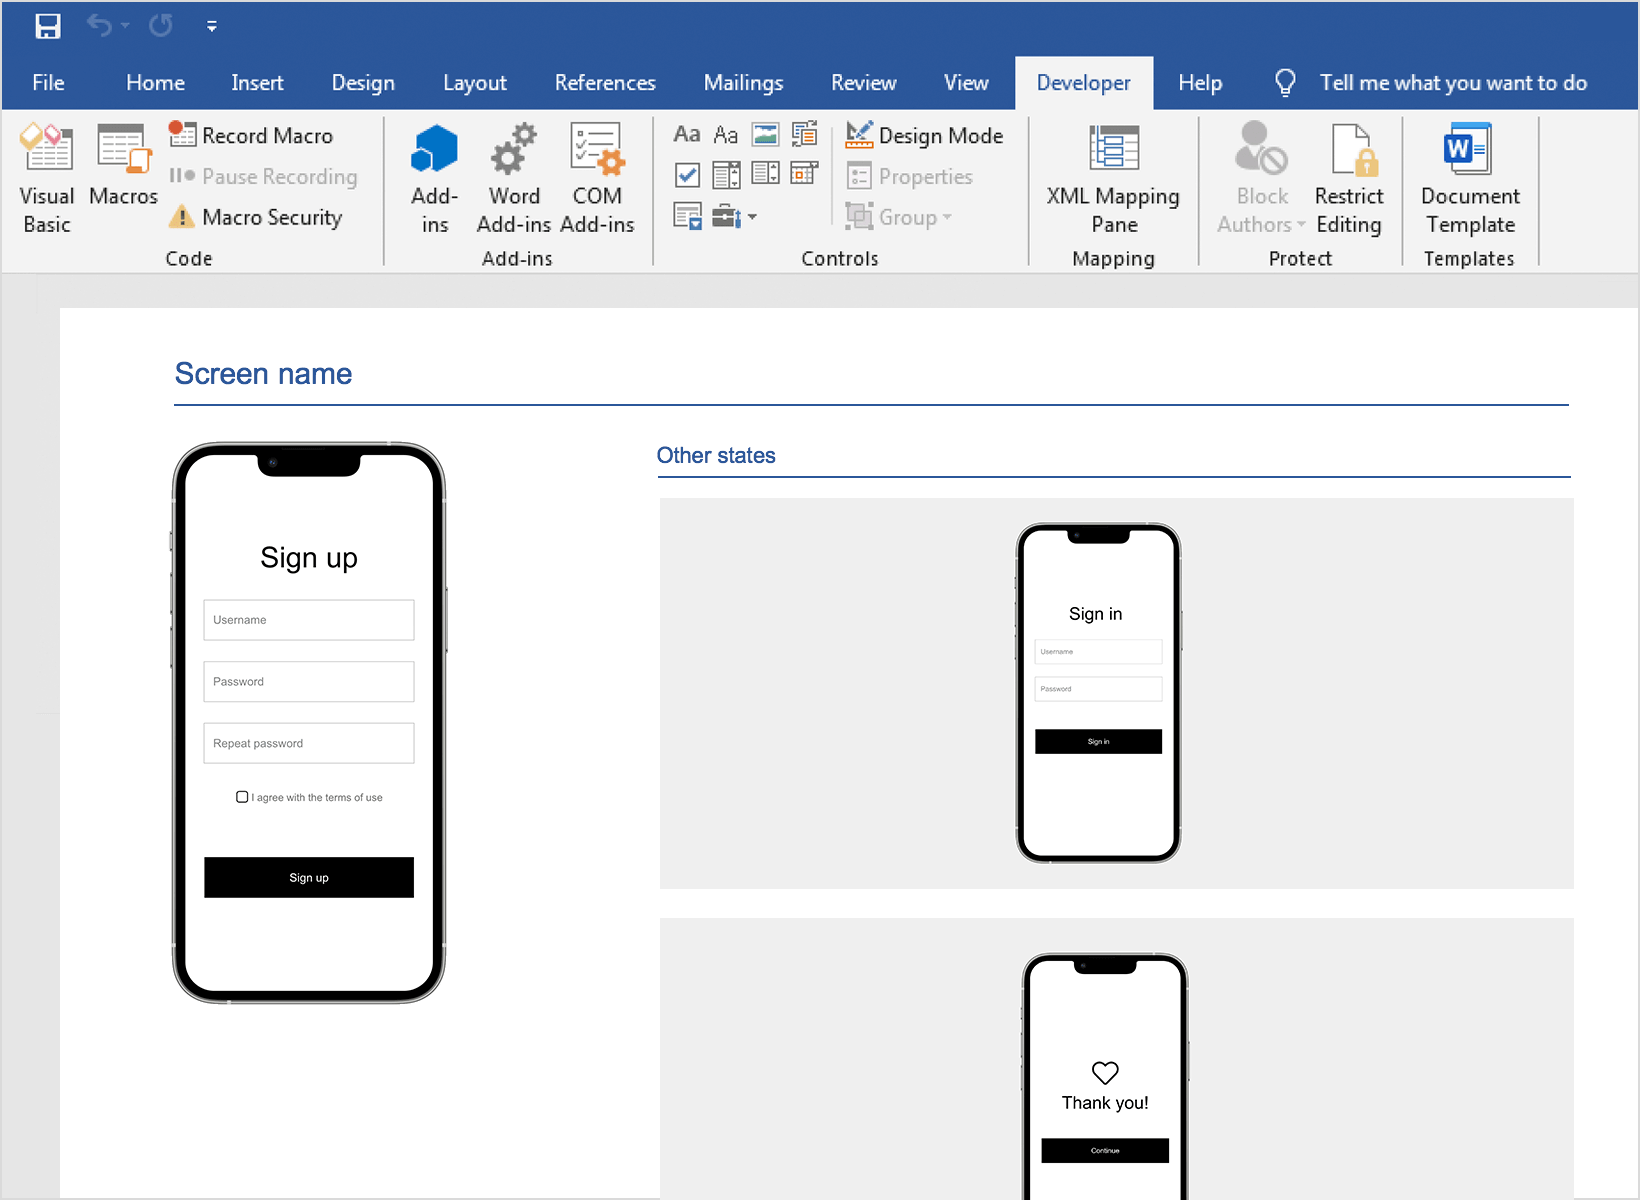
Printing all screens, including all Dynamic Panel panels
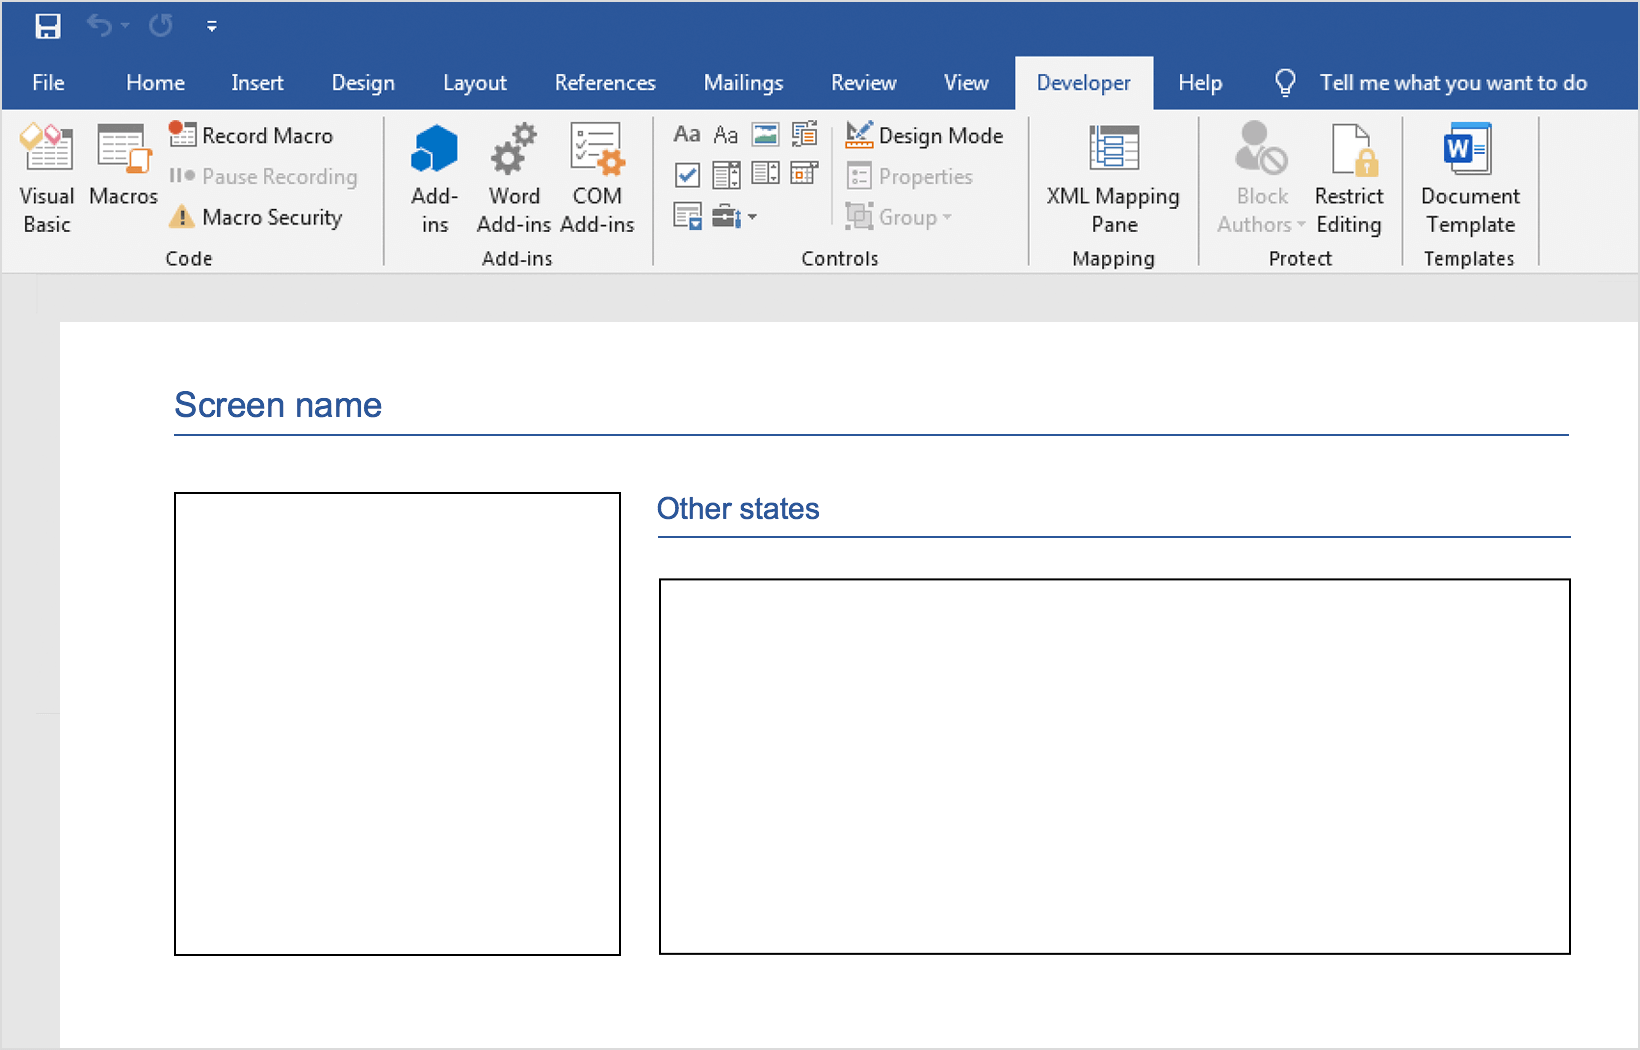
- Open a new document in Microsoft Word and add a large image representing the prototype’s current screen and another to represent its other states (e.g. when additional panels from within a Dynamic Panel are active). Your document template should look something like this:

- Add “Image” controls to the images. Use the “Screen” tag and its children for the screen’s image. As in the previous example, use the “ScreenName” and “ScreenImage” tags. For the other states, refer to the “ScreenDynamicPanels” tag:
- Use the “ScreenDynamicPanelImage” tag for the other states’ image:
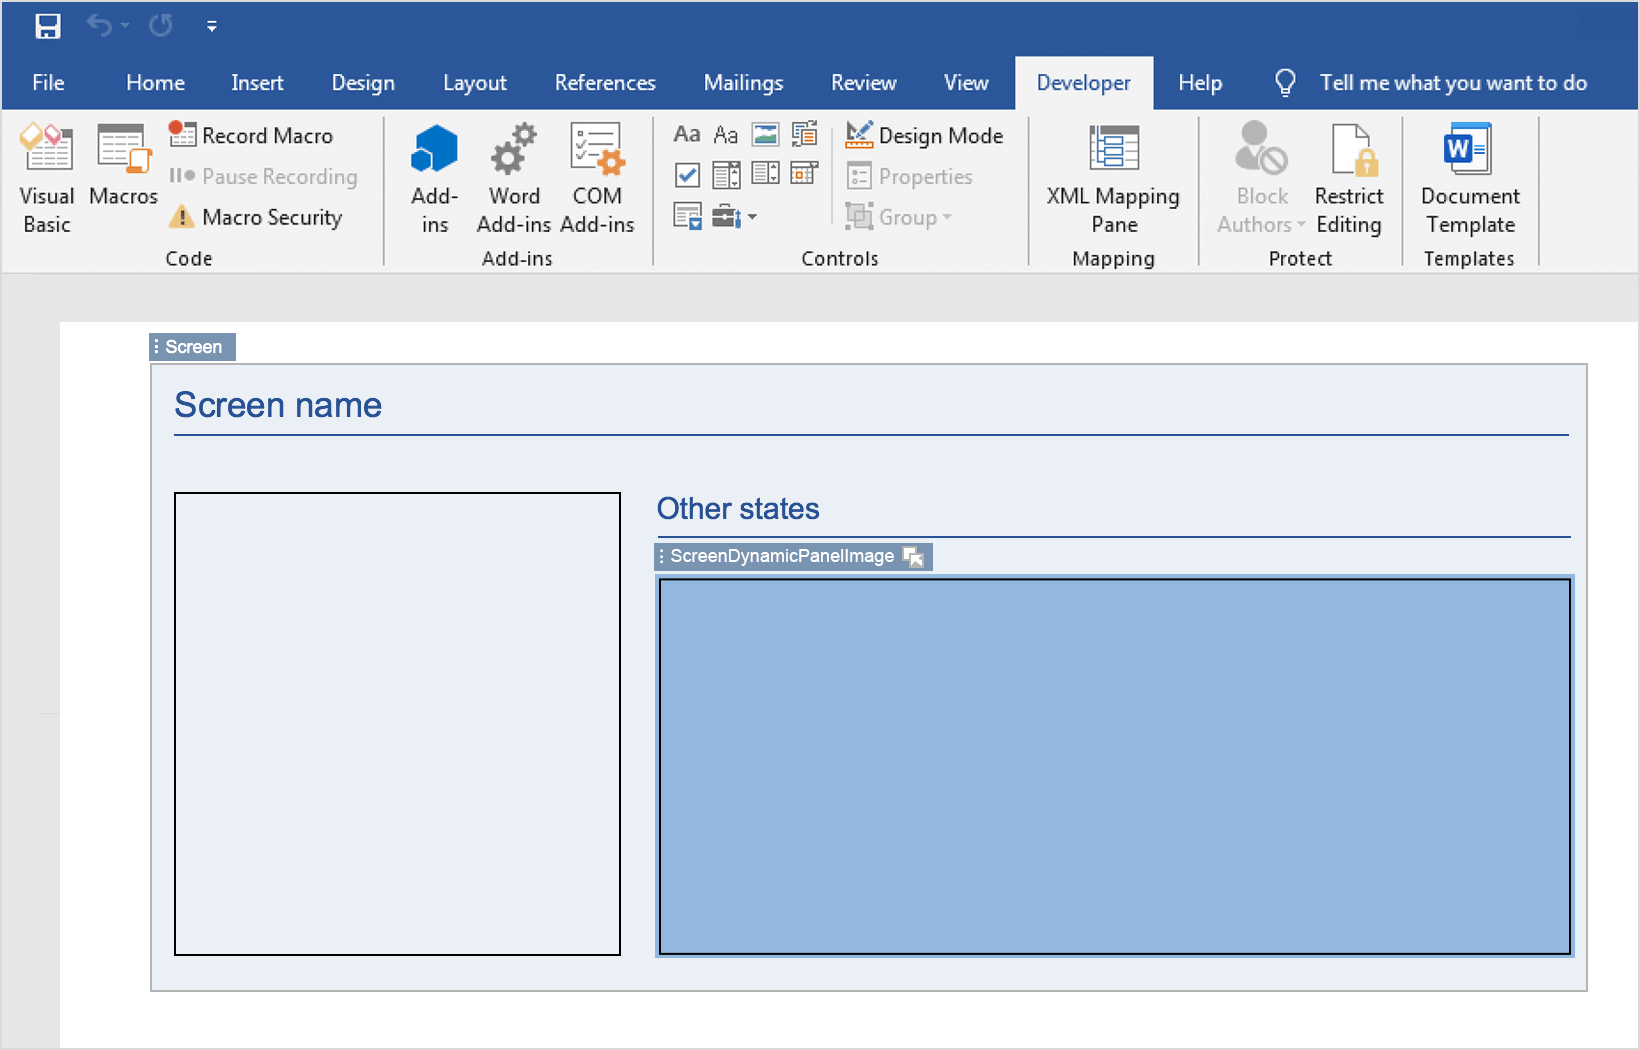
- Next, add a “Rich text” control to the other states’ image and another one, which includes all the elements, to indicate the screen iteration. Use the “ScreenDynamicPanel” tag, which includes the repeat attribute. This will give you all the other states from a given screen:
- Now save the Word document and import it into Justinmind. To do so, go to the “File” main menu option and then “Export to document” and “Customized Document”. Go to the “Contents” tab and select the “User Defined” radio button. Select your document template from your folders and click “Generate Report”.
- Your document should look something like this:


Tips for creating specifications document templates
- Make sure the XML hierarchy is well represented in the template. When you have controls inside other controls, they must respect the hierarchy.
- Don’t change the names of nodes or they won’t work
- Don’t use the or tags to repeat information. The only ones that repeat data are those marked with the “repeat” attribute.
- Don’t add any controls to header or footers, as they won’t be processed
- If something goes wrong, Microsoft Word will warn you about bad structuring. Word usually can fix these minor problems itself. If not, refer back to the hierarchy.xml file.