Advanced examples: events and interactions
In this article, you’ll learn how to build more advanced events with multiple actions and different triggers. You’ll also see how to utilize the functionality of Justinmind’s interactive forms and inputs to create realistic user experiences.
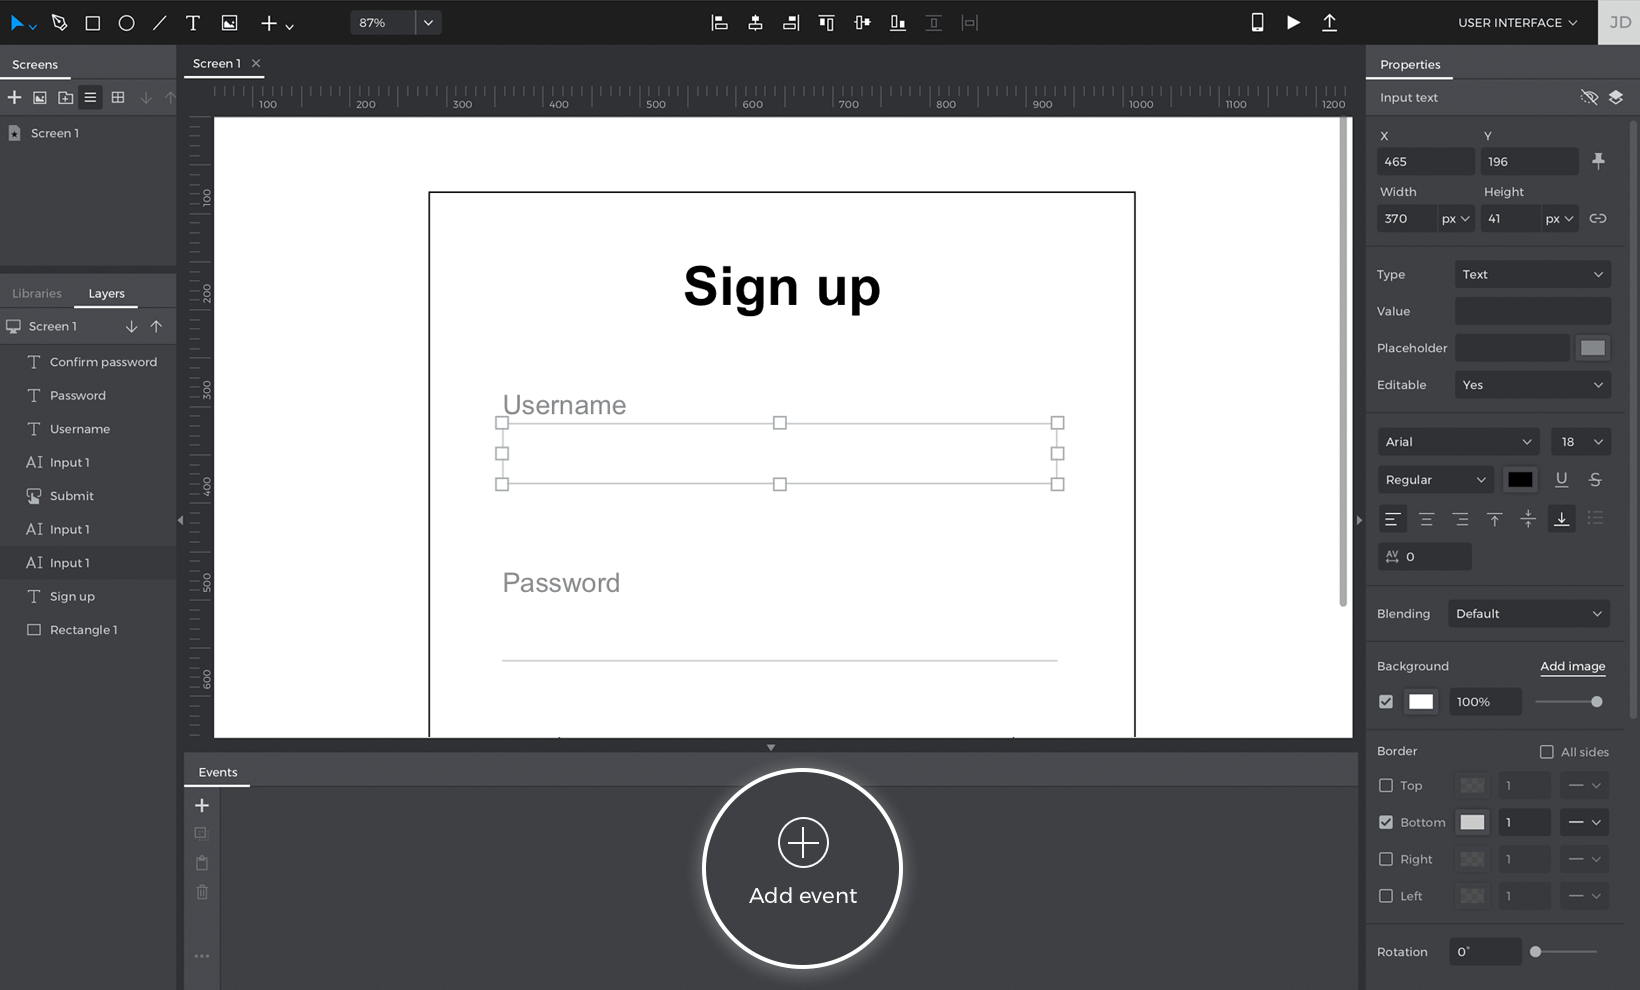
Tab between fields in a form
In this example, you’ll learn how to build convenient and accessible forms using an On Key Up trigger and a Set Focus On action. You’ll add three form fields – “Username”, “Password”, and “Confirm Password” – and move through them by hitting the Tab key.
- Drag three Input Text Field widgets to the Canvas and style them as preferred. You can find them in the ‘Interactive input fields’ section of the Toolbar dropdown or by hitting the F key.
- Select the “Username” input text field and look to the Events palette. Click ‘Add event’.
- Click on the Trigger dropdown, hover over the Keyboard section, and pick the On Key Up trigger.
- You’ll see a new field appear where you can enter the key you’d like to trigger the event when you type it. Enter the Tab key.
- In the Action dropdown, pick the Set Focus on Input Field action. You’ll see a Canvas preview appear, where you can select the “Password” input text field. This will make it the target of the Set Focus On action, so you’ll switch to it when you focus out of the “Username” input text field.
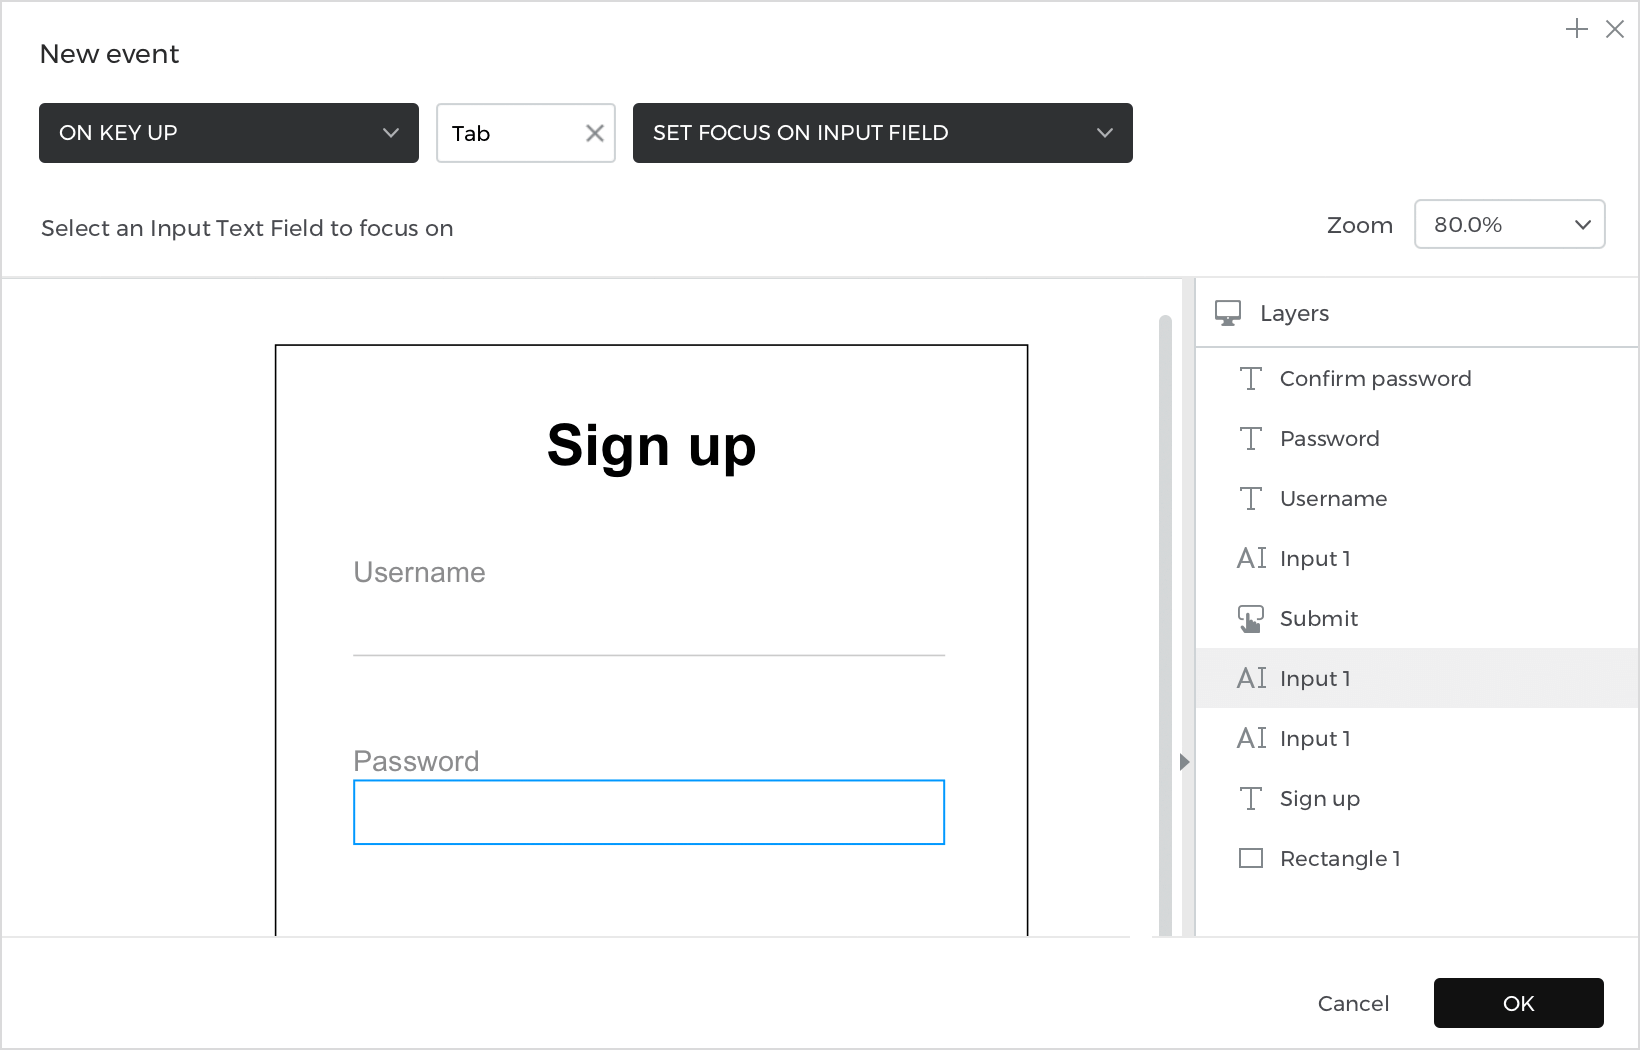

Click ‘OK’ to finish building the event. - Back on the Canvas, select the “Password” input text field. Go to the Events palette and create another On Key Up + Set Focus On action. This time, select the “Confirm Password” input text field as the target of the action. Click ‘OK’ to finish building the event.


Click the ‘Play’ button to simulate your project. Focus in on the “Username” field and hit the tab key to jump to the “Password” field. Hit it once more to move to the “Confirm Password” field.
Multi-effect mouse over
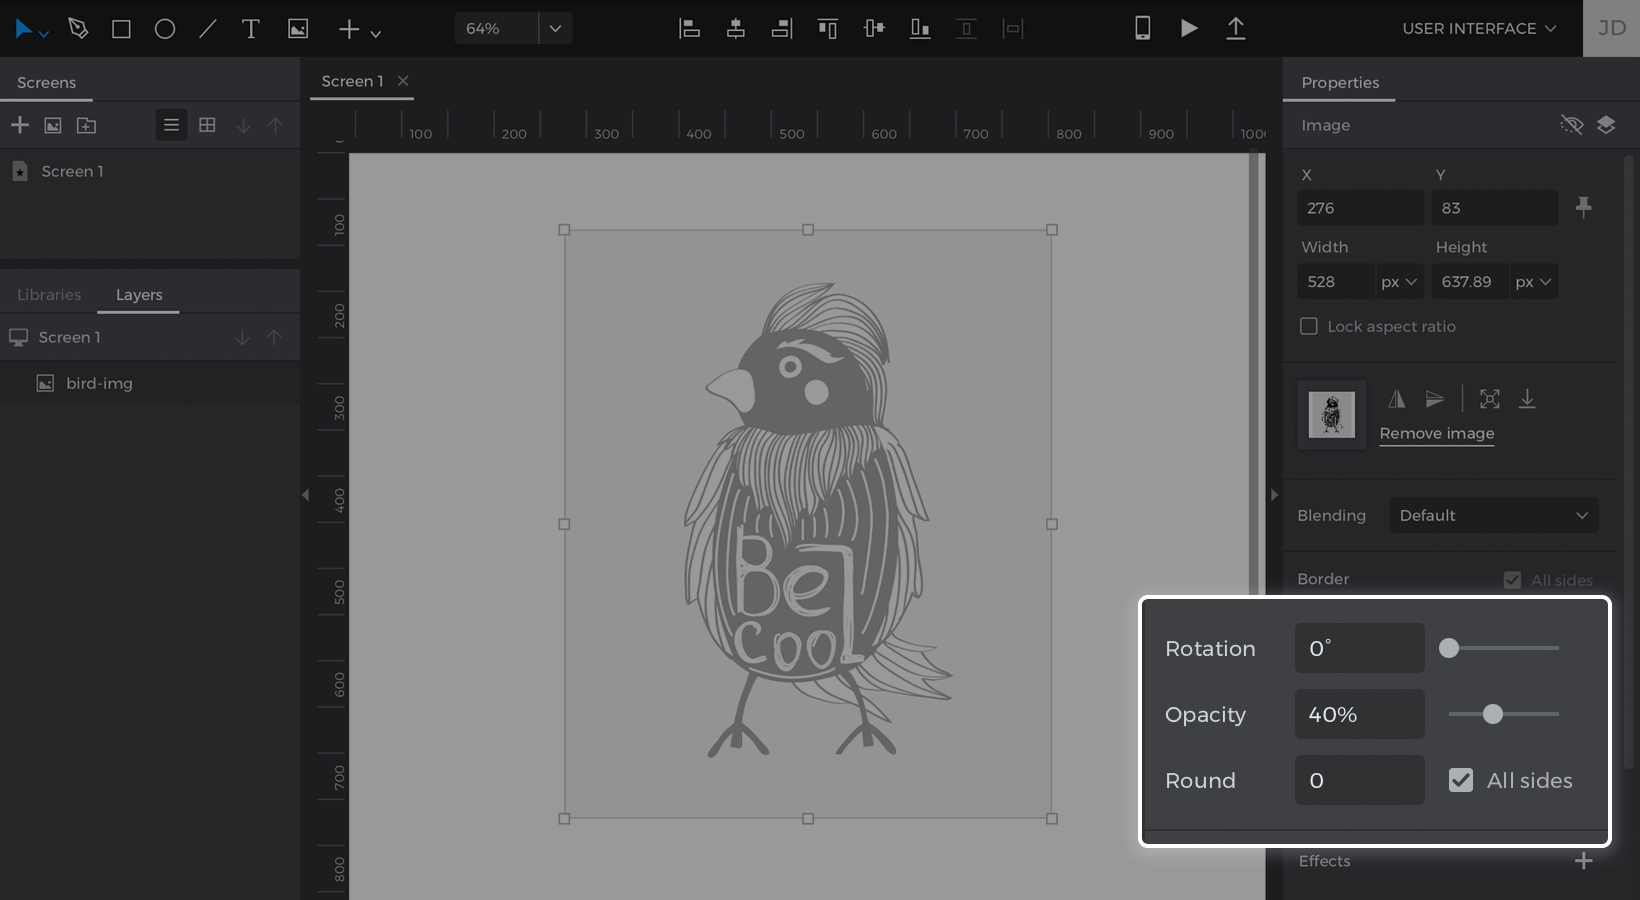
In Justinmind, you can add multiple actions to one event. In this exercise, you’ll learn how to create an On Mouse Over event with two actions. One action will change how an image looks and the other will move the image.
- Create a new Web project and place an Image I on the Canvas. Change the image’s transparency to 40% in the Properties palette.

Make sure you’re using a Web project – Mobile or Tablet won’t work for this example, since you can’t mouse over on a touch screen. - With the image still selected, go to the Events palette and click ‘Add event’.
- Click on the Trigger dropdown, hover over the Mouse section, and select an On Mouse Over action.
- Tap on the Action dropdown and select a Change Style action. You’ll see a Canvas preview appear where you can choose the image as the target of the action.
- In the dropdown below, select ‘Opacity’ as the style to change and alter its opacity to %100. Click ‘OK’ to finish building the event.
- Look to the Events palette where you’ll see the event you just created. You’ll see a ‘+’ button next to the Change Style action. Click on it to add another action to the event.
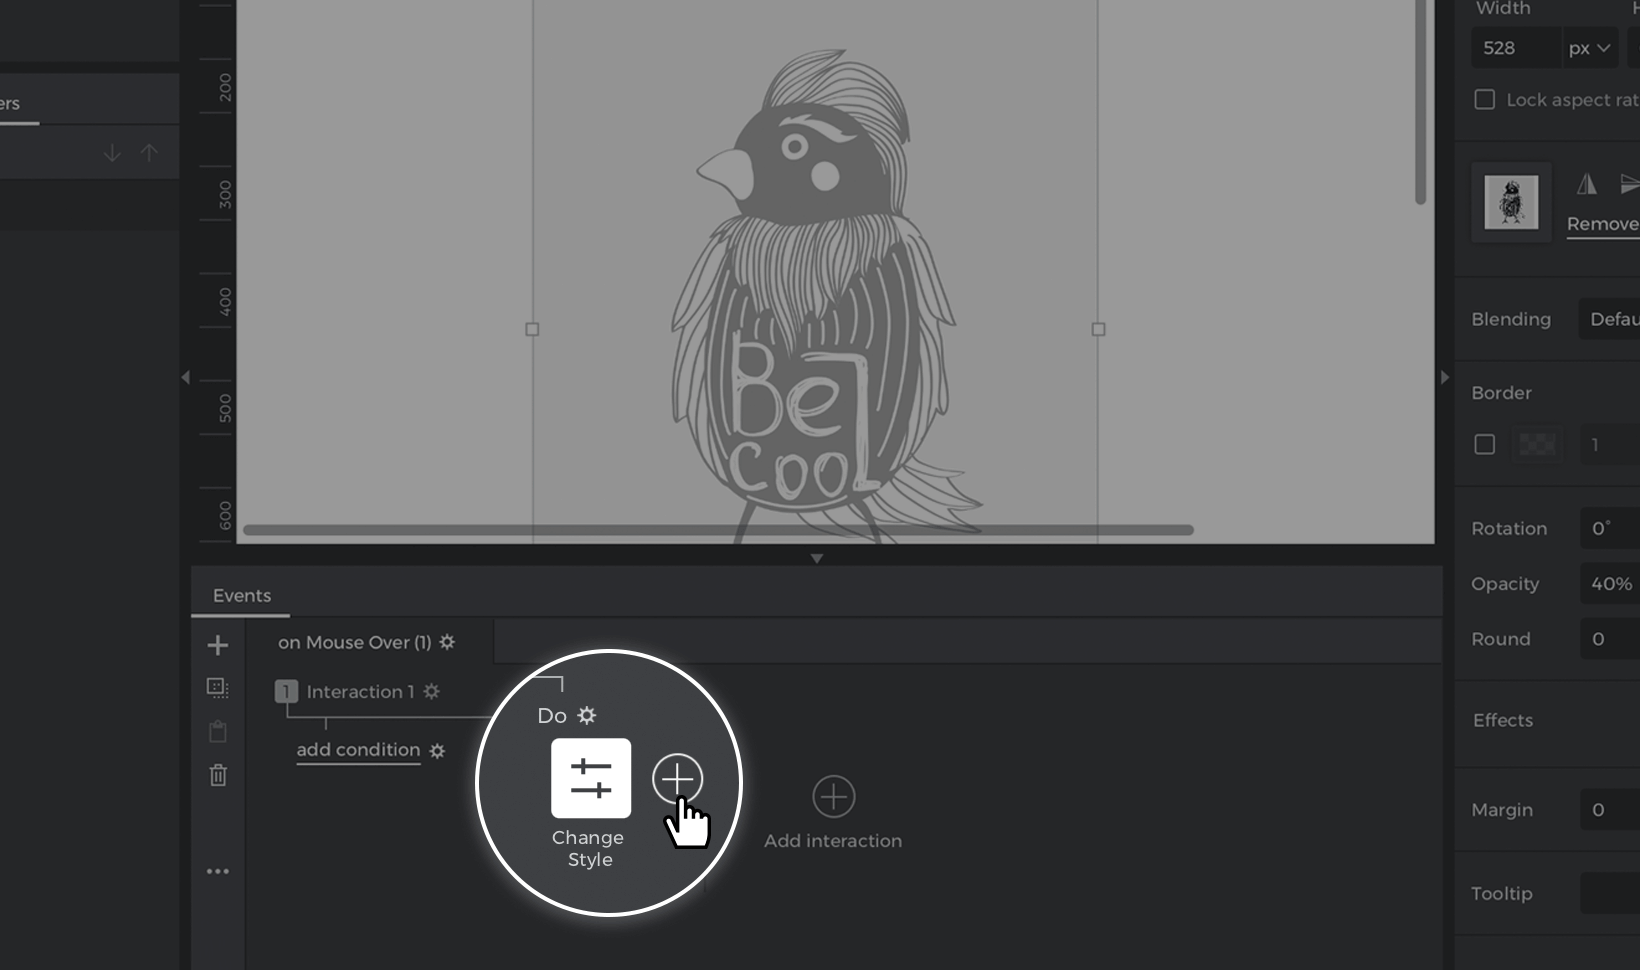

- The On Mouse Over trigger should already be selected, so you just need to pick a Move action.
- Select the image as the target of the action in the Canvas preview. You’ll see a dropdown appear below. Here, you can define where to move the image when you mouse over it. Keep the X (horizontal) position the same, but adjust the Y (vertical) position by 10px.
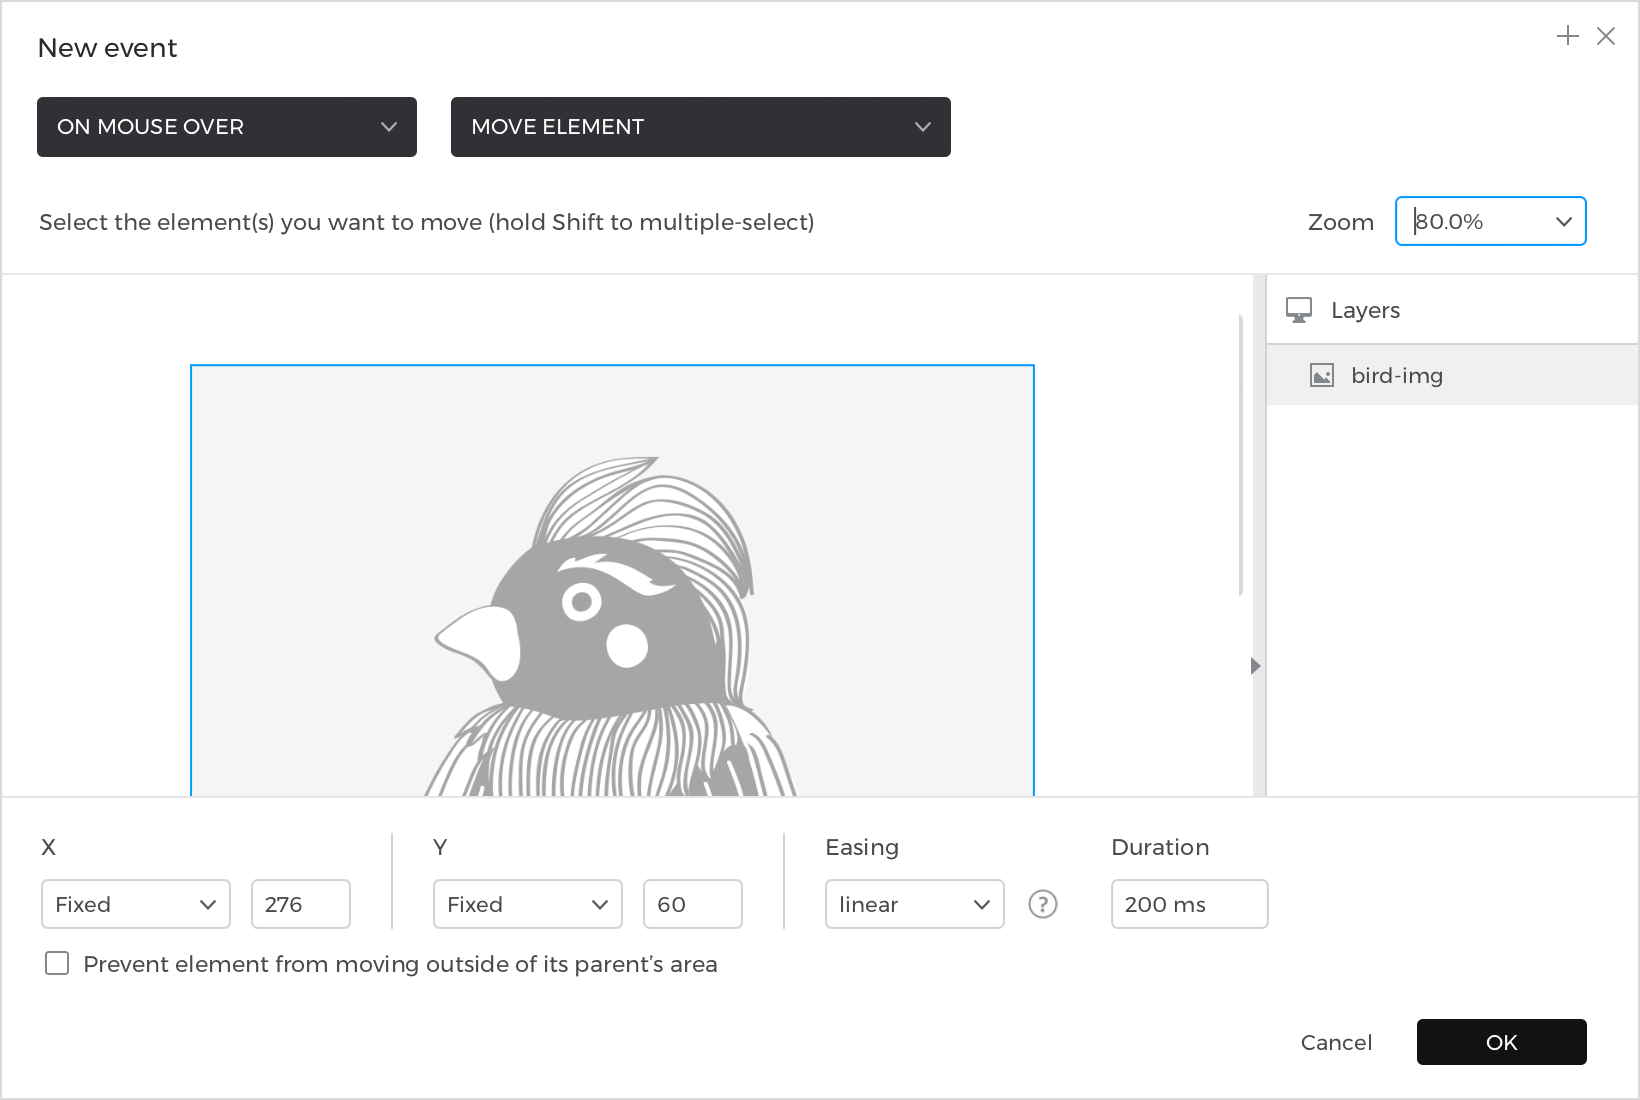

Add some linear easing and change the easing duration to 200ms.Click ‘OK’ to finish building the event.
- Look back to the Events palette and you’ll see an ‘Arrow’ button between the Change Style and Move actions you created. This arrow indicates the action order. Right now, the actions will run one after another, but you’ll want them to occur at the same time.
Click on the ‘Arrow’ button and select ‘With previous’ from the pop-up. This will make the actions occur at the same time when you mouse over the button during simulation.


Click the ‘Play’ button to simulate your project. Hover over the image and see how it changes transparency and shifts upward. Move your mouse away from the rectangle to see the image move back and regain transparency.
Interactive forms with multiple triggers
You can also use different event triggers on one element. In this example, you’ll learn how to build events with On Focus In and On Focus Out triggers to change the appearance of an Input Text Field.
- Drag an Input Text Field F to the Canvas and style it as preferred.
- With the input text field selected, go to the Events palette and click ‘Add event’.
- From the Trigger dropdown, pick an On Focus In trigger.
- Select a Change Style action and pick the input text field as the target of the action in the Canvas preview.
- You’ll see a dropdown appear below where you can specify the styles of the input text field you’d like to change. In this example, change the input text field’s border to be a darker color. Click ‘OK’ to finish building the event.
- With the input text field still selected, look back to the Events palette and click the ‘+’ button at the top of the palette to create a new interaction.

- Pick the input text field as the target of the action and select the border as the style to change from the dropdown below.The default border color should be selected automatically, so you can click ‘OK’ to finish building the event.

Here’s how your Events palette should look:

Click the ‘Play’ button to simulate your project. Focus in on the input text field and see how its border changes color. Click out of the input field and you’ll see its border color change back.
Reflect user input
In this last exercise, you’ll learn how to utilize a Set Value action to mirror user input during simulation.
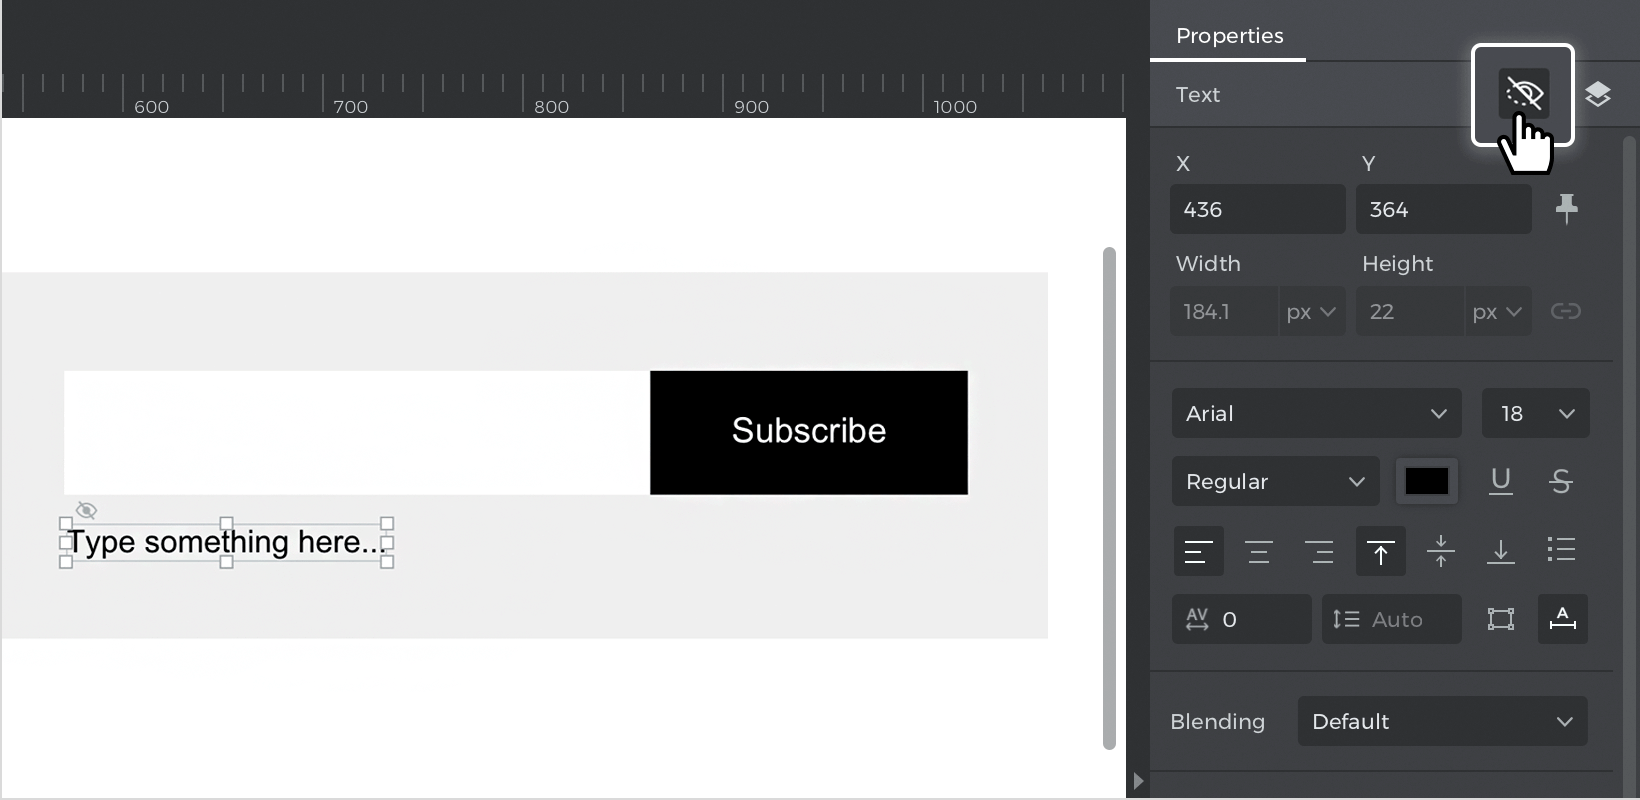
- Place an Input Text Field and a Button B on the Canvas and style them as preferred. Drag a Text T element below the input text field and mark it as hidden during simulation.

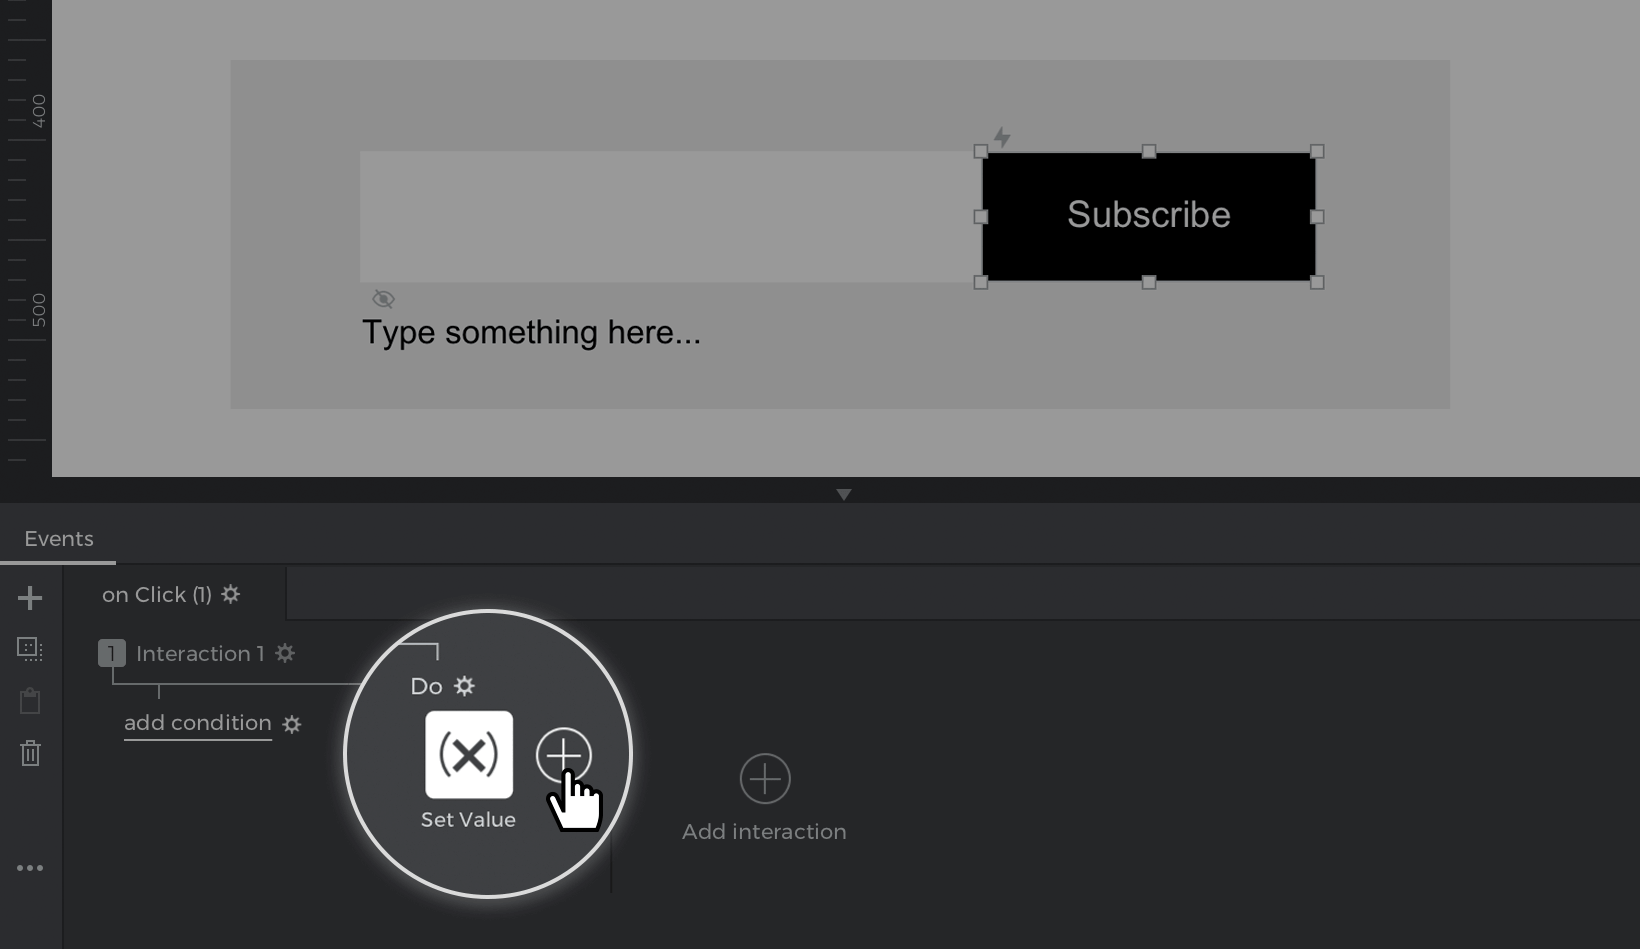
- Select the button, go to the Events palette, and click ‘Add event’. Pick an On Click trigger from the dropdown.
- Choose the Set value to an element action from the dropdown. You’ll see a Canvas preview appear where you can select the text element below the input field as the target of the action.
- Look at the text below that says ‘The value is…’ and select the ‘Calculated’ radio button. Then, click the ‘Add expression’ text link.
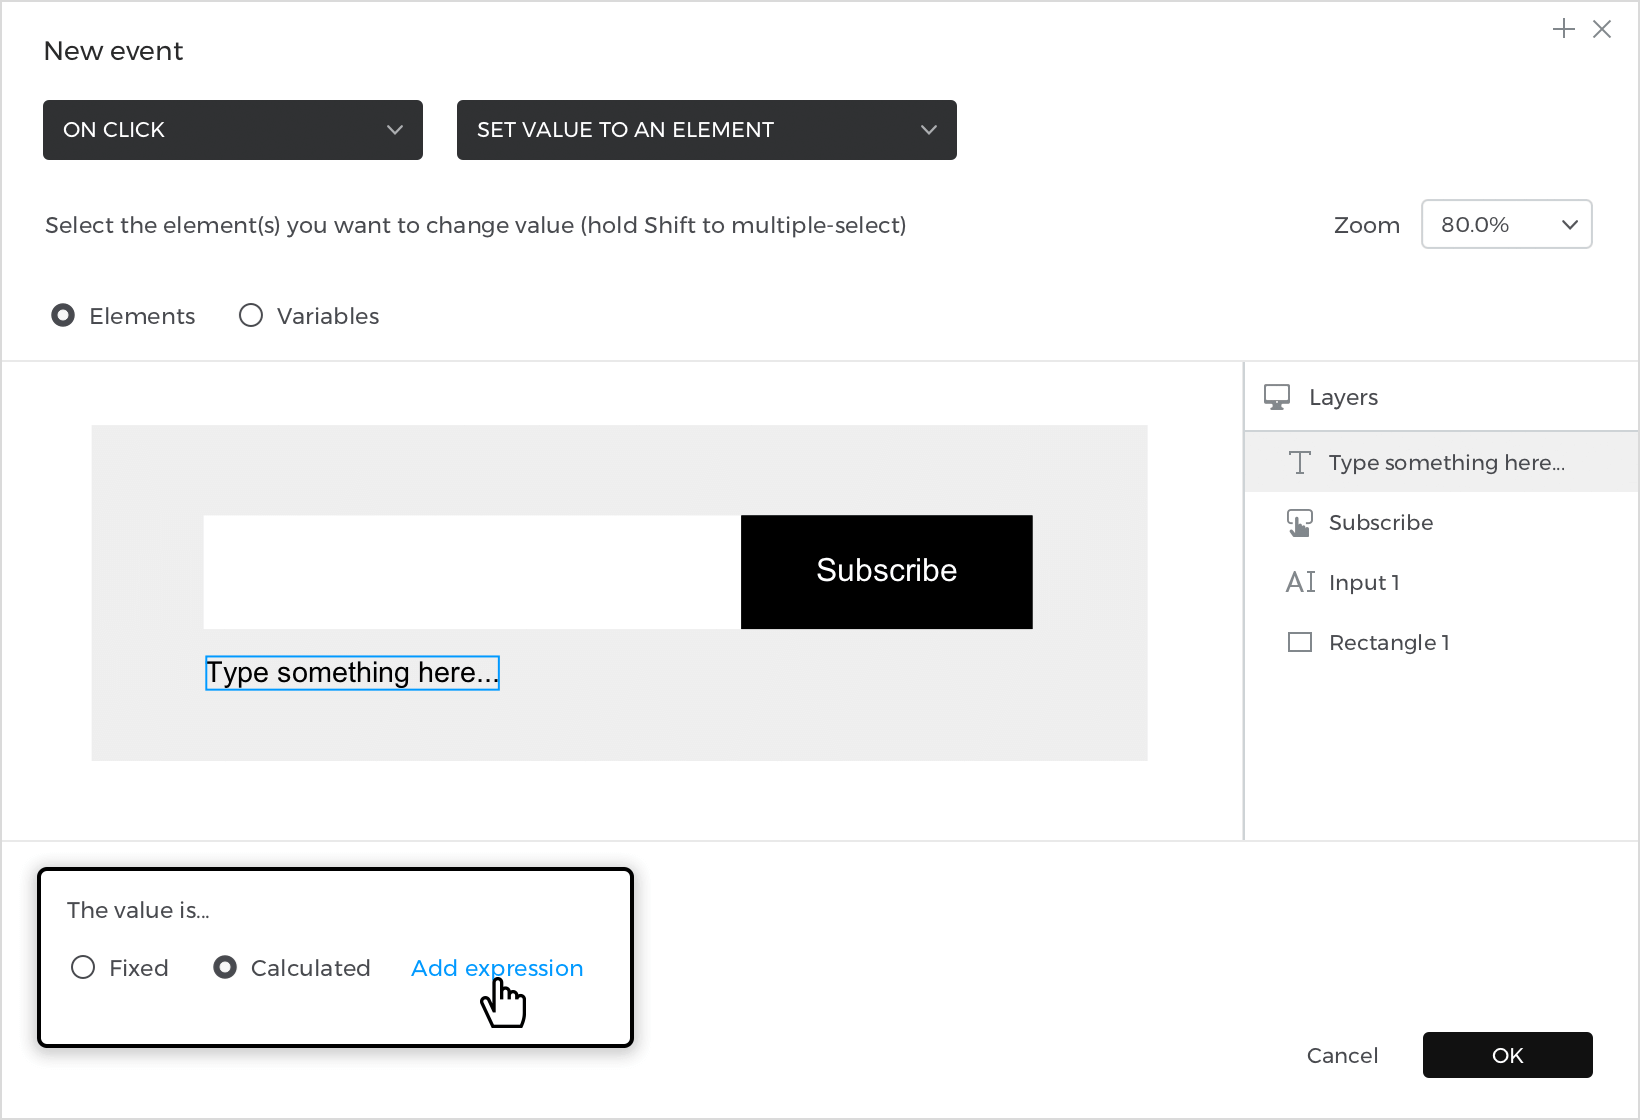

- You’ll see the Value Expression builder appear, which is where you’ll define the value that will be transferred to the text element. Follow these steps to create the value:
- a. In the Functions tab, look to the ‘Text’ section. Click on Concat (concatenate) and drag it to the open space in the expression, which says “Click to edit or drag & drop a component”.
- b. You’ll see two open spaces appear. Double click on the open space on the left and type in “Thanks for subscribing, “.
- c. Look to the Canvas preview below and drag the input text field into the open space on the right.
- Click ‘OK’ to finish building the expressionThe expression you just created will take the value of whatever is entered in the input text field during simulation, move it to the text element below, and place “Thanks for subscribing, ” in front of it.
- Click the ‘+’ button next to the action you just created and build an On Click + Show hidden element event, selecting the text element to show.


Click the ‘Play’ button to simulate your project. Type in some text in the input text field and then click the button. You’ll see the text element below appear with the text you entered.