
TUTORIAL: Creating a clock that displays in 12 hour time format
Within Justinmind, I found it possible to create a clock that displays the time in 12 hour format as opposed to the default 24 hour format. Thinking that others might find it useful, I put together a tutorial outlining the steps it took to create such a clock. While it's length might be intimidating at first glance, I've tried to use as much precision as possible to minimize the chance of missteps and make achieving the end result as easy as possible.
If you get stuck, I will try to help if I can, and please let me know if you should discover any errors.
Thanks and Enjoy!
TUTORIAL: DISPLAYING SYSTEM TIME IN 12 HOUR FORMAT
There are five, and only five, time periods of the day that must be considered in order for System Time to be properly converted from 24 hour format (sometimes referred to as Military Time: 00:00:00-23:59:59) to 12 hour format in a Justinmind prototype. Note that within Military Time, both 00:00:00 or 24:00:00 are, at times, used to refer to midnight. In System Time, however, midnight is represented as 00:00:00.
Time Period 1: The time from midnight to one second before one o'clock in the morning (00:00:00-00:59:59). In 12 hour format, this time period has a 2-digit hour (12) and has a morning suffix (AM). This time period is unique in that the 2 hour digits from its 24 hour format representation (00) cannot be used directly in converting to 12 hour format and must be converted via mathematical operation (adding 12). Example: 00:47 -> 12:47 AM.
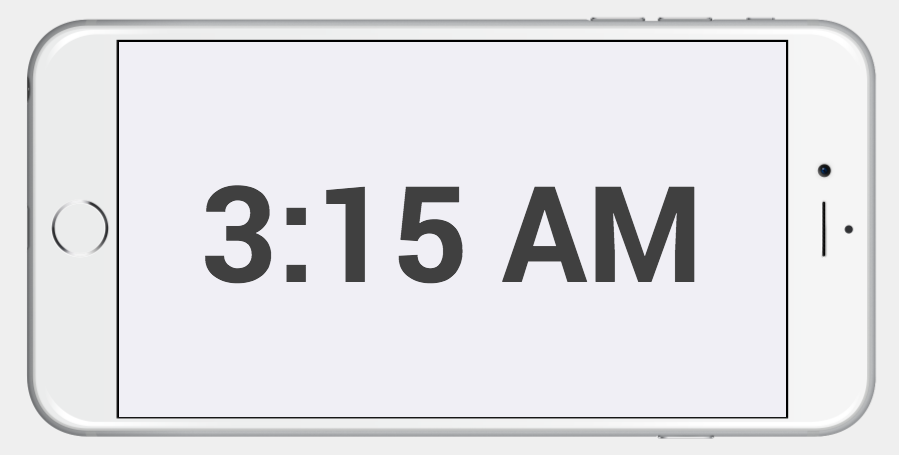
Time Period 2: The time from one o'clock in the morning until one second before ten o'clock in the morning. In 12 hour format, this time period has 1-digit hours (1 through 9) and has a morning suffix (AM). This time period is unique in that, in order to be converted from 24 hour format to 12 hour format, the leading hour digit, which is a "0" for all times within this time period, must be truncated from the 24 hour format representation. Example: 03:15 -> 3:15 AM.
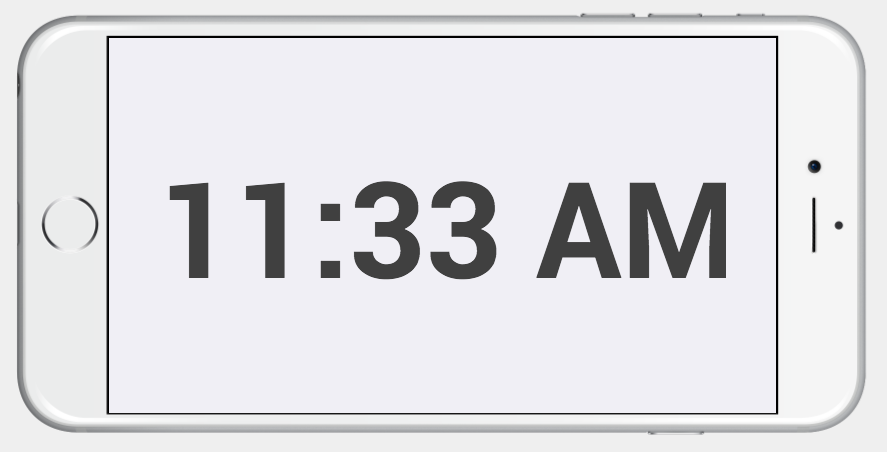
Time Period 3: The time from ten o'clock in the morning until one second before twelve o'clock in the afternoon. In 12 hour format, this time period has 2-digit hours (10 and 11) and has a morning suffix (AM). This time period is unique in that the 2 hour digits from its 24 hour format representation (10 and 11) can be used directly in converting to 12 hour format, but unlike Time Period 4, has a morning suffix (AM). Example: 11:33 -> 11:33 AM.
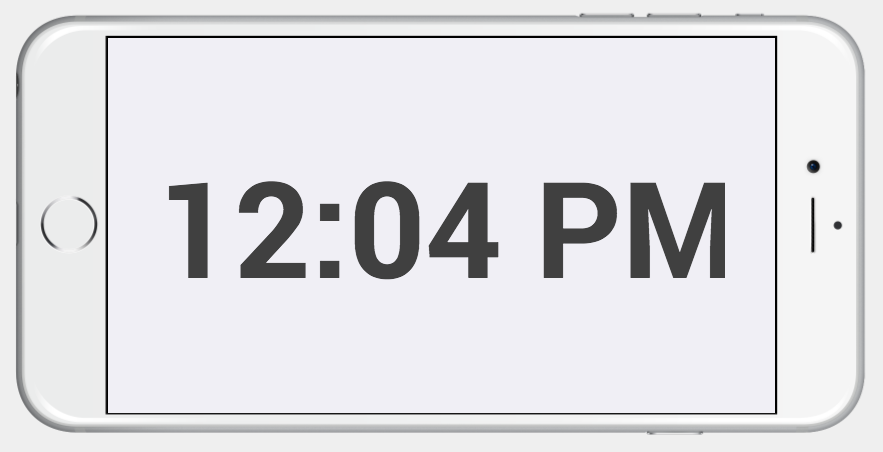
Time Period 4: The time from twelve o'clock in the afternoon until one second before one o'clock in the afternoon. In 12 hour format, this time period has a 2-digit hour (12) and has an afternoon suffix (PM). This time period is unique in that the 2 hour digits from its 24 hour format representation (12) can be used directly in converting to 12 hour format, but unlike Time Period 3, has an afternoon suffix (PM). Example: 12:04 -> 12:04 PM.
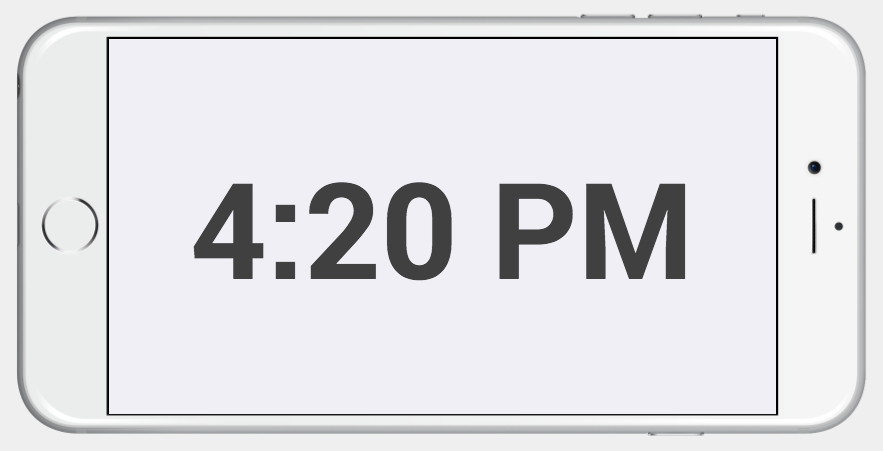
Time Period 5: The time from one o'clock in the afternoon until one second before midnight. In 12 hour format, this time period has both 1-digit hours (1 through 9) and 2-digit hours (10 and 11) and has an afternoon suffix (PM). This time period is unique in that the 2 hour digits from its 24 hour format representation (13-23) cannot be used directly in converting to 12 hour format and must be converted via mathematical operation (subtracting 12). Example: 16:20 -> 4:20 PM.
In order to create a clock that represents the current system time in 12 hour format, we will create a text box on a screen and then add events that format the time correctly using event conditions to determine the time period to which the current time belongs and, in turn, the appropriate event to execute. For this clock, seconds will not be used and are, thus, truncated from the time in all of the event expressions used to format it appropriately.
Also note that, due to the fact that the events utilized in this prototype capture the current System Time during a Page Load event, the clock created in this tutorial will not continually update while remaining on the same screen. It will, however, update each time a new screen is navigated to or, if used within a website prototype, the current page is reloaded.
1. Open "Justinmind" and select "Create a New Prototype".
2. Within the "Select a device" screen, select "iPhone".
3. Within the "Create a new prototype" screen, for "Start your prototype from" select "Empty" and for "Define Your Prototype Settings - Orientation" select "Landscape".
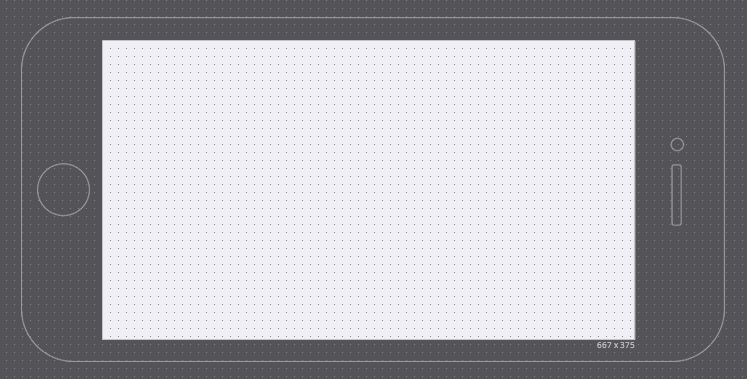
4. Drag a "Text" widget to your screen to add a new text box.
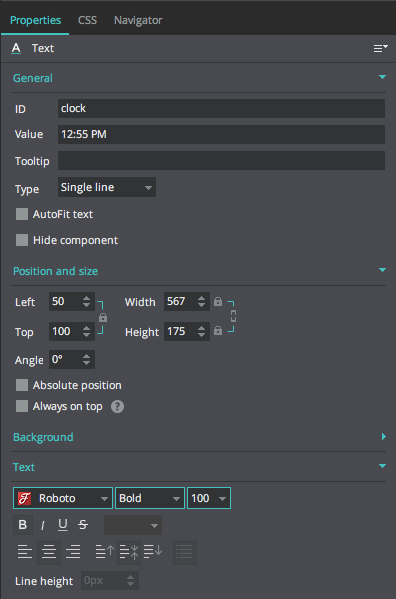
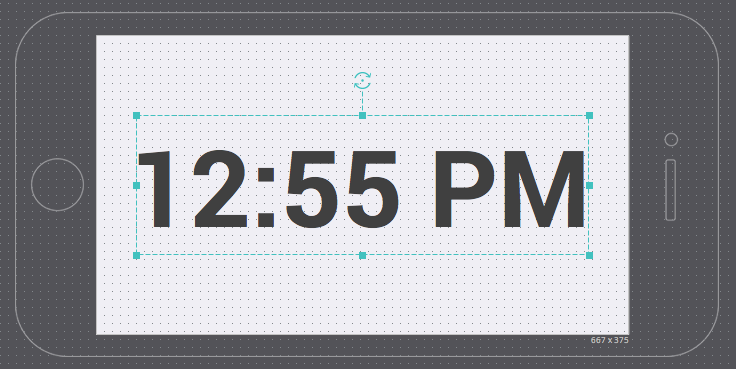
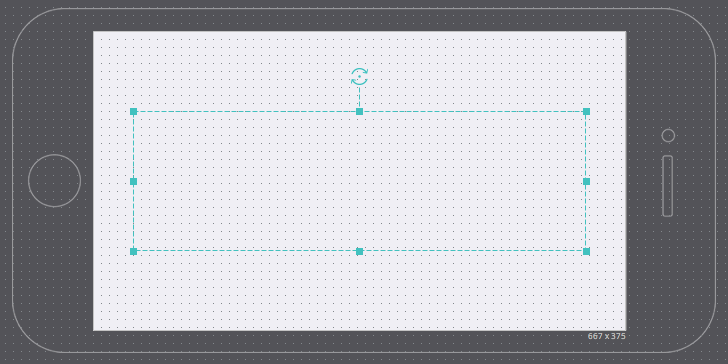
5. For this tutorial, the text box "Properties:General", "Properties:Position and size" , and "Properties:Text" are shown here. Select your text box and match these settings in the "Properties" Panel. Make sure the "Properties:General:AutoFit text" check box is unchecked.
After entering these settings, your screen should look like the following image.
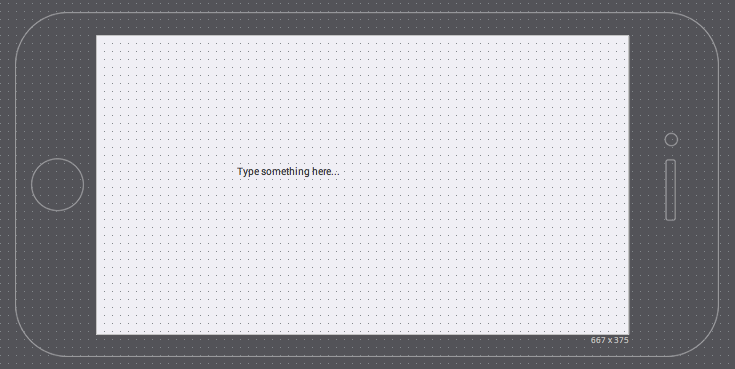
6. Delete the "12:55 PM" from the text box, otherwise, when you run a simulation, "12:55 PM" will appear briefly before it is replaced with the current System Time. Your screen should now look like the following image (with text box selected).
Keep in mind that if you deselect your text box at any point, since it contains no text, it will appear as though it has been deleted, but it is there and selectable in the outline.
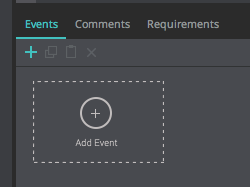
7. With the text box selected, add an event to it by clicking "Add Event" in the "Events" panel.
Note that, in this tutorial, you will only click "Add Event" once. All subsequent events are created as "Else when" or "Else" conditions on this original event and, as such, are initiated through the clicking of a different link within the "Events" panel.
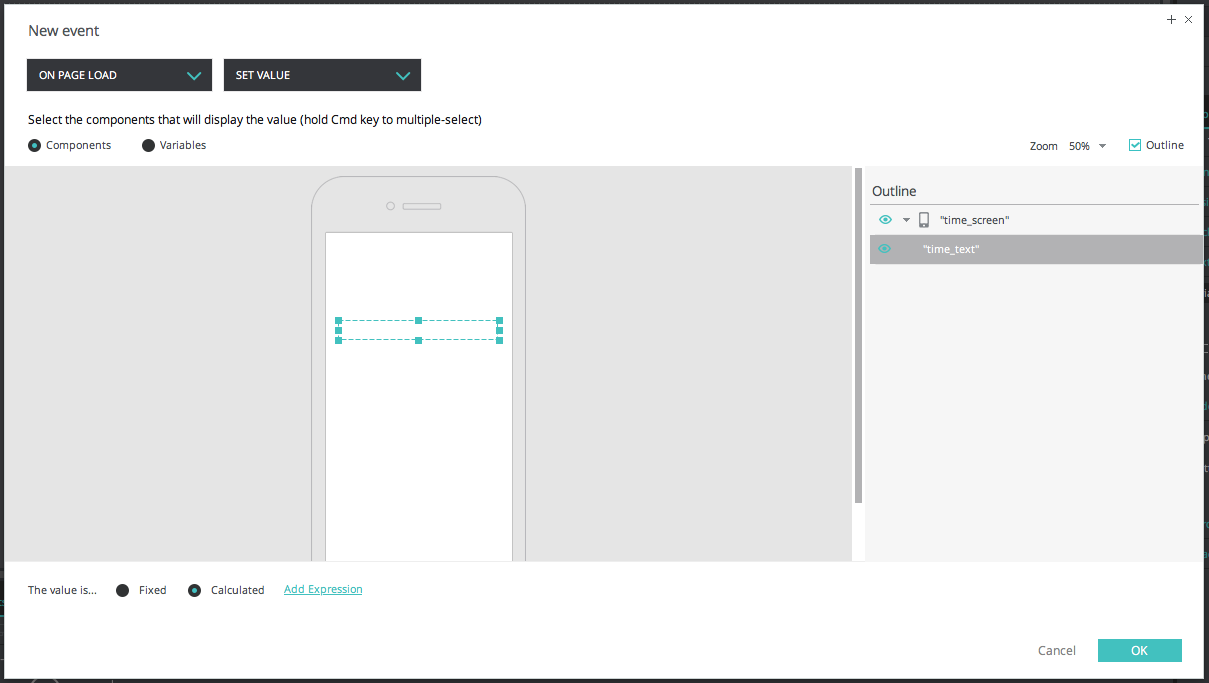
8. The first time you see the "New event" screen, as well as all of those for the subsequent "Do" events you will chain to this initial event, you will select "On Page Load" and "Set Value" for the two dropdown selectors at the top, select the text box (in this example named "clock") as the element to set the value of, either by clicking on the text box in the image (which may look like it isn't there because it contains no text, but it is there) or by selecting it in the "Outline" in the right panel (if you don't see the Outline, make sure the "Outline" checkbox in the upper right is checked), click the "Calculated" radio button at the bottom for "The value is...", and then click the "Add expression" link to bring up the "Add Value Expression" screen.
9. The "Add Value Expression" screen is where you will create the "Do" event expressions for all of the time periods, each requiring a different action in order to ensure proper formatting. For creating expressions, you will find the "System Hour" constant under the "Constants" tab and all of the other operators ("Concat", "Substring", etc.) under the "Functions" tab in the left-side panel. Expressions (as well as conditions) are created by dragging elements (or nodes) from the left-side panel tabs to the gray or condition) panel at the top and arranging them in the appropriate order to achieve the correct resulting value. Brackets for grouping logical portions of an or a condition) are created automatically.
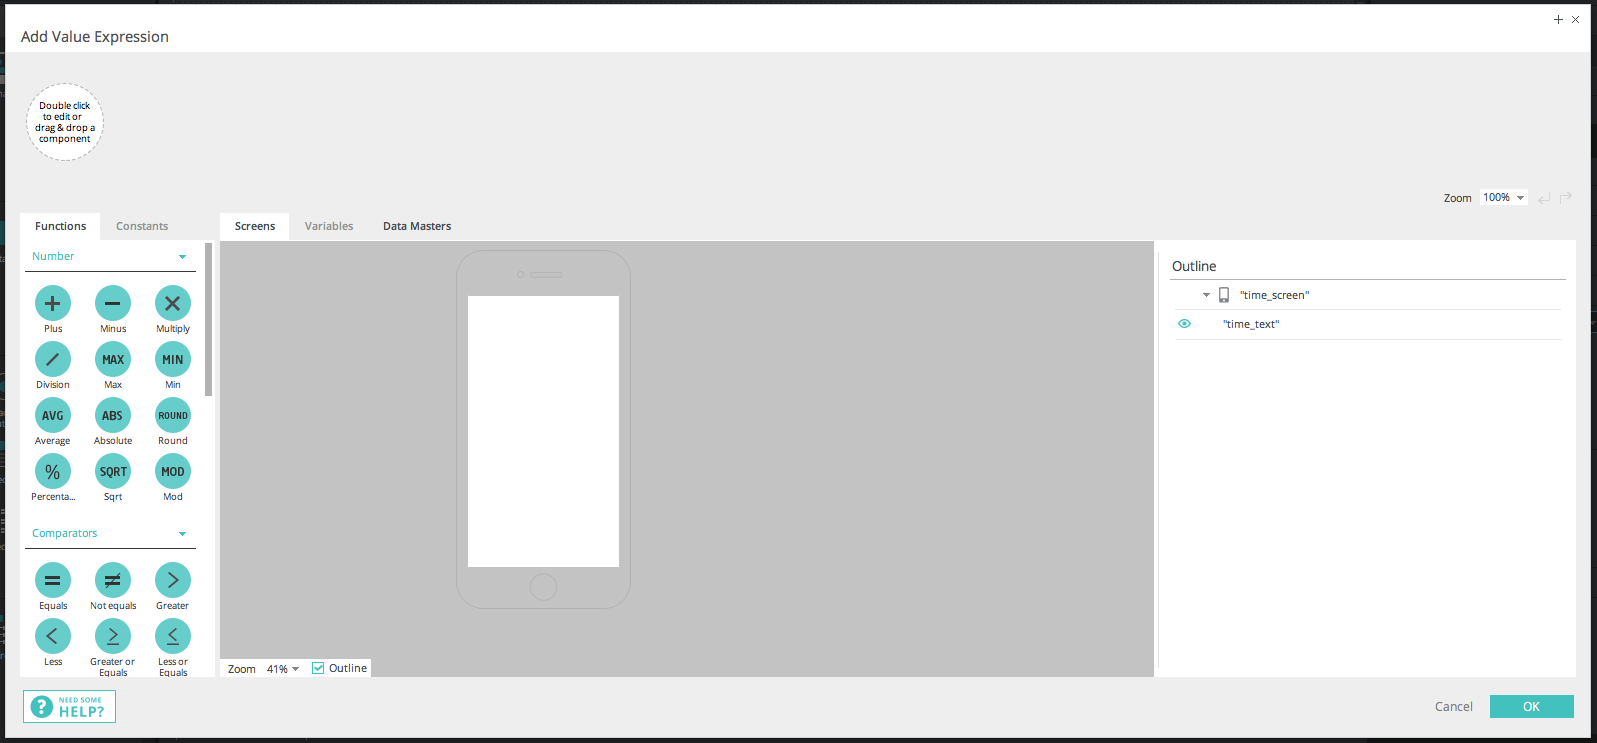
When you view the image of our first Value Expression in Step 10 below, you will notice an inconsistency between the name of the constant symbol used to represent System Time ("SYSTEM HOUR") and the caption under that same symbol ("System Time"), which could lead to some confusion as to what it actually represents. As it is, in truth, a complete representation of a time of day (hours, minutes, and seconds) and not solely the hour of that time, it will be referred to within this tutorial only as "System Time". You may on occasion, however, in viewing and creating these expressions, need to remind yourself that the symbol does indeed represent the complete System Time.
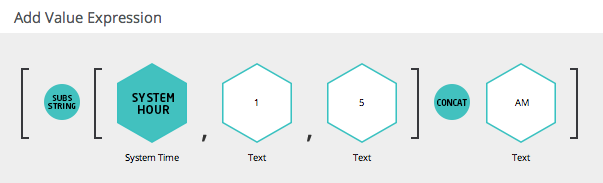
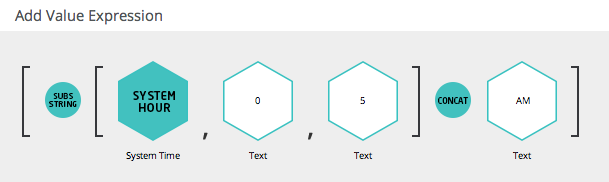
10. For the initial event, after setting the "New event" screen as indicated above in Step 5, create the following expression pictured below in the "Add Value Expression" screen.

This expression ensures that any System Time that falls within Time Period 1 will be formatted correctly.
Below, we will add a condition associated with this event which will evaluate the current System Time to determine if it falls within Time Period 1, allowing only times which qualify to trigger this event.
To create the hexagons for text in Value Expressions as well as in Conditions, simply double-click on a circle labeled "Double click to edit or drag and drop a component" and you will get a blinking cursor. Once you've entered your text or number and conclude with "Enter" or "Tab", the circle will become a hexagon labeled "Text". Non-numerical characters entered are treated as text while numerical characters (without any surrounding non-numerical characters) will be treated as numbers for mathematical operations, in spite of the fact that the hexagon will remain labeled "Text". Numerical characters can additionally be used with text operators such as "Concat" and, thus, be treated like text as well, such as in the above expression where "12" is treated as text and has the remainder of the string concatenated onto it. Clear as mud, right?
When dragging elements into an expression or a condition, it can sometimes be tricky to get the brackets, which are created automatically, to match the positions in these images. It is important, however, to make sure brackets are in their correct positions because different positions will almost always change the resulting value. After some trial and error and experience observing how bracket positions change as you drag an element within the expression before releasing it, you should get the hang of it.
For the Value Expressions we are creating, you will likely want a space between the minutes digits in your clock and the "AM" or "PM" suffix. To ensure this space exists, add a space at the beginning of the "AM" or "PM" text when you enter it in the e.g. " AM").
If you understand the JIM "Substring" operator used here and how substring indexing works, the indexing used in this expression to capture the minutes, from index 3 to index 5, may seem incorrect (intuitively it would be from index 3 to index 4 for a zero-based indexed string: "HH:MM:SS" -> H0 H1 :2 M3 M4 :5 S6 S7). For a possible explanation of the discrepancy and of how System Time indexing appears to actually work within JIM, see my follow up post below.
11. Click "OK" to save the expression, then click "OK" to save the event.
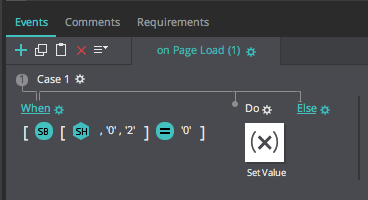
12. In the "Events" panel, click on the "add condition" link to the left of your newly created event.
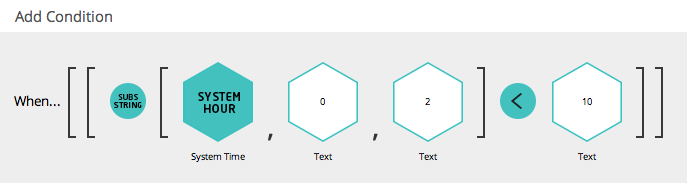
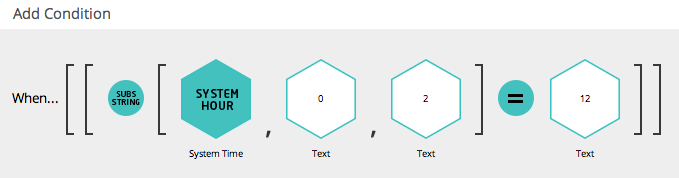
13. In the "Add Condition" screen, create the following condition:
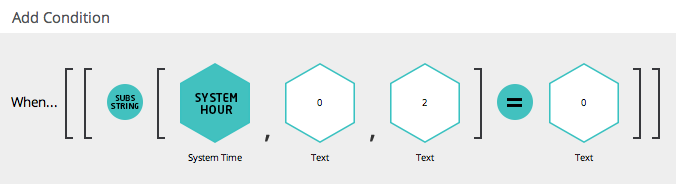
This condition ensures that only System Times that fall within Time Period 1 will trigger the "Do" event above.
14. Click "OK" to save the condition.
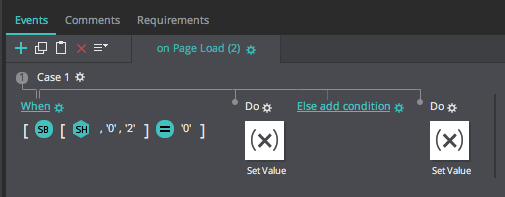
15. Complete the remaining "Do" events and their respective "Else When" conditions outlined in the steps that follow in a similar manner, first by clicking on the "Else" link that appears at the far right of the events chain after each new "Do" and its respective "When"/"Else When" condition are created...
...then by creating the next event as outlined above, then by clicking on the "Else add condition" that appears to the left of your just-created "Do" event and creating its respective "Else When" condition.
IMPORTANT: In order for all of these expressions, events and conditions to work properly together to result in a 12 hour formatted time text box, it is critical that these "Do" events and their respective "Else When" conditions are created in the order they are presented in this tutorial, starting with the initial one above.
________________________________________________________________________________________________
Do:
This expression ensures that any System Time that falls within Time Period 2 will be formatted correctly.
Else When:
This condition ensures that only System Times that fall within Time Period 2 will trigger this "Do" event.
________________________________________________________________________________________________
Do:
This expression ensures that any System Time that falls within Time Period 3 will be formatted correctly.
Else When:
This condition ensures that only System Times that fall within Time Period 3 will trigger this "Do" event.
________________________________________________________________________________________________
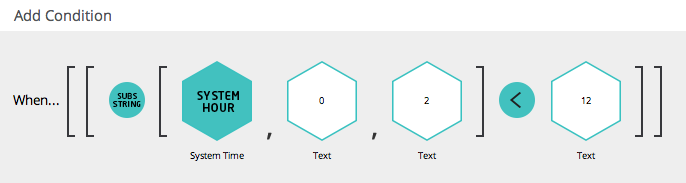
Do:
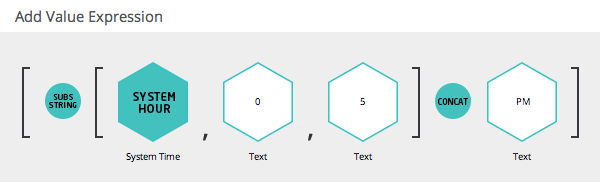
This expression ensures that any System Time that falls within Time Period 4 will be formatted correctly.
Else When:
This condition ensures that only System Times that fall within Time Period 4 will trigger this "Do" event.
________________________________________________________________________________________________
Do:

This expression ensures that any System Time that falls within Time Period 5 will be formatted correctly.
________________________________________________________________________________________________
When you have completed creating all of the "Do" events and their respective "When"/"Else When" conditions, your "Events" panel should look like the following image.

Notice that the final "Do" event does not have an "Else When" condition like the others (or a "When" in the case of the initial "Do" event). It concludes the event chain with "Else add condition", which means it's simply an "Else", an event without a condition that requires only that it be reached for it to be triggered.
Depending on the goal or logic of an event chain, this won't always be the case. If the goal or logic of an event chain needs to support a scenario where, depending upon the value being evaluated, there is a possibility none of the events will be triggered, which is sometimes desirable, then you would see an event chain where even the final "Do" event had an "Else When" condition as well. In such a scenario, if the value being evaluated in the event chain fails all of the conditions, then none of the events in the chain would be triggered and life would continue on as we know it.
The specific goal of our event chain, however, is that every potential value, in this case a current System Time, triggers one, and only one, "Do" event. To that end, based upon the way we have constructed our event chain, we know that there are two requirements that must be satisfied for any one "Do" event in the chain to be triggered:
1. The value being evaluated (current System Time) must satisfy the "When"/"Else When" condition associated with that "Do" event, and
2. The value being evaluated must fail all "Do" event "When"/"Else When" conditions that come before it (are left of it in the Events panel).
Conditions and events that come after (to the right in the Events panel) do not need to be considered for any specific "Do" event because if its own condition is satisfied it will be triggered and those conditions and events that come after will never be reached. That is the beauty of the word "else".
Knowing, then, what we know, the only System Time values that will reach the final "Do" event in our chain are those times that fall within Time Period 5, because all others will have been captured by previous event conditions. And since the final "Do" event has a Values Expression designed to format times that fall within Time Period 5, this is exactly the behavior we want, so no condition is required for this event.
16. In the main menu, select "File>Save" to save your prototype with a name like "clock_in_12_hr_format_prototype".
17. In your prototype "Screen", click on the green "Simulate" button in the upper right corner.
If your browser opens a new tab with your simulated iPhone clock prototype showing the current system time in 12 hour format, then you have followed the steps of this tutorial accurately. CONGRATULATIONS!!!
Now, as exciting is this is, the only thing we know for sure is that our prototype accurately displays the current System Time for whatever Time Period we have happened to run the simulator. There are three options for verifying that it will accurately display the System Time in 12 hour format for any Time Period:
1. Take my word for it.
2. Run the simulator during each of the Time Periods throughout a day.
3. Change your system clock to a time within each of the Time Periods and run the simulator. Warning: This method comes with the following caveat...
CAVEAT: I have successfully utilized this method in OS X to verify that the prototype works as advertised without any unwanted side effects from changing the system time. But that is only me and I make no guarantees that it will hold true for you in OS X or any other platform. Therefore, USE THIS METHOD AT YOUR OWN RISK. If you are at all concerned that it could negatively impact any of your programs or processes, then DON'T USE IT. You have two alternatives.
Now, with that being said, if you have OS X and want to use this method, go into your "Time & Date Preferences", unlock it if it's locked, click inside the time setter to highlight just the hour. Now you can adjust the hour to reflect a time in each of the Time Periods, running the simulator after each change. Since the time setter is in 12 hour format, you will need to change "AM" and "PM" as appropriate to achieve the time in the desired Time Period.
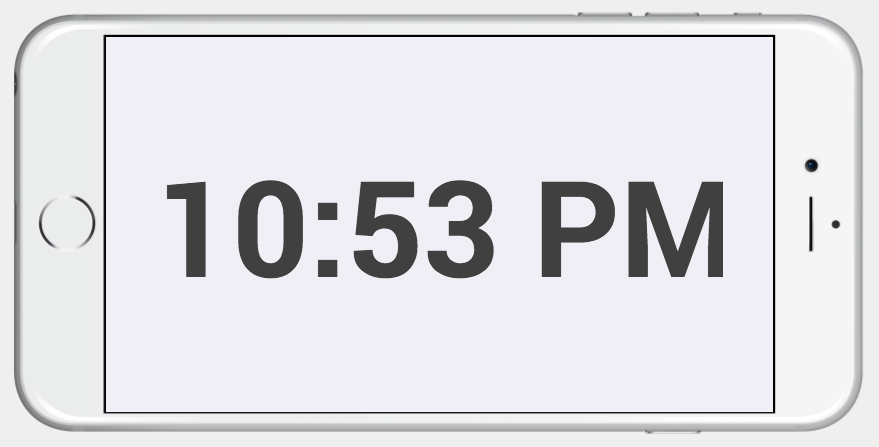
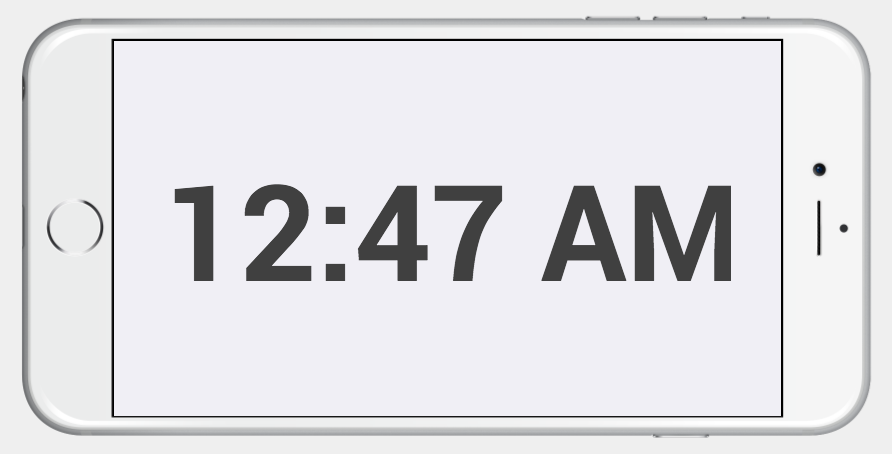
Here are the simulation screens that were my results after using this method:
________________________________________________________________________________________________
TIME PERIOD 1 (00:00:00-00:59:59)
________________________________________________________________________________________________
TIME PERIOD 2 (01:00:00-09:59:59)
________________________________________________________________________________________________
TIME PERIOD 3 (10:00:00-11:59:59)
________________________________________________________________________________________________
TIME PERIOD 4 (12:00:00-12:59:59)
________________________________________________________________________________________________
TIME PERIOD 5 (13:00:00-23:59:59)
________________________________________________________________________________________________
Cheers!!!
FYI, I'm not insane. The gaping spaces of blank lines were not my doing. :>|
FYI, I'm not insane. The gaping spaces of blank lines were not my doing. :>|
For those looking for additional insight into JIM string indexing when it comes to the System Time (aka System Hour) constant, here is my theory, as promised at the end of Step 10 of the tutorial.
The substring indexing of System Time isn't particularly intuitive. Since the indexing of strings is zero based (first index is 0, second index is 1, etc.), the hour should be contained and confined to the first two positions. Therefore, with a system time of say "16:32:54", one would think the substring expression to capture the hours as a number would be "Substring(System Hour, 0, 1)" returning the number "16". Likewise, capturing minutes as a number would be achieved, one would also think, with "Substring(System Hour, 3, 4)", skipping from the "1" index in hours to the "3" index in minutes, presumably jumping the "2" index, which should belong to the colon ":" that separates hours from minutes.
In actuality, the way I believe string indexing of the "System Hour" constant in JIM works is that in order to capture both digits of the hour as a number, you need to index the substring as 0-3, even though this would seem to capture the colon along with the two hour digits. What it actually appears to capture is the two hour digits and perhaps some sort of system character that says "a colon goes after this number in this context", rather than it being a simple colon ":" text character. The same holds true for minutes, with the indexes for capturing both digits of minutes being 3-5. "Substring(System Hour, 0, 2)" returns "16", not "16:", and "Substring(System Hour, 3, 5)" returns "32", not "32:".
I assume this implementation has to do with preserving the numerical value of the hour so that mathematical operations can be performed on it rather than it being solely text, even though you are using a text operator "Substring" to capture that number. It seems that within JIM, numerical characters have a dual identity as both numbers and text and this implementation preserves them for use as both.
The frequent use of words like "seems", "appears", etc. within this post should indicate that this is merely a guess. But knowing, it least, that it functions this way may save you some time as you create event expressions in your prototypes or least more clearly understand the substring indexing in the tutorial.
Hope it helps. Would love to hear a better explanation.
Cheers!
Dear Eggroll,
Thank you so much for taking the time to write and share this tutorial with the community. It's awesome! We have reviewed it and it is a great way to accomplish that. If you agree, we would like to convert and add it as a tutorial into our Support section: https://www.justinmind.com/support.
Regarding your last question, take into account that the start and end range values that we have introduced into the substring (text function) works the same way as Javascript (the language we use for the simulation part). We have applied the standard:
(https://www.w3schools.com/jsref/jsref_substring.asp)
Best,
Sonia Durán
Hi Sonia,
Yes, please feel free to convert and add it to the support section. I'm glad that others might find it useful.
Also, apparently it has been awhile since I've had to use substring within javascript because I had no recollection that the end index was exclusive. That is a much simpler explanation and certainly makes my secret system "a colon goes after this" conspiracy character sound crazy. After you've posted the tutorial in the support section, I wouldn't at all be opposed to you deleting this post. :-)
Cheers!!
Replies have been locked on this page!