
Want to create a website or app that users love? Tree testing is your secret weapon! Learn how to do it.
Tree testing is a design method that helps UX and UI designers such as yourself gain a better understanding of information architecture (IA) and the hierarchy of categories in any given product. It is the compass used to navigate the maze of your website or app, ensuring that your users can easily find their way.
Understanding how users think and how they interact with your information architecture can eliminate confusing categories and labels, making your digital product easy to use. But what does a tree test look like? Why is it beneficial for design teams? What kind of tasks can you give users in this test? What’s the difference between tree testing and card sorting? Too many questions. Such little time. Let’s get cracking!
Read on to find out more about this very popular user testing method, how you can carry it out and why it’s gained so much popularity over the years.
Imagine you’re lost in a vast, unfamiliar forest. The trees tower above, obscuring your path. You’re searching for a specific clearing, but the winding trails and dense foliage make it difficult to navigate. This is a common challenge users face when interacting with complex information architectures.
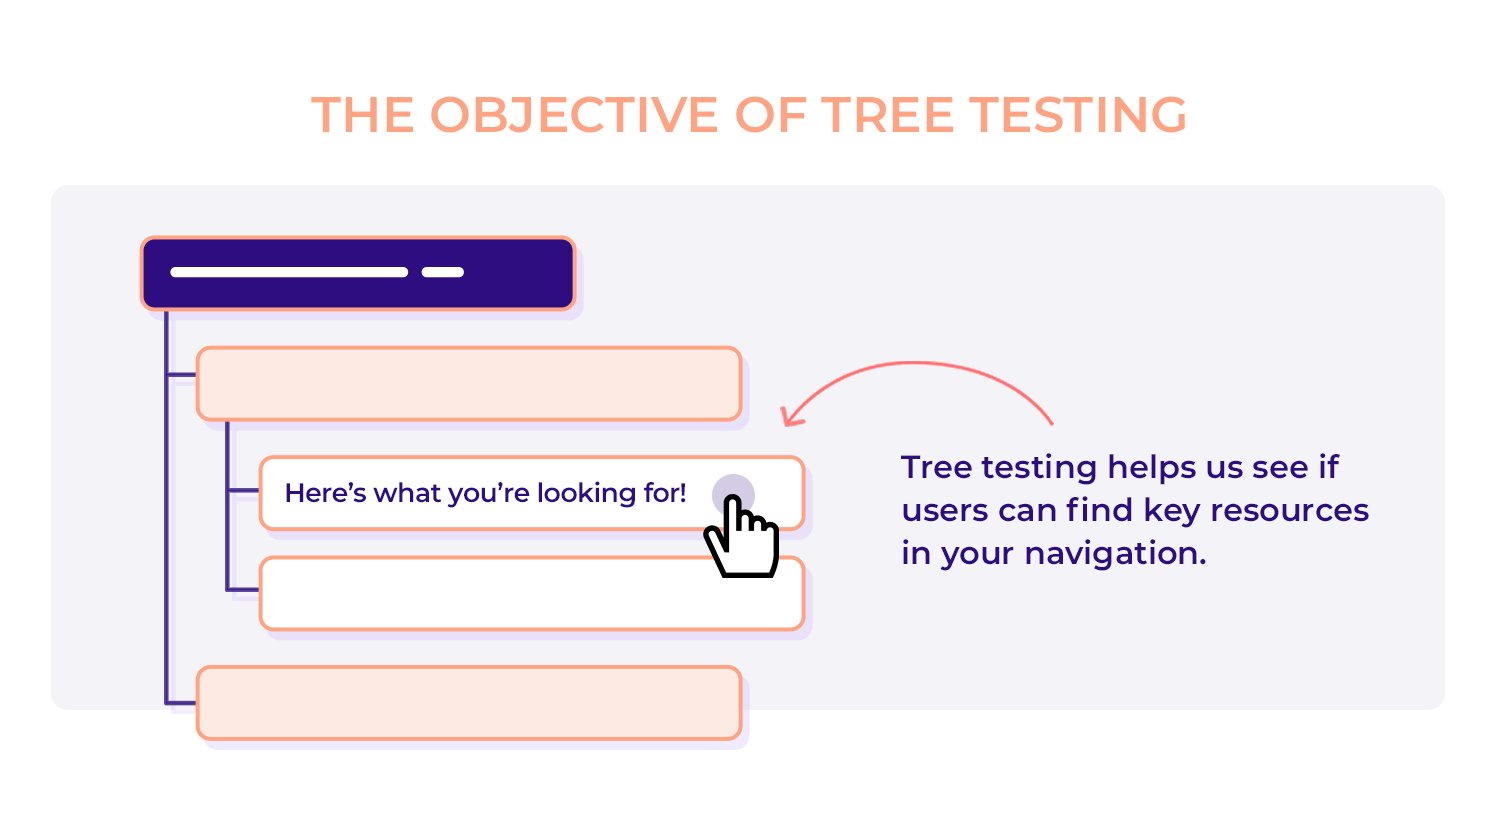
Tree testing is a user research method that helps us illuminate these hidden paths. By simulating a real-world scenario, we can uncover the challenges users encounter as they navigate through hierarchical structures, such as website menus or document outlines to find key resources.
The best way to go about it, is to use card sorting as a first step to give you an idea of how your users categorize things. From there, you can create your own structure, respecting your users’ way of thinking. In this sense, tree testing can also be considered a good follow-up on card sorting.
It’s meant to be simple and straightforward, free of any visual distractions so that the user can fully focus on the logic of the design. The test itself looks like a mental map, showing the hierarchy of the categories you want to test.
The task given to users can change, but generally involve giving a specific item or information and letting the user choose its location within the tree.
Conducting tree tests is an excellent way to gain valuable insights into user behavior. They pinpoint areas where users struggle to find information, ensuring that your IA aligns with user expectations.
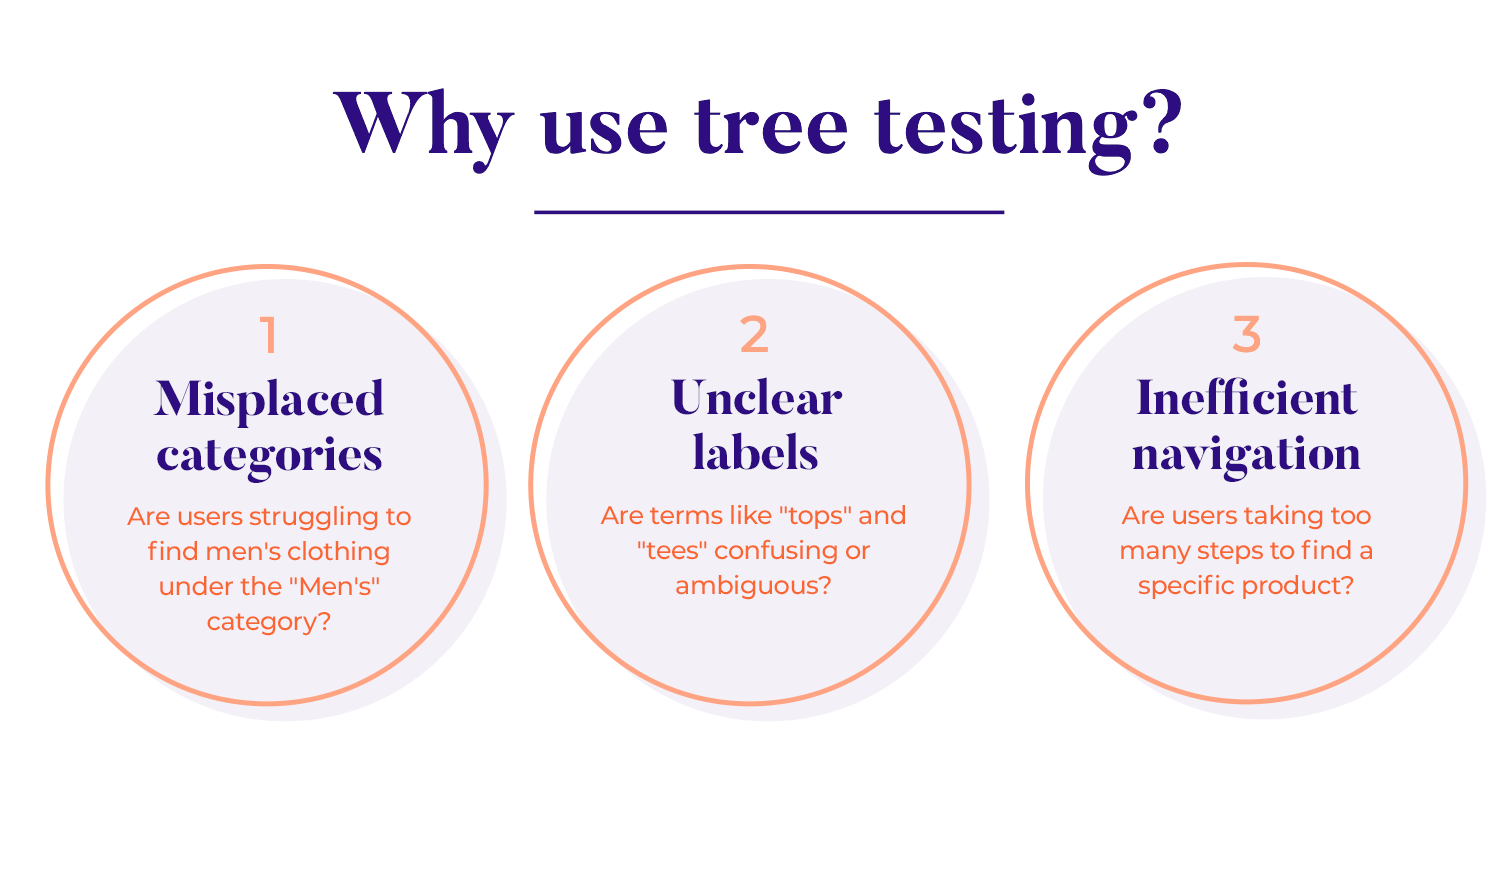
Tree tests also allow you to make data-driven decisions to optimize user experience and drive conversions. And, last, but certainly not least, they help prioritize design and development efforts to focus on the areas that will have the biggest impact on user satisfaction. For example, let’s say you’re designing a new e-commerce website for a clothing brand. If you decide on conducting a tree test, you can uncover issues like:
- Misplaced categories: Are users struggling to find men’s clothing under the “Men’s” category?
- Unclear labels: Are terms like “tops” and “tees” confusing or ambiguous?
- Inefficient navigation: Are users taking too many steps to find a specific product?
Tree testing offers a multitude of benefits for designers and developers. One benefit to conducting tree tests early in the design process is that it empowers you to proactively identify and address potential issues before they escalate.
It also keeps things nice and tidy, which makes a huge difference in user experience. Tree testing helps you create a clear and easy-to-navigate IA, which reduces frustration and boosts conversions.
Plus, tree testing provides valuable insights into how users think. This helps make better, data-driven decisions that ultimately improve your designs and allow you to create a more intuitive IA.
The theory of this method can often confuse people, mainly because it shares a lot of aspects with card sorting. In truth, tree testing and card sorting can be considered two different sides of the same coin. In this case, tree testing offers users a predefined structure, instead of asking them to create their own categorization.
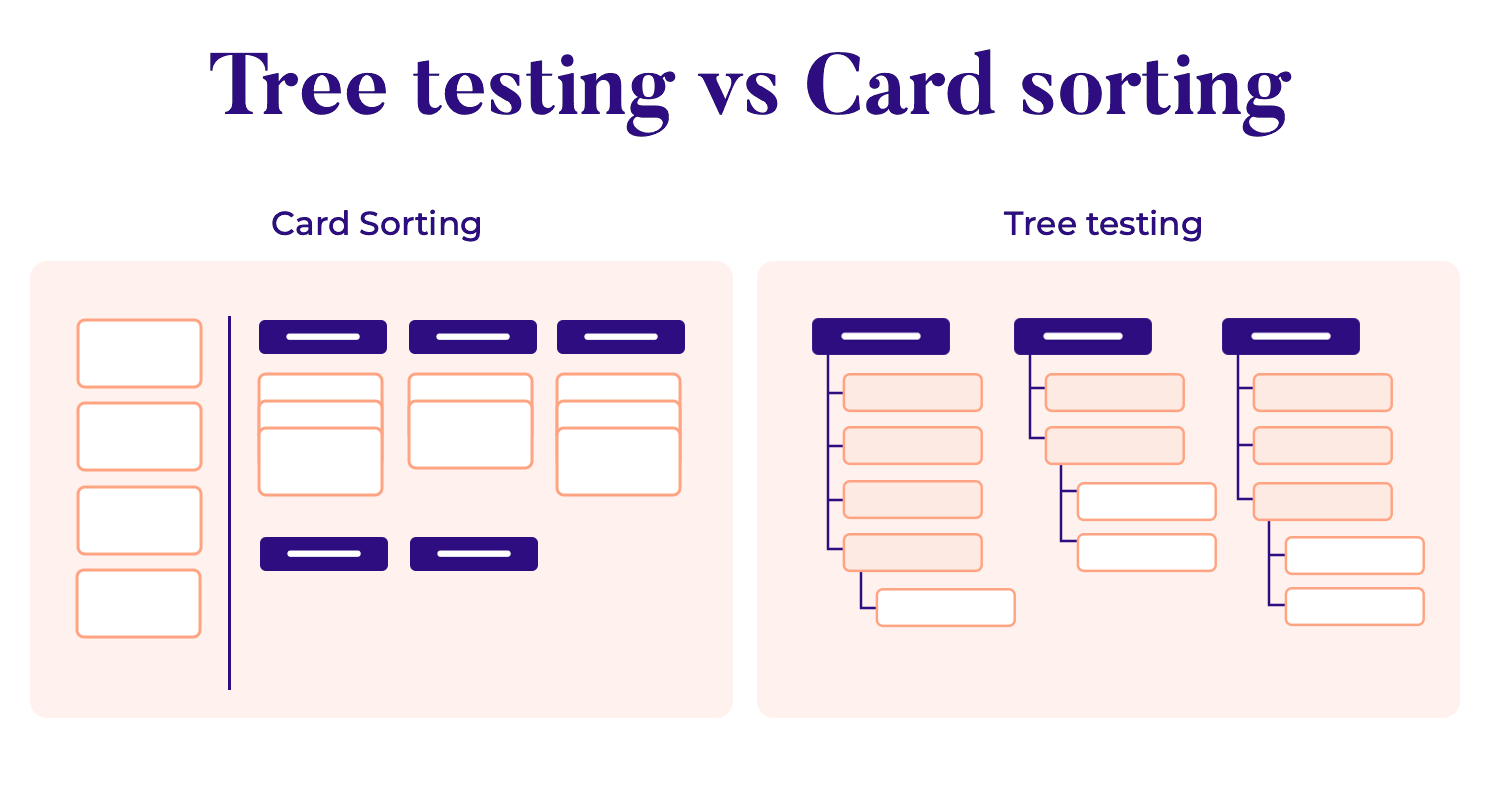
While both tree testing and card sorting are valuable tools for understanding and optimizing IA, they serve distinct purposes.
Card sorting is a generative technique that involves presenting participants with a set of cards, each containing a specific piece of content. Participants are then asked to group and categorize these cards based on their understanding of the content. This method helps uncover users’ mental models and identify natural groupings of information.
Tree testing, on the other hand, is a more evaluative technique. It involves presenting participants with a pre-defined hierarchical structure, often in the form of a tree diagram.
Participants are then asked to complete specific tasks, such as finding particular information or navigating to specific sections. This helps assess the clarity, efficiency, and effectiveness of the existing IA.
In essence, card sorting helps you create an IA, while tree testing helps you evaluate an existing one. Often, these two methods are used in conjunction to create a robust and user-friendly IA.
Now that we have the what and the why out of the way, let’s take a look at how tree testing works. What do we need to do to make it happen?
The name is very telling. A tree testing study presents participants with a hierarchical structure, often visualized as, yes, you guessed it, a tree diagram. This tree represents the IA of a website or application, with branches and leaves representing categories and subcategories, respectively. The goal is to understand how users navigate and find information within this structure. Imagine a website’s menu as a tree.
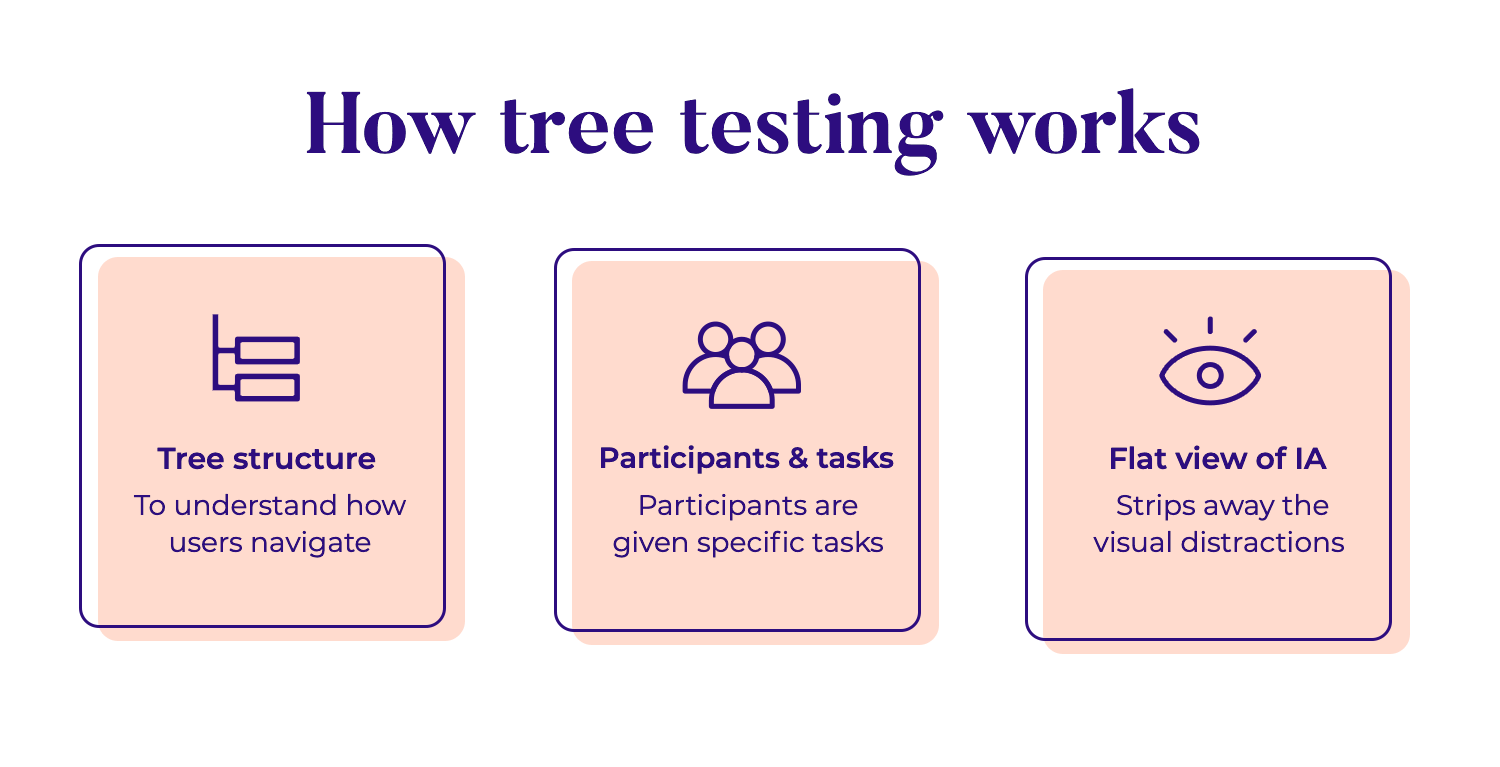
The main categories are the branches, and the subcategories are the leaves. Yes we know, it’s adorable. Tree testing basically presents users with this simplified structure, stripped of any visual design elements.
Participants are given specific tasks, such as “Find a pair of women’s boots” or “Locate the return policy.” They navigate through the tree structure by clicking on categories and subcategories.
Researchers observe their choices and decision-making processes. Let’s say that a participant struggles to find the return policy, it might be a sign that it’s not clearly labeled or is buried too deep in the hierarchy.
Tree testing strips away the visual distractions of a website or app, focusing solely on the underlying IA.
Presenting participants with a simplified, text-based representation of the hierarchy can help researchers pinpoint issues like unclear or ambiguous labels, poorly categorized information, and missing content.
In short, tree testing can help you evaluate the effectiveness of your IA at different stages of the design process. We dive further into this below.
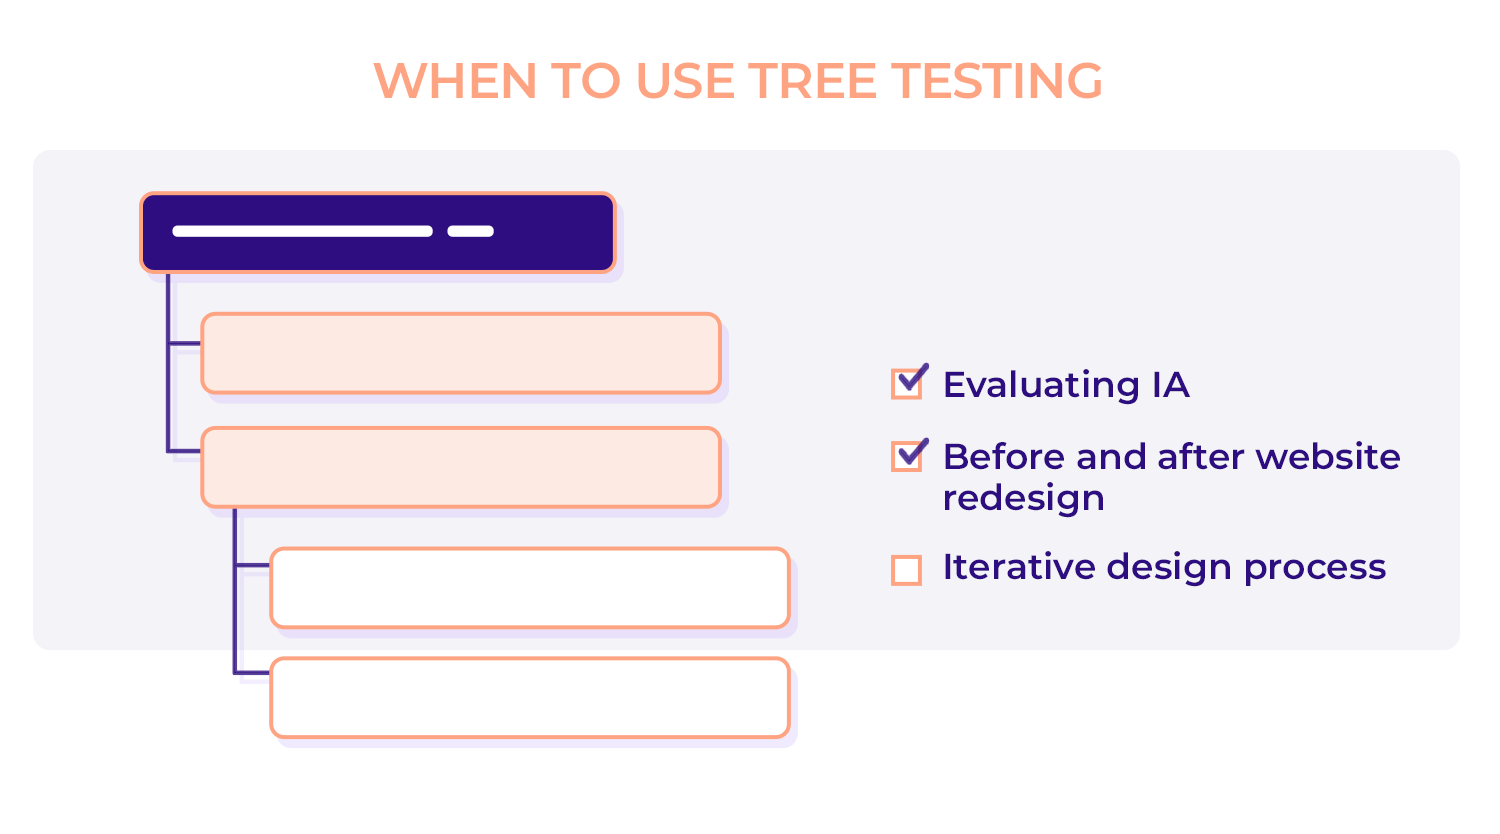
Tree testing is an invaluable tool for assessing the effectiveness of your IA. Whether you’re designing a new website or redesigning an existing one, tree testing can help you identify potential issues before they impact user experience.
If you’re building a new e-commerce website, for example, a tree test can help you determine the best way to categorize your products. Should you organize by brand, product type, or a combination of both?
When embarking on a major redesign, tree testing can be used to compare the old and new IAs.
Before a major redesign of, let’s say, a news website, you might conduct a tree test to understand how users currently find articles. After the redesign, you can test the new structure to see if it has improved user experience.
For example, if users struggle to find specific news categories in the new design, you can make adjustments to the hierarchy. This allows you to refine your redesign and ensure that the new structure is more intuitive and user-friendly.
With everything UX, it’s always good to remember that an iterative approach helps you create a website or app that is constantly evolving to meet the needs of your users.
Tree testing is a valuable tool that can be used at various stages of the design process. Here are some common scenarios where tree testing can be particularly helpful:
- Early-stage validation: Before diving into detailed design, tree testing can help you validate your initial information architecture.
- A/B testing: You can use tree testing to compare different information architectures and identify the most effective structure.
- Post-launch evaluation: After launching your website or app, you can conduct tree tests to assess the effectiveness of your information architecture and identify areas for improvement.
Once you’ve decided to conduct a tree test, here are the steps involved in the process.
Before diving into the nitty-gritty of tree testing, it’s crucial to establish clear objectives. What do you hope to achieve? Are you aiming to improve the findability of specific products on your e-commerce site? Or perhaps you want to streamline the navigation for users seeking support information?
Consider as many specific questions as you’d like answered, such as “Are users able to easily find the ‘About Us’ page?” or “Is the product categorization intuitive and easy to navigate?
Clearly defining your goals will help you design a focused and effective test.
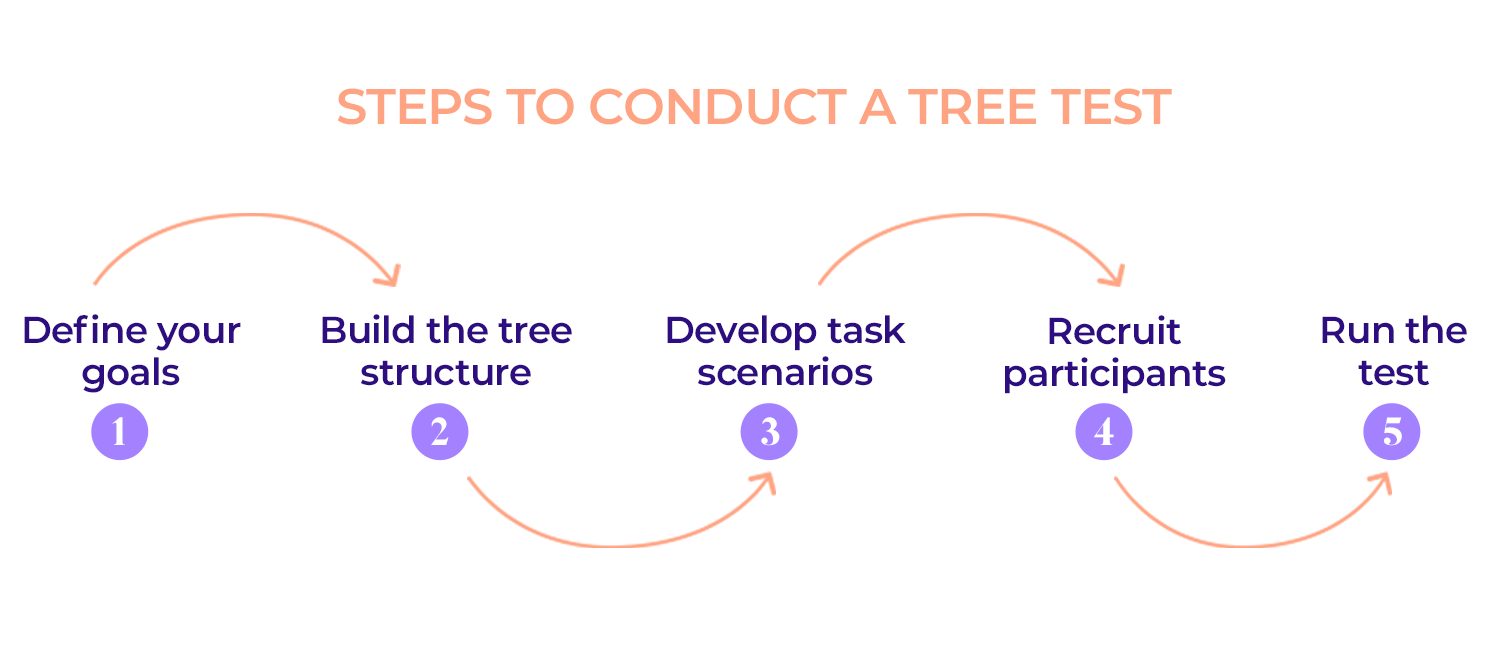
Imagine creating a simplified map of your website. This map, or “tree,” should represent the hierarchical structure of your site’s content.
For instance, an online bookstore might have a tree structure with main categories like “Books,” “Magazines,” “About Us,” and “Contact,” and subcategories within “Books” such as “Fiction,” “Non-Fiction,” and “Children’s Books.”
This simplified representation, stripped of visual elements, focuses solely on the underlying structure. Be sure to use clear and concise labels for each category and subcategory. Avoid jargon or overly specific terms that may confuse users.
Now, let’s create real-world scenarios that mimic how users might interact with your site. For example, you could ask participants to “Find a book about climate change,” “Locate the return policy for a faulty product,” or “Contact customer support to inquire about an order.”
These tasks should be clear, concise, and relevant to your target audience.
The next step is to carefully select your participants. Consider factors like age, gender, tech-savviness, and familiarity with your brand. A diverse group of participants will provide a broader range of insights.
To recruit these participants, you can leverage online platforms, reach out to your target audience through social media, or send targeted email invitations to your existing user base.
With your participants recruited and tasks defined, it’s time to conduct the test. You can choose between remote and moderated testing methods.
Remote testing allows participants to complete tasks independently using an online tool, making it cost-effective and scalable. Moderated testing, on the other hand, involves a researcher observing participants as they complete tasks, and asking questions to gain deeper insights into their thought processes.
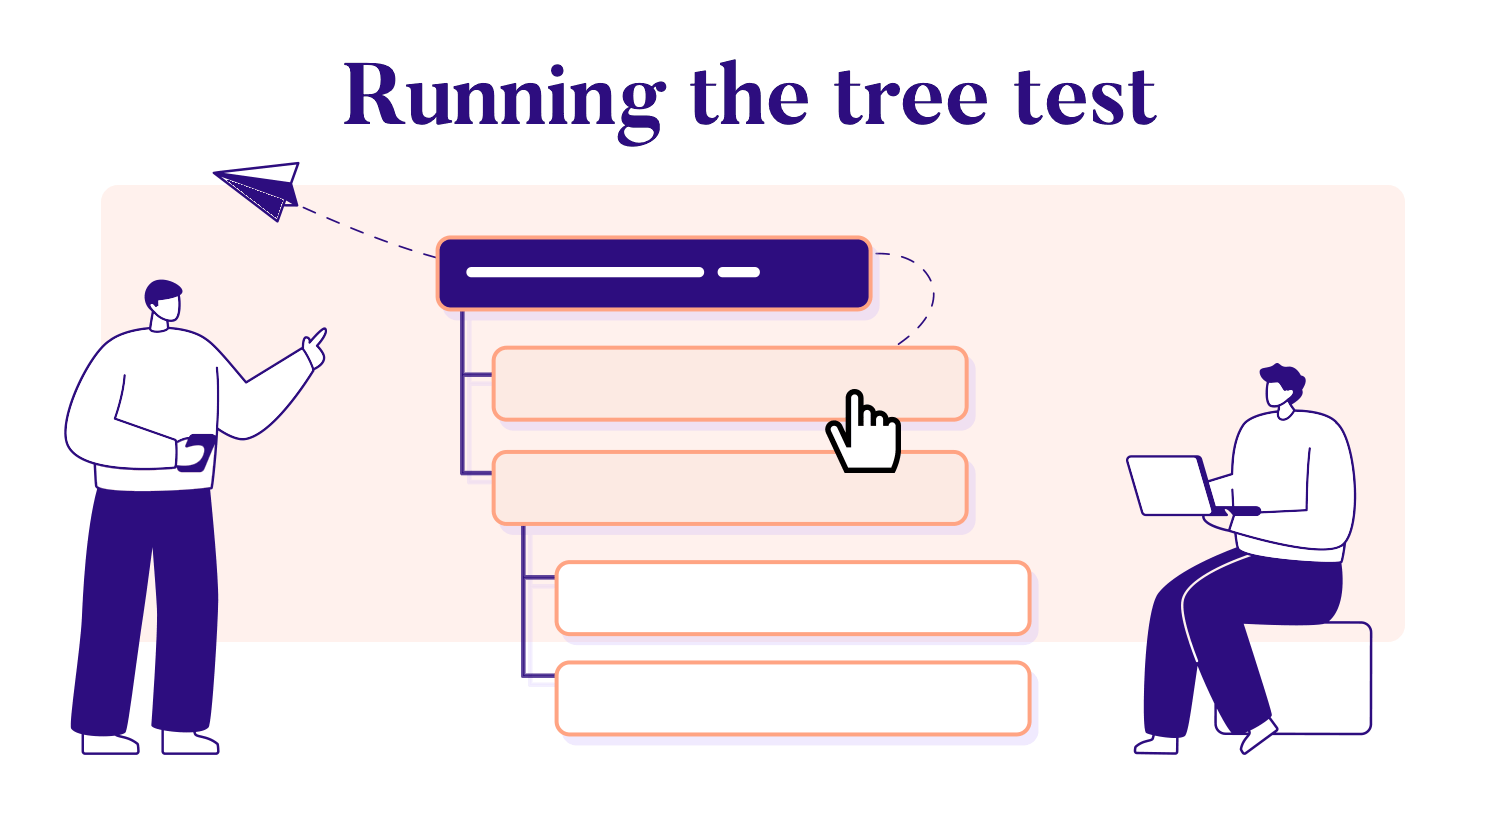
Now that you’ve prepared your tree test, it’s time to run it with participants. Here’s how to conduct the test:
To ensure the effectiveness of your tree test, it’s crucial to develop realistic task scenarios that mirror real-world user goals and needs. For an e-commerce website, this might involve tasks like “Find a pair of men’s running shoes in size 10” or “Locate the return policy for a faulty item.”
Each task should have a clear starting point and a specific destination. Avoid creating tasks that require participants to make multiple decisions or explore different paths. This can confuse participants and make it difficult to analyze their behavior.
It’s also important to avoid leading or ambiguous tasks. Instead of asking “Find the women’s clothing section,” you could ask “Find a summer dress.” This allows you to observe how participants naturally navigate the tree.
Finally, strike a balance between task length and difficulty. Tasks should be concise but challenging enough to reflect real-world usage. Overly simple tasks may not provide valuable insights, while overly complex tasks can frustrate participants.
Before participants begin, provide clear instructions and a brief onboarding session. Explain the purpose of the test, the types of tasks they will encounter, and the importance of thinking aloud as they navigate the tree. This will help participants understand the expectations and encourage them to share their thoughts.
As participants work through the tasks, observe their behavior. Pay attention to how they navigate the tree, any errors they make, and how often they need to backtrack. Are they able to find the correct categories and subcategories efficiently? Do they seem confused or frustrated by the IA? Understanding their behavior empowers you to identify areas where the IA may be unclear or inefficient.
Time is of the essence! Track how long it takes participants to complete each task. Are they breezing through the tasks, or are they getting bogged down in a tangle of confusing labels? Additionally, monitor the success rate.
Are participants able to find the information they need? A high success rate indicates a well-structured IA, while a low rate may signal the need for improvement.
A sample size of 30-50 participants is generally recommended to achieve reliable results. However, the optimal sample size may vary depending on the complexity of your IA and the specific goals of your test. A larger sample size can provide more statistically significant results, but it may also increase the cost and time required for the test.
A well-structured tree is the backbone of a user-friendly IA. Imagine an e-commerce website selling electronics. A poorly structured tree might have multiple levels for each product category, overwhelming users with excessive choices. For example, a complex hierarchy for smartphones could include brands, models, and specific features.
This can make it difficult for users to find what they need. Instead, a simpler, more user-friendly structure might focus on core product categories like smartphones, tablets, laptops, cameras, and accessories. By avoiding unnecessary complexity and prioritizing key categories, you can create a clear and intuitive navigation experience.
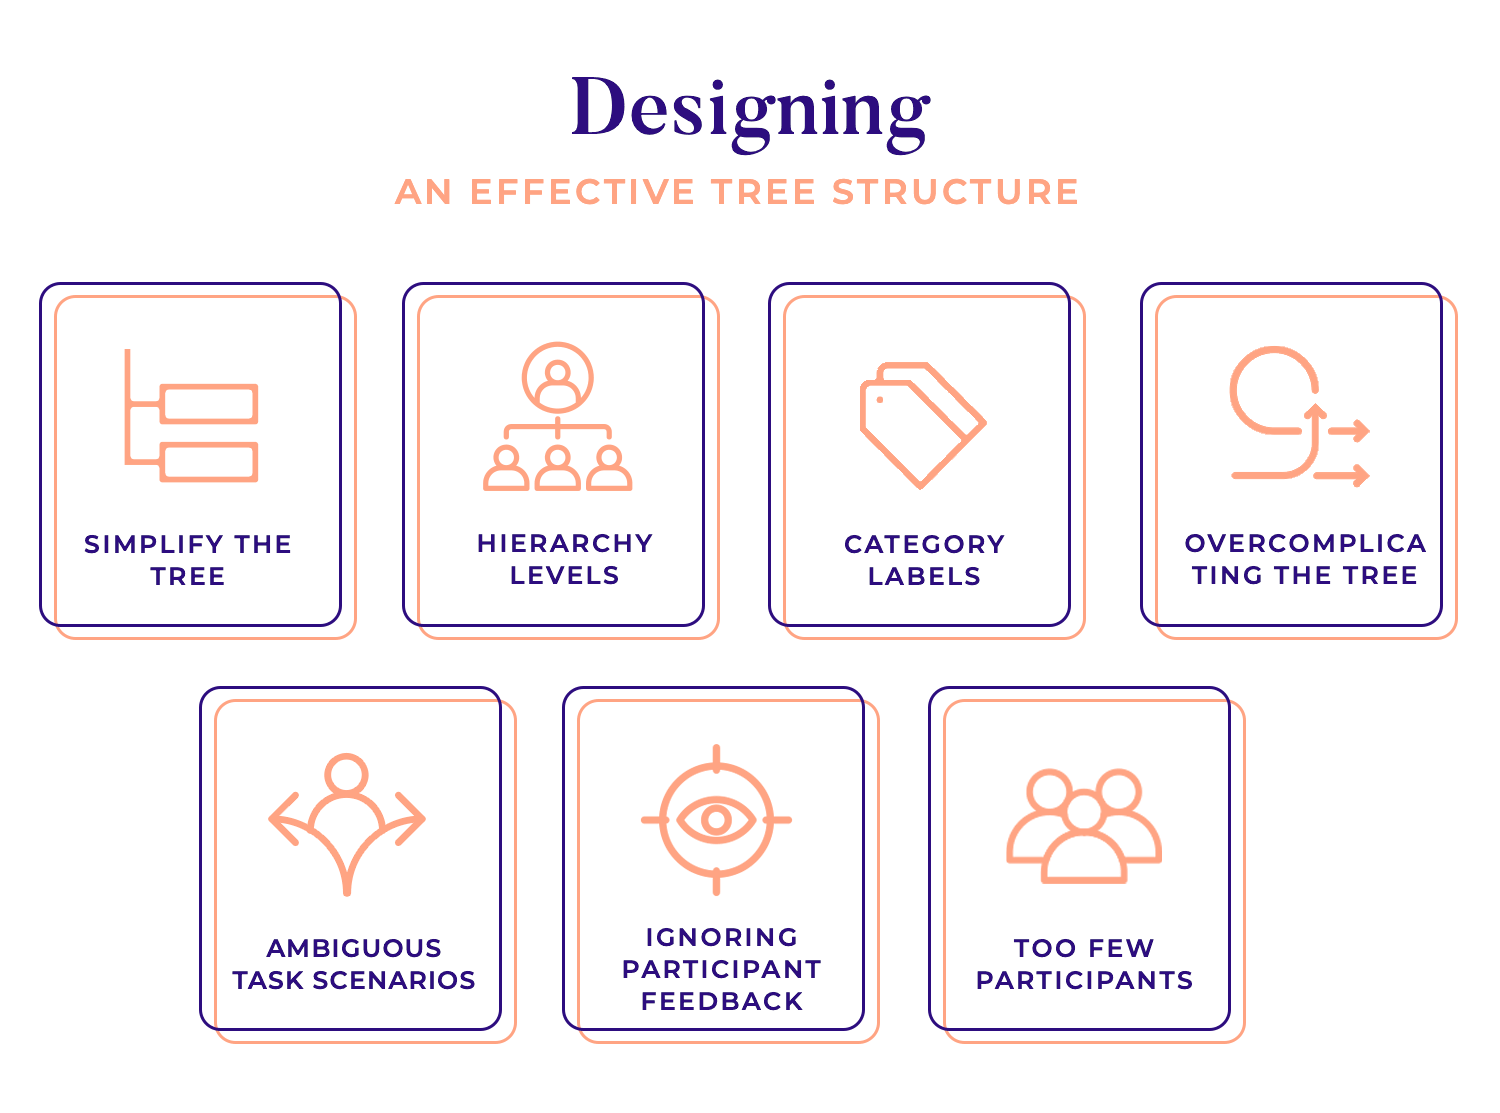
The number of hierarchy levels in your tree structure should be appropriate and logical. Too many levels can make it difficult for users to navigate, while too few may not provide enough granularity. A well-structured tree typically has 2-3 levels of categories.
For instance, an e-commerce website might have a main category like “Electronics,” with subcategories such as “Smartphones,” “Tablets,” “Laptops,” and “Cameras.” This simple, two-level structure allows users to quickly find the products they need without getting lost in a maze of options.
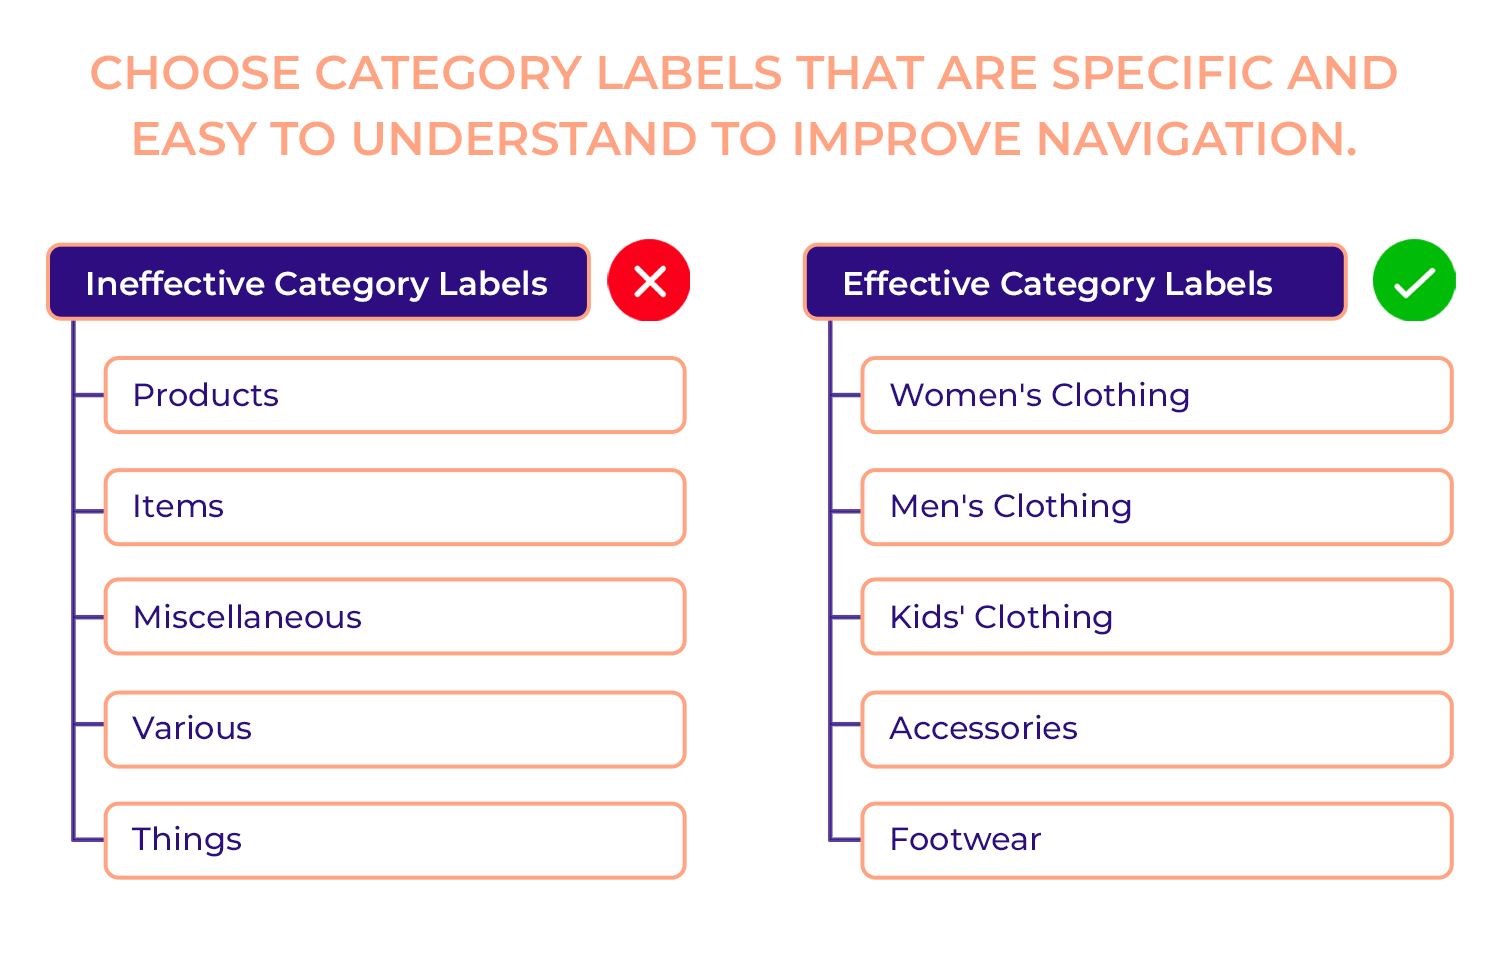
Clear and concise category labels are essential for effective navigation. When crafting labels, ensure they accurately represent the content, using simple language that’s easy to understand. Maintain consistency throughout the tree, avoiding jargon and technical terms. Be specific enough to guide users towards the right information.
For example, instead of a vague “Products” category, consider using more specific labels like “Women’s Clothing,” “Men’s Clothing,” and “Kids’ Clothing.”
One common pitfall in tree testing is overcomplicating the tree structure. By including too many categories or levels, you can overwhelm participants and hinder their ability to navigate effectively. Strive for simplicity and focus on the core IA. A cluttered and convoluted tree can lead to confusion and frustration, ultimately impacting the user experience.
So, if you’re testing the IA of an e-commerce website, don’t create overly specific subcategories. Instead, just focus on broad categories that are easy to understand and navigate.
Writing vague or misleading tasks can confuse participants and lead to unreliable results. Ensure that tasks are clear, concise, and specific. Avoid using ambiguous language or open-ended prompts.
For example, instead of asking “Find information about the product,” you could ask “Find the product specifications for the iPhone 14.” This more specific task will help you gather more accurate data on user behavior.
While quantitative metrics like task completion time and success rate provide valuable insights, it’s equally important to pay attention to qualitative feedback from participants.
Other than the obvious fact that they are dedicating time, energy, and mental space for tree testing your website or app, which makes ignoring them just flat-out rude; their comments, suggestions, and observations can reveal hidden issues and opportunities for improvement.
Actively listening to their feedback helps you gain a deeper understanding of their experiences and identify areas where the IA may be misleading, confusing, or inefficient.
A small sample size can limit the reliability of your results. To ensure statistical significance, aim for a sample size of 30-50 participants. A larger sample size will provide a more accurate representation of user behavior and help you identify trends and patterns.
Doing this increases confidence in your findings and helps you make more informed decisions about your IA.
Keep reading to learn more about how to choose the right tree testing tool for you, and check out some tools we picked out to help you get it done faster.
A powerful tree testing tool should be equipped with a suite of features to streamline the research process. It should allow you to easily create and visualize hierarchical structures, craft clear and concise tasks for participants, and delve deep into the analysis of user behavior. Detailed reports on success rates, time on task, and common error patterns can provide invaluable insights. Additionally, robust participant management tools can help you efficiently recruit, invite, and manage participants, ensuring a smooth and efficient testing experience.
A user-friendly interface can significantly streamline the testing process, saving you time and effort. Comprehensive reporting capabilities can help you gain valuable insights from your data, empowering you to make data-driven decisions. Additionally, the tool should offer efficient participant management features to help you recruit, invite, and manage participants seamlessly. Lastly, consider your budget and choose a tool that offers flexible pricing plans to suit your needs.
Optimal Workshop‘s Treejack is a powerful tree testing tool that simplifies the process of tree testing. Its intuitive interface allows you to effortlessly create and edit hierarchical structures, ensuring that your IA is clear and easy to navigate.

Treejack’s detailed analysis and reporting features provide a comprehensive understanding of user behavior. You can visualize user journeys with heatmaps, identify common pain points, and track key metrics like success rates and time on task. With remote testing capabilities, you can reach a wider audience and gather diverse perspectives.
Free trial available.
Userlytics is a comprehensive UX research platform that goes beyond traditional tree testing tools. It offers a wide range of features, including heatmaps, session recordings, and advanced analytics. With UserZoom, you can not only evaluate the findability of information within your IA but also gain a deeper understanding of user behavior.

Analyzing heatmaps helps you identify areas of high and low user attention. Session recordings provide insights into how users interact with your website or app, revealing their thought processes and pain points. And with advanced analytics, you can uncover valuable trends and patterns in user behavior.
Free trial available.
Maze is a versatile UX research platform that supports a wide range of testing methods, including a tree testing tool. Its simple and intuitive interface makes it accessible to both seasoned researchers and beginners. With Maze, you can easily create and analyze tests without any technical expertise.

Conducting tree tests with Maze provides valuable insights into how users navigate your IA, identify potential roadblocks, and helps you optimize your design for a better user experience.
Free plan available.
UXtweak is another user-friendly tool that offers a comprehensive suite of UX research features, including tree testing. Its intuitive interface makes it easy to create and analyze tests, even for those without a strong technical background.

Detailed reports provide a comprehensive overview of user behavior, including success rates, time on task, and common error patterns. Additionally, UXtweak offers features like participant management, task creation, and flexible customization options, making it a powerful tool for conducting effective tree tests.
Free plan available.
PlaybookUX is a comprehensive UX research platform that goes beyond tree testing. It offers a wide range of tools to help you understand your users better, including card sorting and surveys. With PlaybookUX, you can conduct a variety of research methods to gain valuable insights into user behavior and preferences.
Pay as you go plan available.
Whether you’re using it as a tree testing tool for the IA of your website or app, or exploring user attitudes toward your brand, PlaybookUX has the tools you need to succeed. Plus, with flexible pricing plans, you can choose the option that best suits your budget and research needs.
Tree testing is a standard classic in most user testing tool boxes out there, and it’s easy to see why. When used wisely, this simple test can help us understand some key things that allow for user-centric design. Covering two major aspects of any product, navigation and information architecture, tree testing can be a way of covering your bases and validating the core of your design.
Remember that the details matter in tree testing. Not the visual details, not the interactivity of your product, but the really important details of your navigation, categorization and labelling. From the test, it’s all about iterating on the design until you reach a certain level of quality – that means fluid testing and lots of learning experiences!